The information in this article is the intellectual property of xMatters and is intended only for use with xMatters products by xMatters customers and their employees. Further, this intellectual property is proprietary and must not be reused or resold.
We're celebrating our Ninja release, named in honor of the classic video game Ninja Gaiden, the side-scrolling, beat 'em up arcade game where wily ninja vanquish their enemies and save the world from two demonic statues (yes, really). You might not have an evil statue problem, but the action-packed Ninja release will save you time, toil, and temper while managing your digital services.
While our Service Dependencies map steals the show for managing digital service interruptions, this release also features enhancements for automating your digital and business response, new reporting that seamlessly spans current and historical data to display all your alerts in one place... and a lot more.
Before you dive in to learn about all the improvements, here are some important dates:
- Non-production environment access: Tuesday, October 26
- Production environment access: Tuesday, November 9 (enabled between 10:00-10:30am Pacific)
Ninja Training Webinars
For a guided Ninja tour — including tips and tricks — sign up for one of our webinars.
Future feature release
As a special bonus, we'll also give you a sneak peek at enhancements we're working on for a future release:
- Microsoft Teams as a device — receive and respond to incident alerts, updates, & other notifications as DM's in your chat.
- Call a flow — call a sequence of steps from your other flows in Flow Designer to streamline your workflow automations.
Our Community shrinks images for convenience but allows you to click on them for a closer look. See an image or animated GIF you like? Click it.
Jump ahead
In a hurry? Here's an overview of this doc if you want to skip ahead to something awesome:
-
Incident Management
- Automation
- Reporting
- User Experience
- Other Product Updates
- Mobile App Updates
- Early Access Program & Feature Delivery Update
Incident management
Our incident management capabilities help you bridge your tools and teams, facilitate collaboration, and automate manual processes with ease — while also providing data to inform and continuously evolve your incident resolution processes. In this release, we enhance the incident management capabilities of our Service Catalog, add further ways to collaborate on incident response, and add new services endpoints to the xMatters REST API to populate the Service Catalog.
Service reliability & incidents
The xMatters platform lets you respond faster during a crisis, and having services embedded in our incident management capabilities helps supercharge your response to digital service interruptions. This release, take advantage of new features to define and explore the relationships between your services, identify the potential root causes of incidents, engage service owners more quickly, monitor incident traffic associated with your services from the dashboard, and control who can view and create services in your system.
Service dependencies
Our new service dependencies map lets you visualize the relationships between the business, technical, and external services defined in your Service Catalog. You can use the dependencies map for a service to define and explore how that service relates to other services in your architecture. You can also access a service dependencies map for an incident to view which services are impacted by the incident, investigate which other services may be affected, and to identify potential root causes.
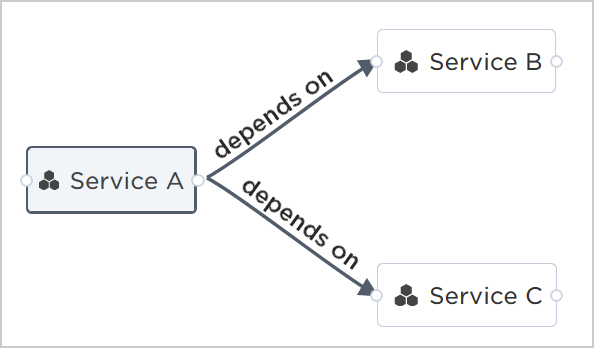
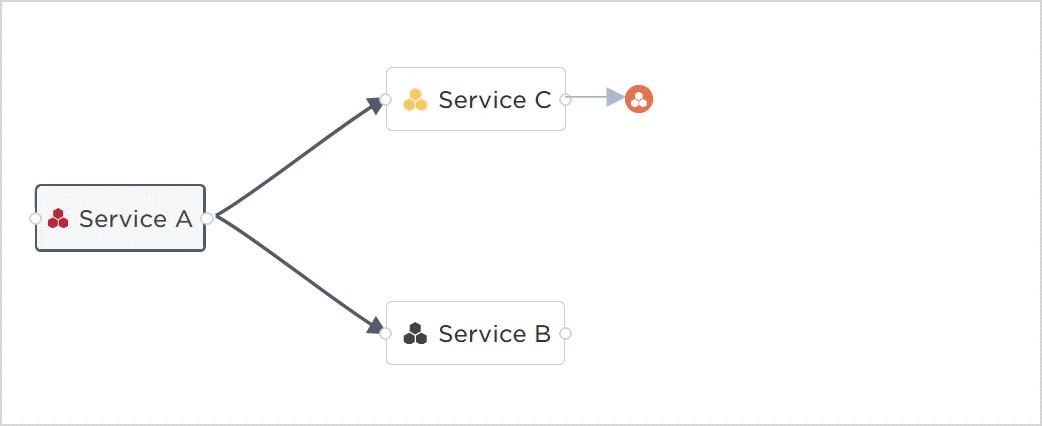
Reading the map
The direction of arrows on the map indicates what a service depends on. For example, this map shows that 'Service A' depends on 'Service B' and 'Service C' (conversely, 'Service B' and 'C' are depended on by 'Service A'):
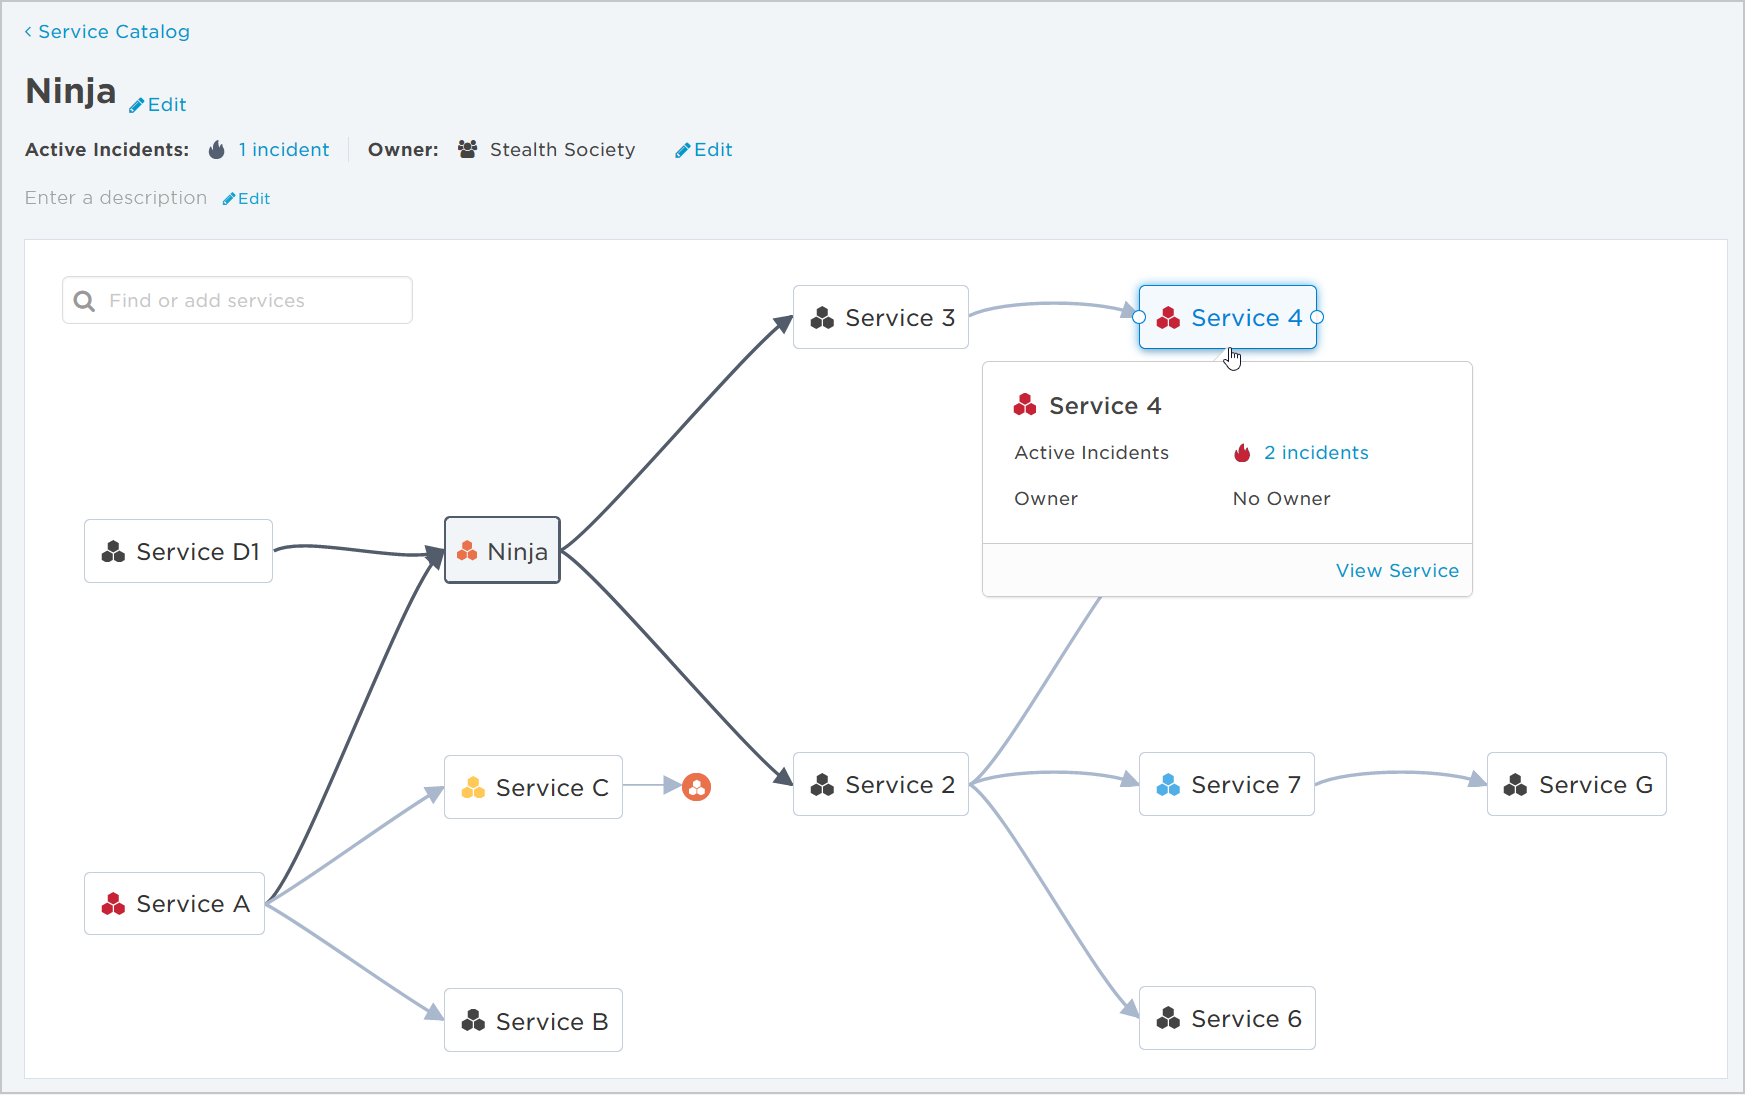
You can tell at a glance if a service is associated with any active incidents because its icon is color-coded with the highest severity level of those incidents. Click on a service to view more information about the service, the number of incidents it's associated with, and its owner:
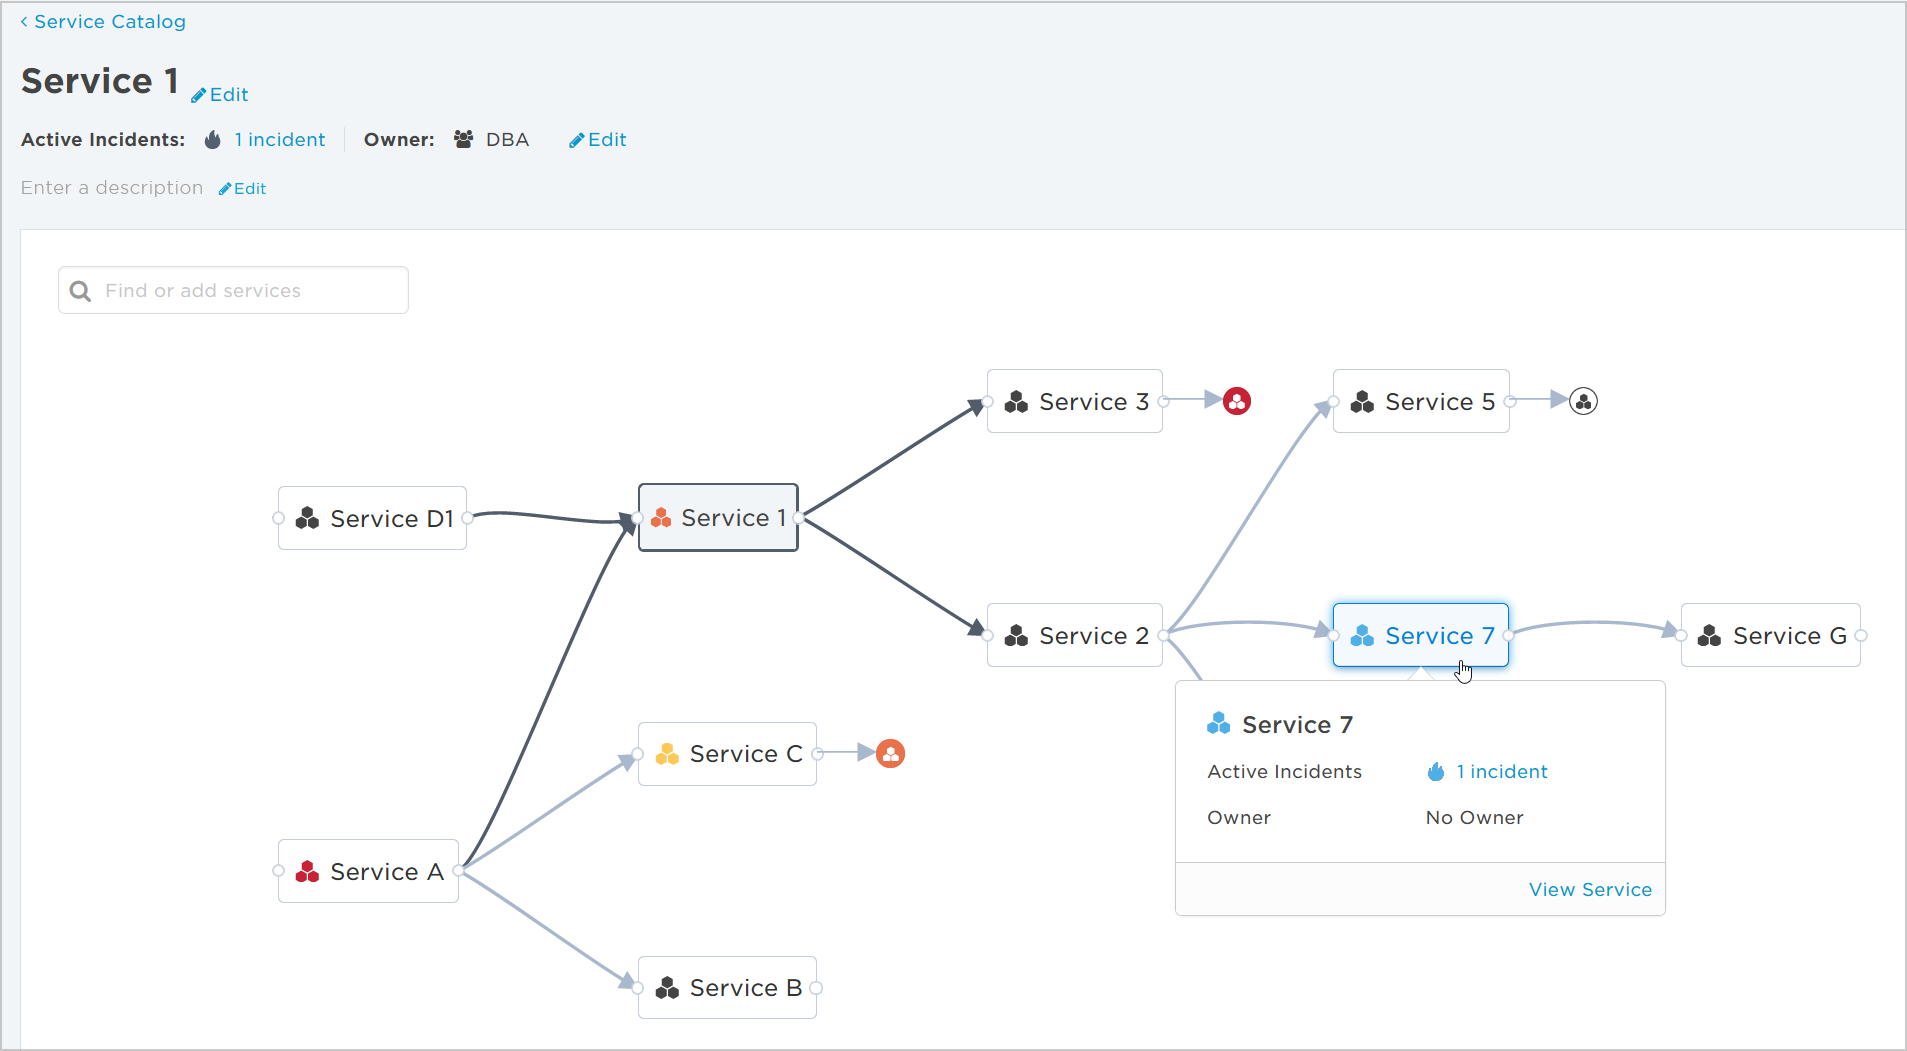
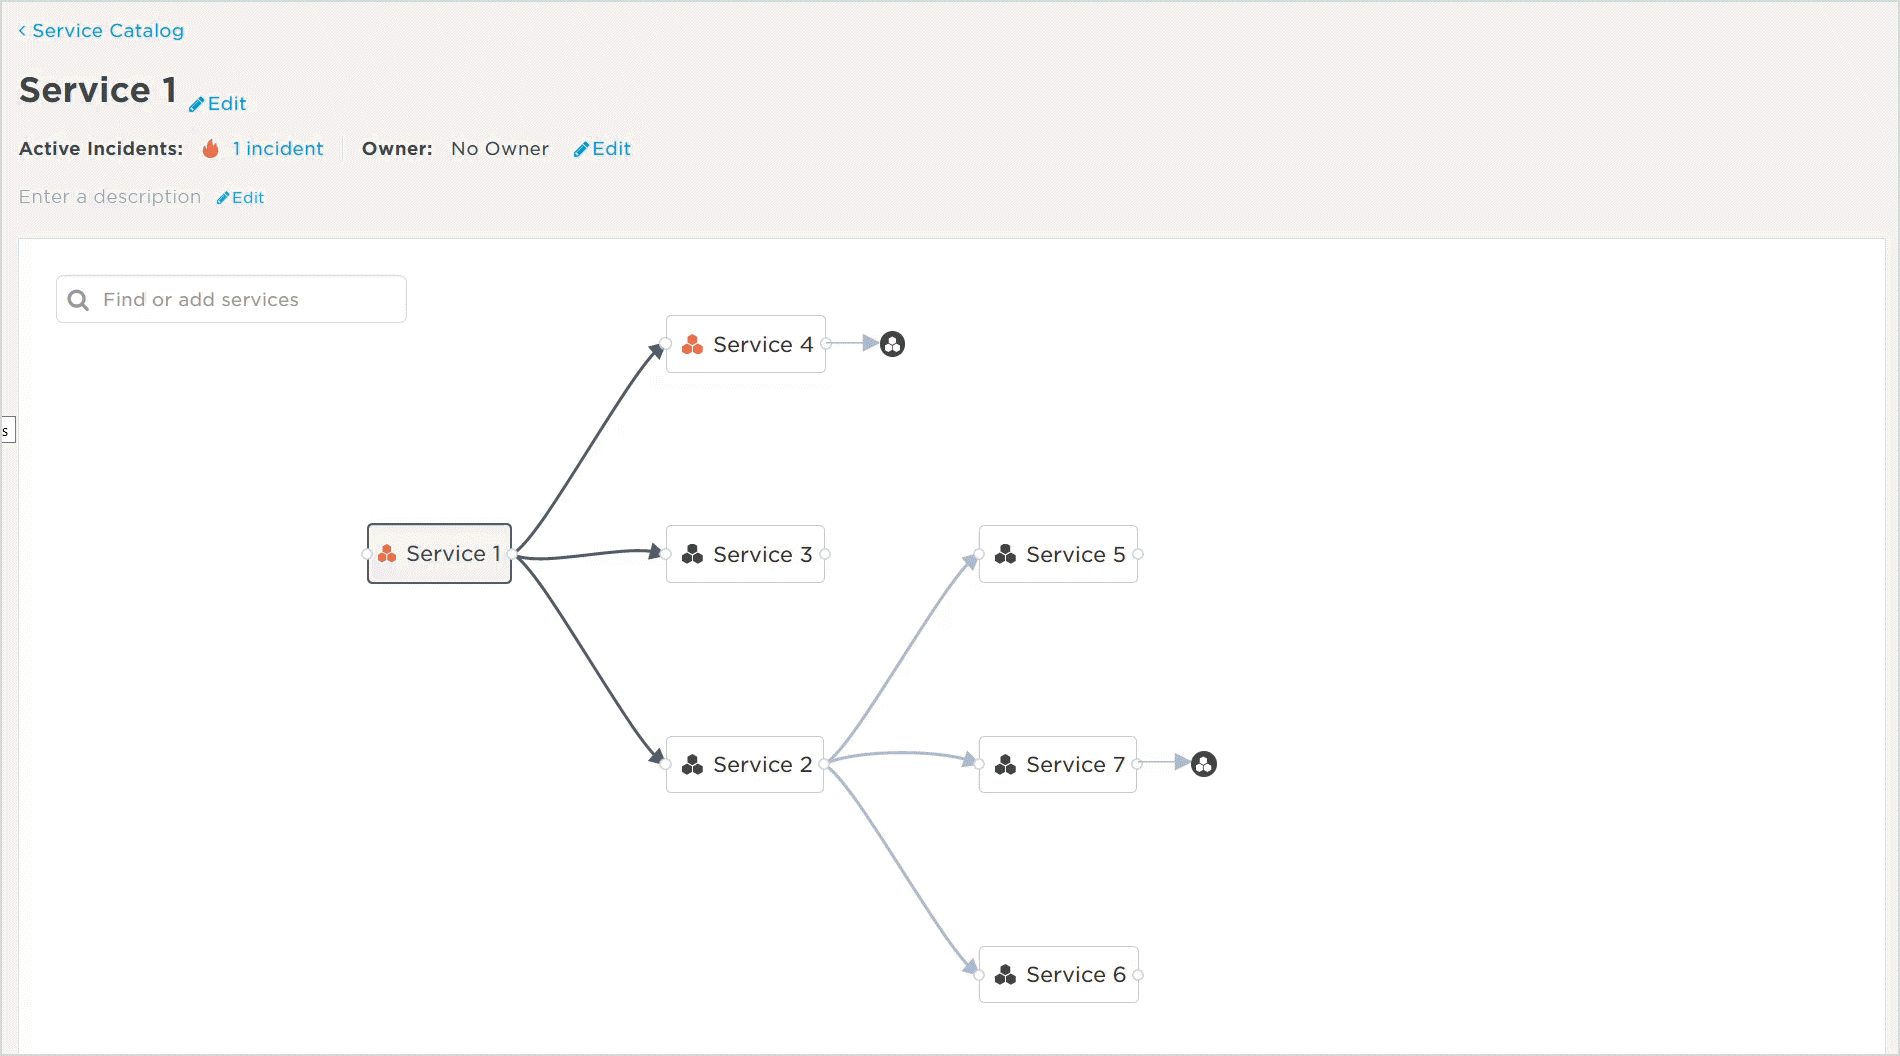
Expand the map
The map also uses icons to indicate when a branch continues beyond the currently displayed services. These icons use the same color-coding to indicate whether any of the services in that branch are associated with active incidents, and the highest severity level of those incidents. You can click on these icons to expand the map to the next level of service dependencies:
Find a service on the map
If you want to view a particular service that's not currently displayed, you can use the 'Find service on map' search feature to automatically expand the map and display it. This functionality is also helpful if your map is large and complex and you want to quickly locate services even when they are being displayed.
Defining service dependencies
Defining the dependencies between your services can reduce incident diagnosis time by giving resolvers broader visibility into the scope of a problem across services. It can also show incident commanders when customer-facing services are impacted so they can communicate resolution progress to stakeholders of those services.
Add or delete dependencies
It's easy to manually add or remove dependencies between your services using the service dependencies map. To add a dependency, simply draw a line from one service to another service it depends on. To remove a dependency, click the line between two services to highlight it, then click the options menu and select 'Delete Dependency':
Add services to the map
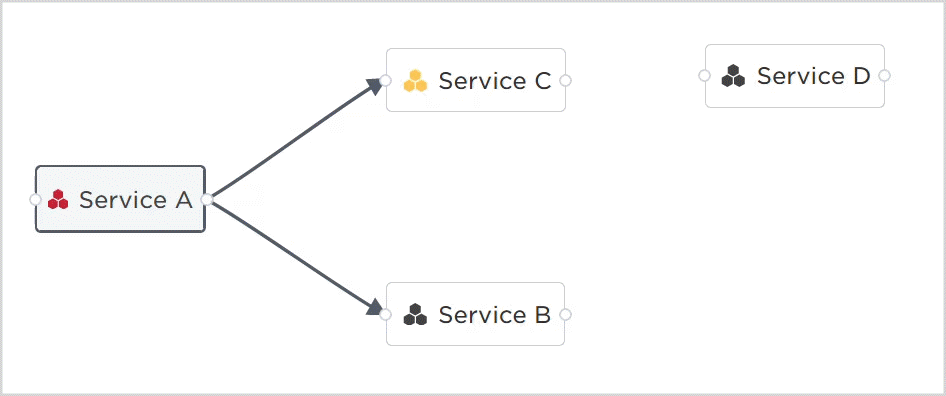
You can use the 'Find or add services' search bar to drop services from the catalog onto your map so that you can add dependencies between them. There's also a very convenient option to add a new service directly to the map — which saves you from having to navigate out to the Service Catalog while you're defining dependencies:

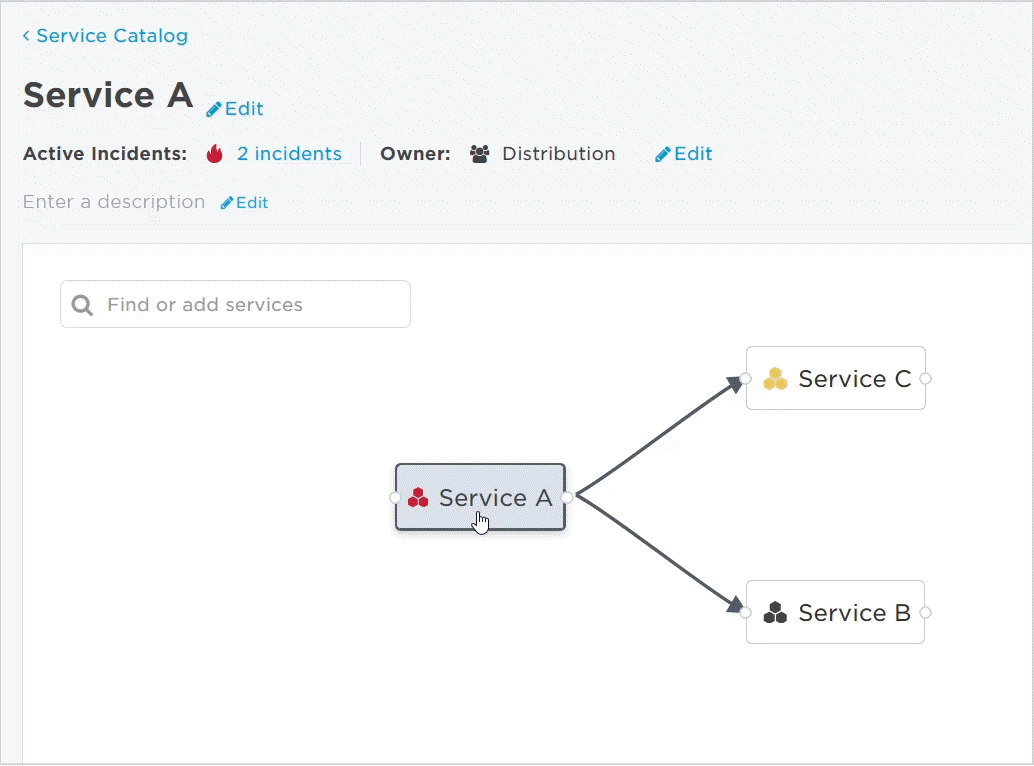
View dependencies for a service
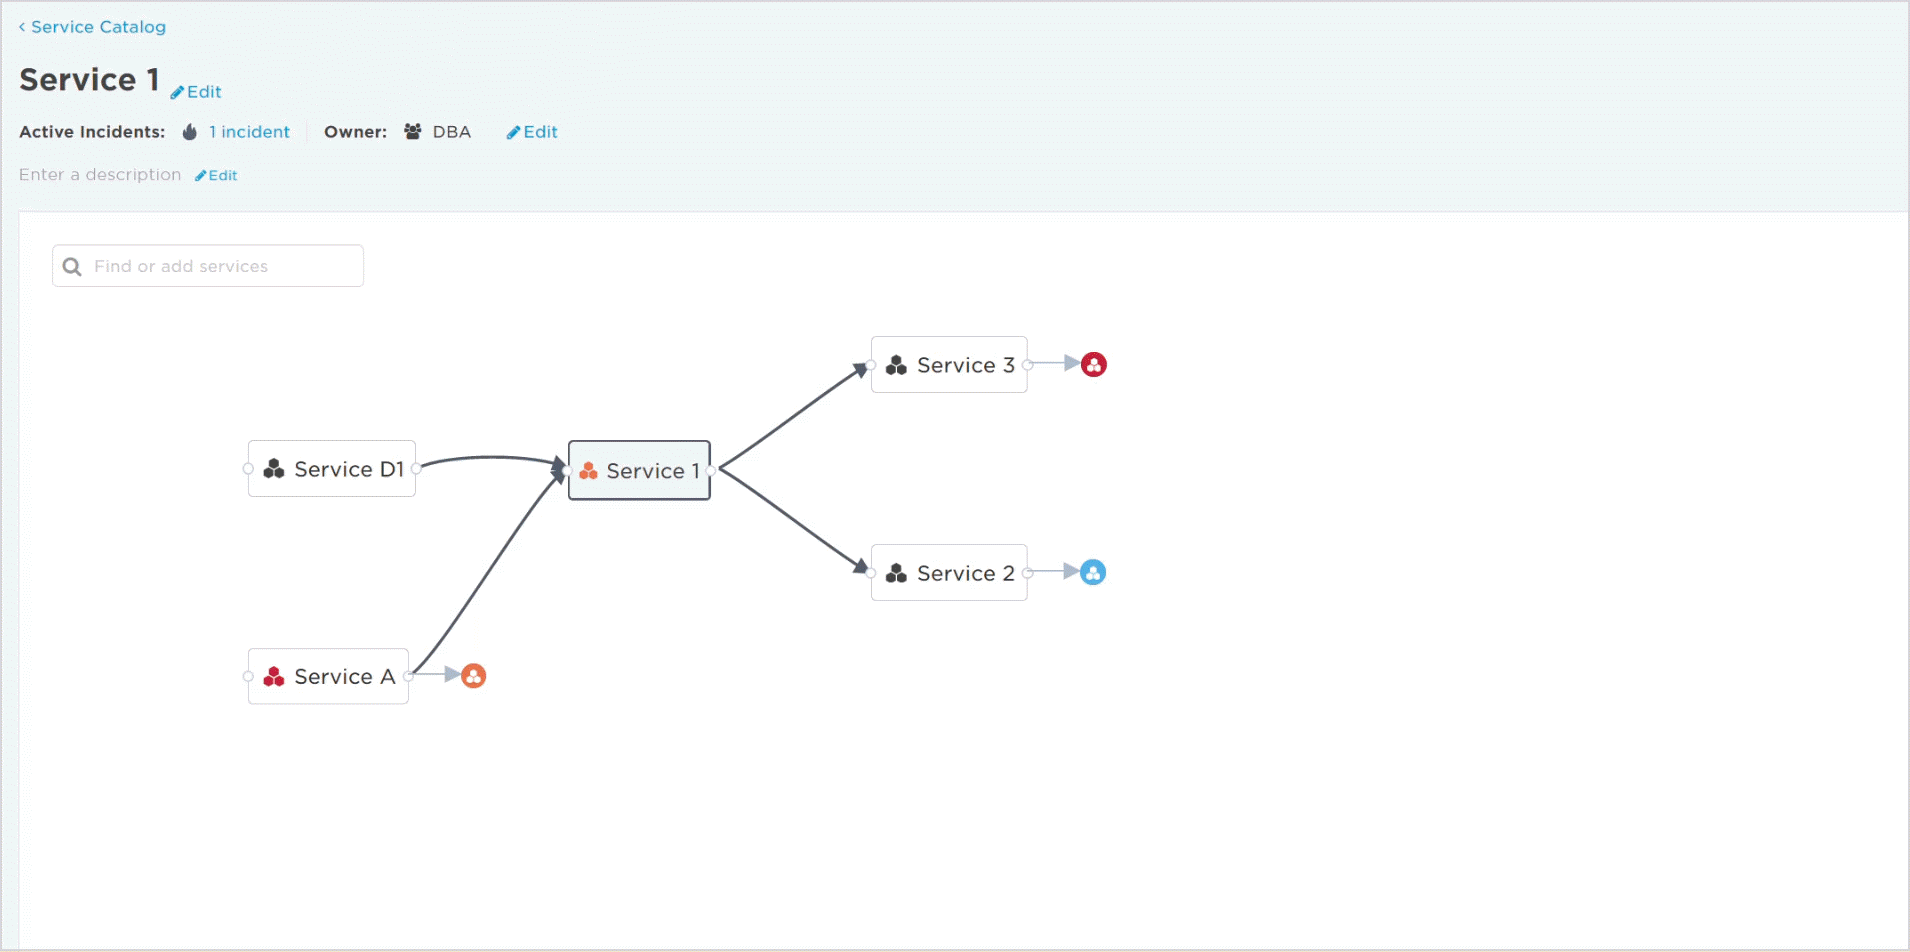
Service owners can use a service's dependencies map to explore how their service relates to other upstream or downstream services. The service is highlighted near the center of the map, and bold lines indicate that service's direct dependencies:
If their service is experiencing an incident, owners can use the map to identify which services may also be affected, and whether they need to communicate with stakeholders from other services about incident resolution activities.
View dependencies for an incident
The Impacted Services section of the Incident Console includes an option to 'View Dependencies' for the incident.
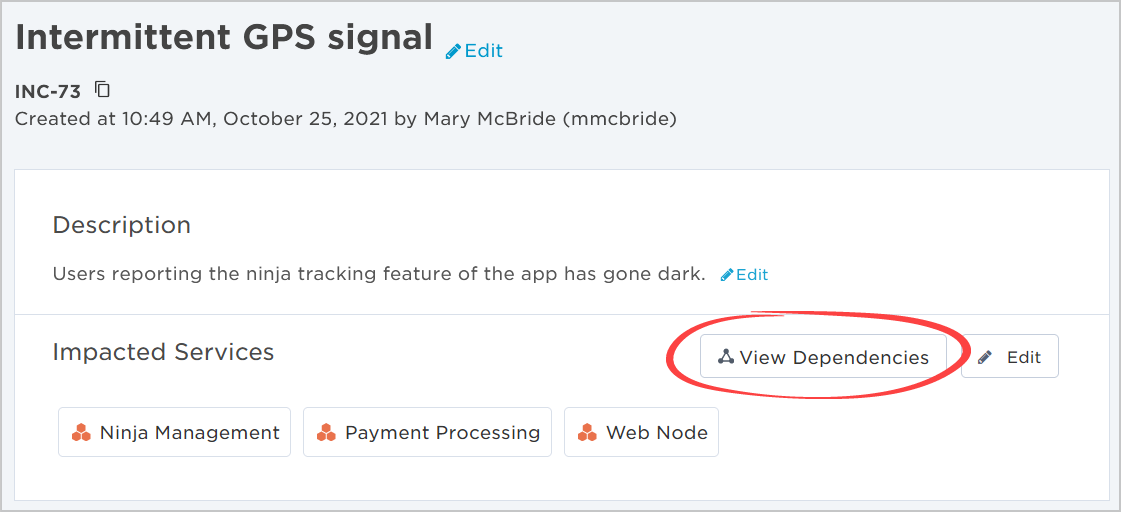
Selecting this option displays a dependencies map focused on the services impacted by the incident that incident commanders can use to explore the current extent of the issue, identify which other services may potentially be affected, and identify potential root causes:
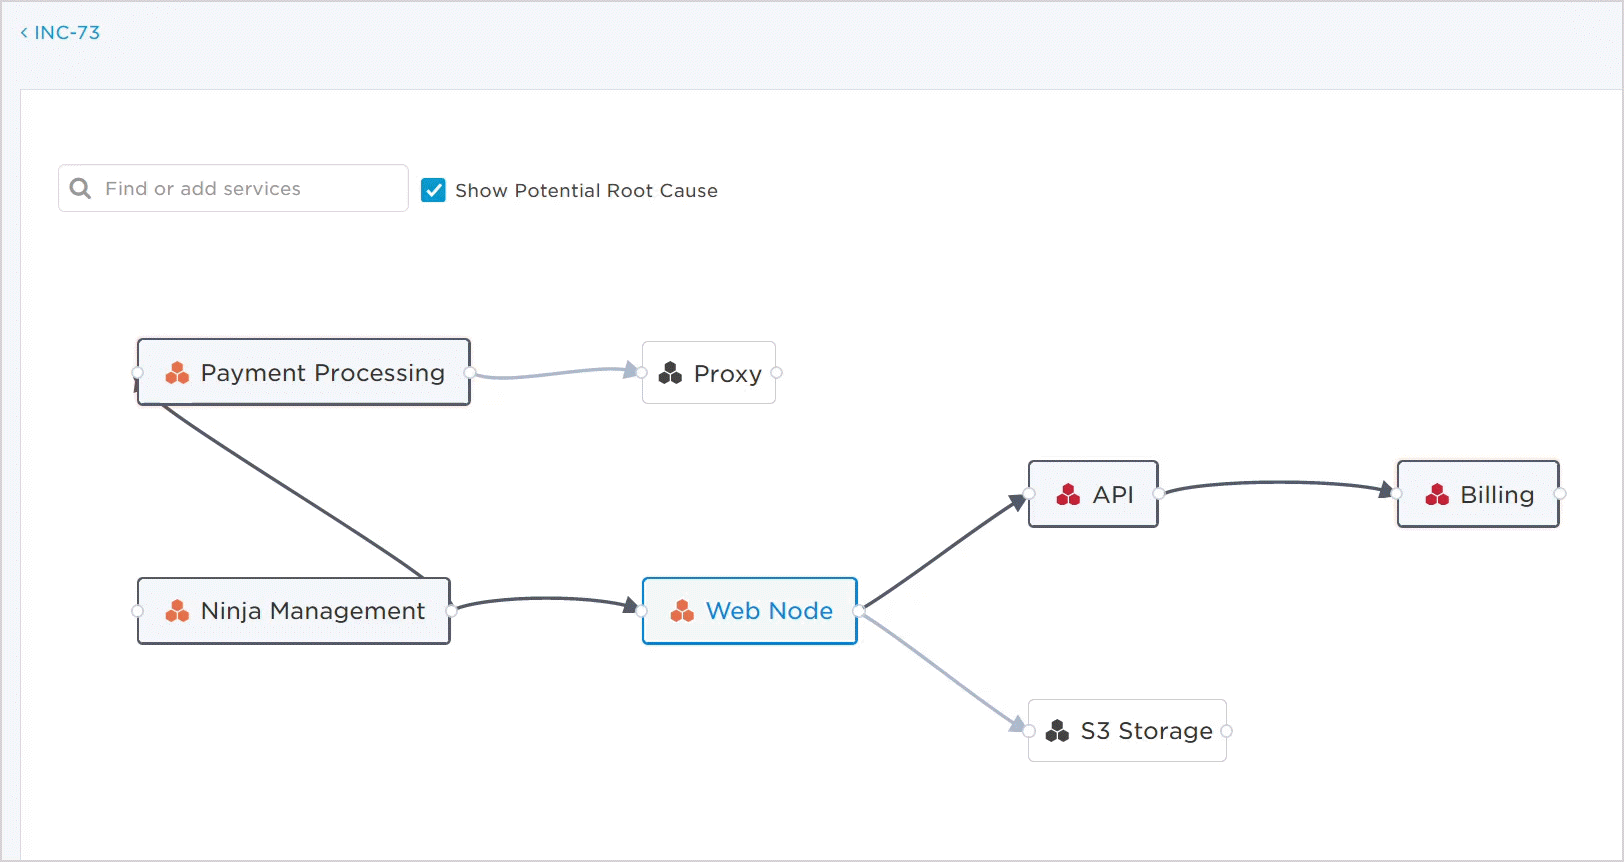
When the option to 'Show Potential Root Cause' of the incident is selected, the map traces incidents in your service dependencies and highlights which services are the suspected root causes. This can help reduce diagnosis time by giving you visibility into the scope of a problem across services and indicating which services you should focus your efforts on.
Engage impacted service owners
In our last release, we enhanced our recipient selector so you can search for services and select the group that owns them. We've now made it even easier to request the owner of an impacted service to engage as an incident resolver.
When you click on an impacted service in the Incident Console, the service info card now includes a Notify to Engage button that you can use to add the owner as a resolver:
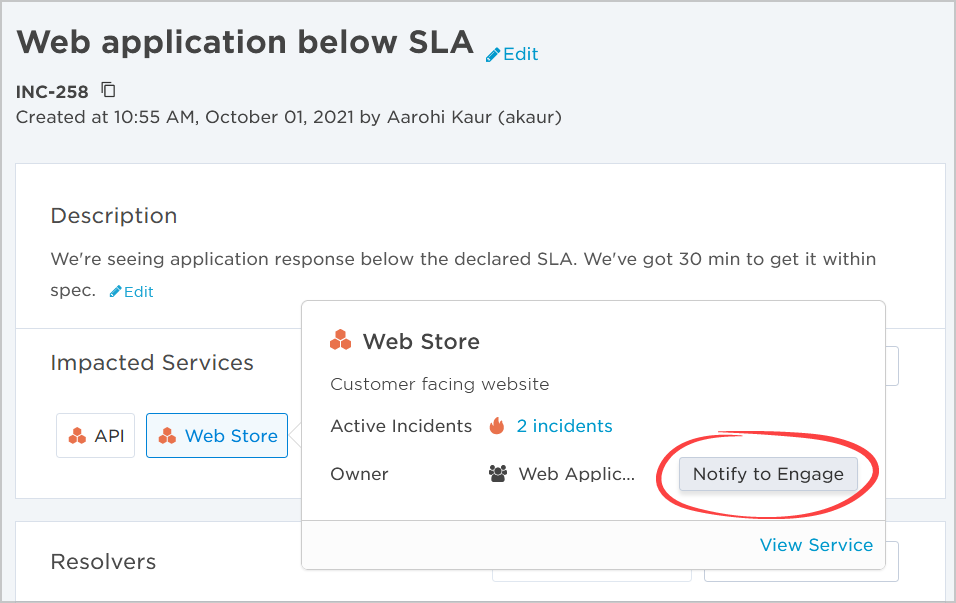
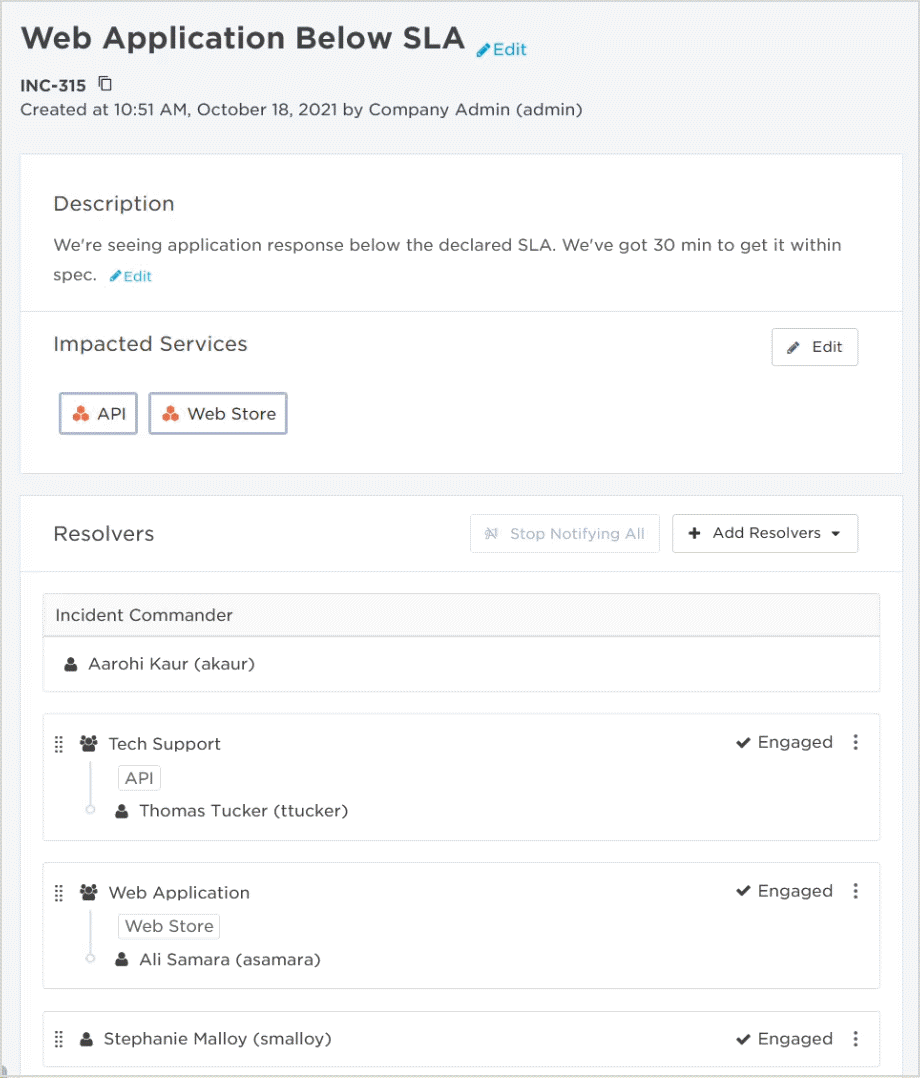
You can tell at a glance which impacted services are engaged by their bold outline in the Impacted Services section of the console. Click See Resolver on an engaged service's info card to highlight its owner in the Resolvers list (you'll notice we've also added new service 'pills' to the Resolvers section so it's clear which impacted services a group represents):
Monitor incidents by service
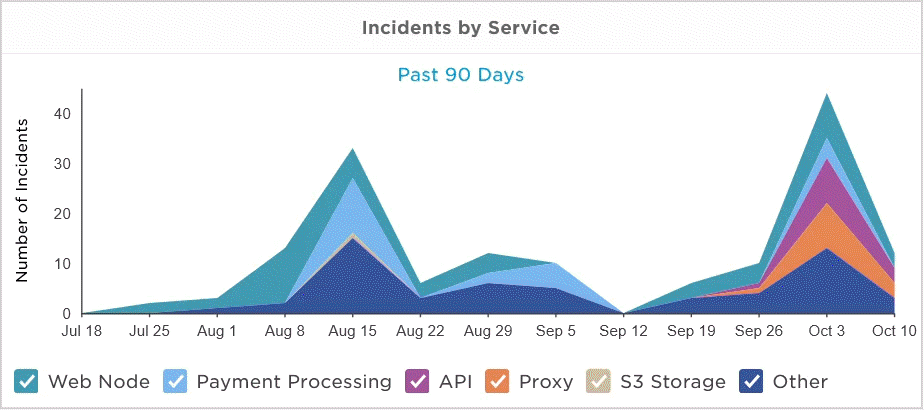
The Communication Center now includes an Incident Activity widget that you can add to your dashboards to monitor incident history based on your incidents' severity levels or the services they impacted.
The widget bundles together our previous 'Incidents by Severity' graph with a new 'Incidents by Service' option, which allows you to configure which services you're interested in over different timeframes:
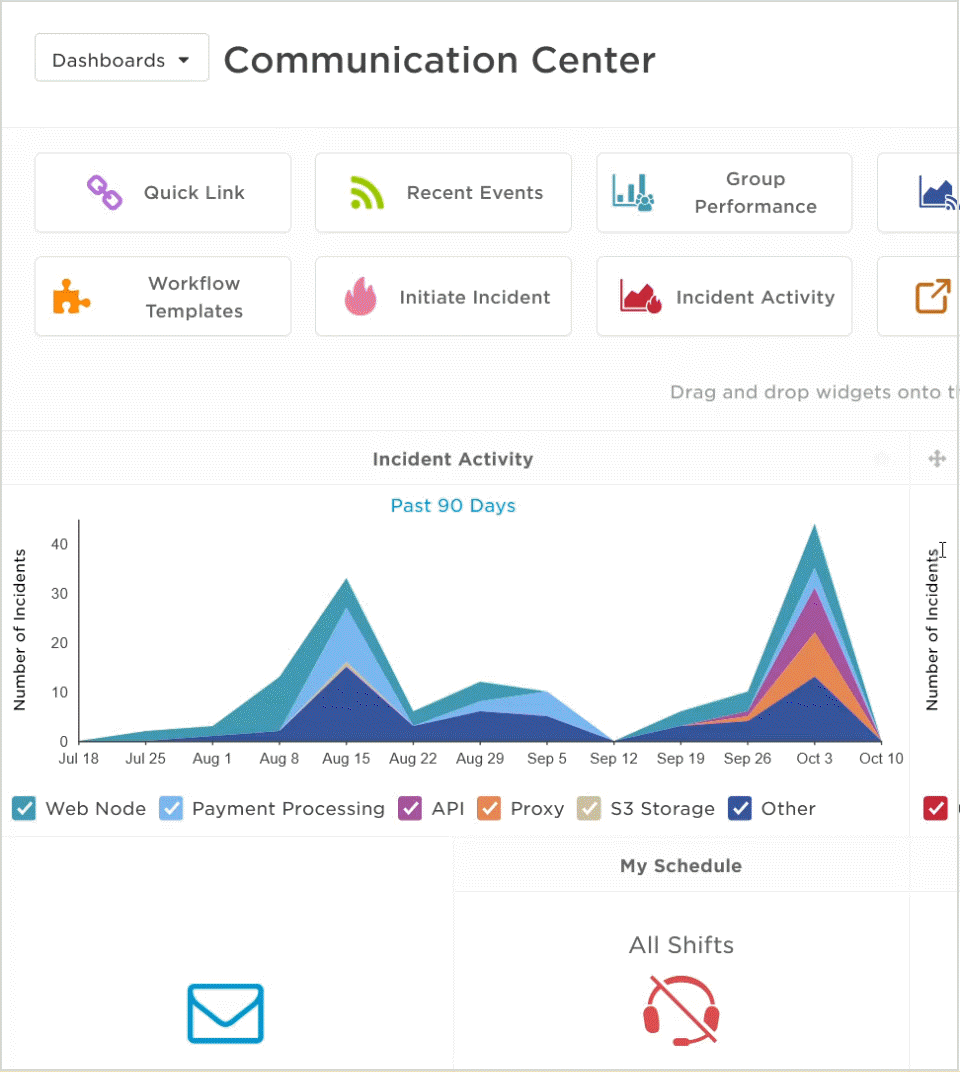
By adding Incident Activity widgets to your dashboard, you can create custom snapshots of incidents over different time periods, making it easier to visualize trends, pinpoint problem services, and identify opportunities for improvement.
For example, on the dashboard below we're using two Incident Activity widgets — one for monitoring incidents by service over the past 90 days, and another for monitoring incidents by severity over the past 30 days:
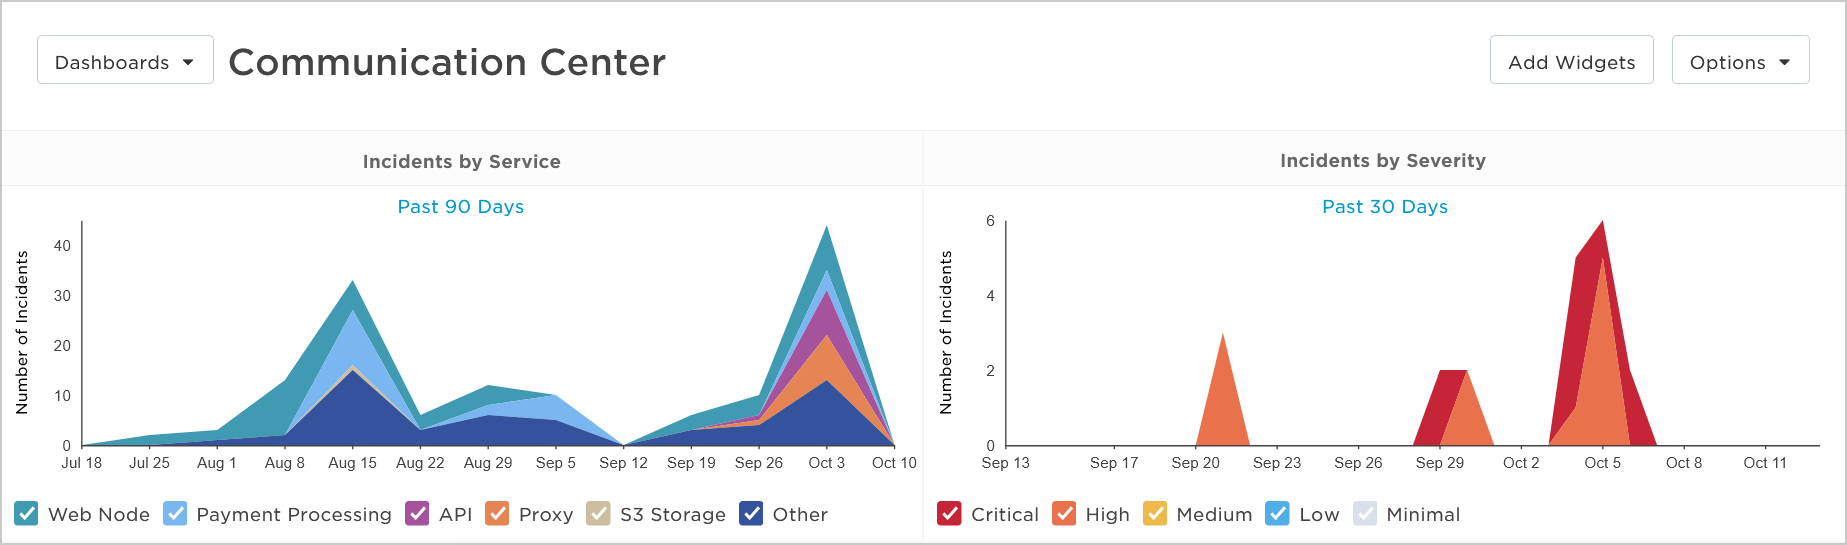
Drill into the data
You can move your cursor over a graph to get a summary of incidents at a specific point in time. You also have the option to drill through to the Incidents list to explore a graph's underlying data in more detail. You can do this either by:
- Clicking the timeframe link below the graph's title ('Past 90 Days' in the example below) to view incidents for the entire timeframe displayed on your graph.
- Clicking and dragging your cursor over a specific region of the graph and selecting 'View Incidents' to view incidents for just the selected period:
Control who can view or create services
You asked and we listened! We received feedback that some of our customers would like to have more granular control over which of their users can view the Service Catalog or add new services to it. We're happy to announce that we've added new permissions for viewing and creating services, as well as editing service dependencies. These permissions can be added or removed from your company's roles as needed via a Customer Support request.
Incident response & collaboration
Effective and timely communication is key to successful incident response and collaboration. To support a wider range of communication types, we've made it possible to automatically add any collaboration channels that use a URL, and we've added support for private Slack channels. We'll also give you a sneak peek at an exciting new device type we'll soon be adding so xMatters can alert you directly in your chat apps.
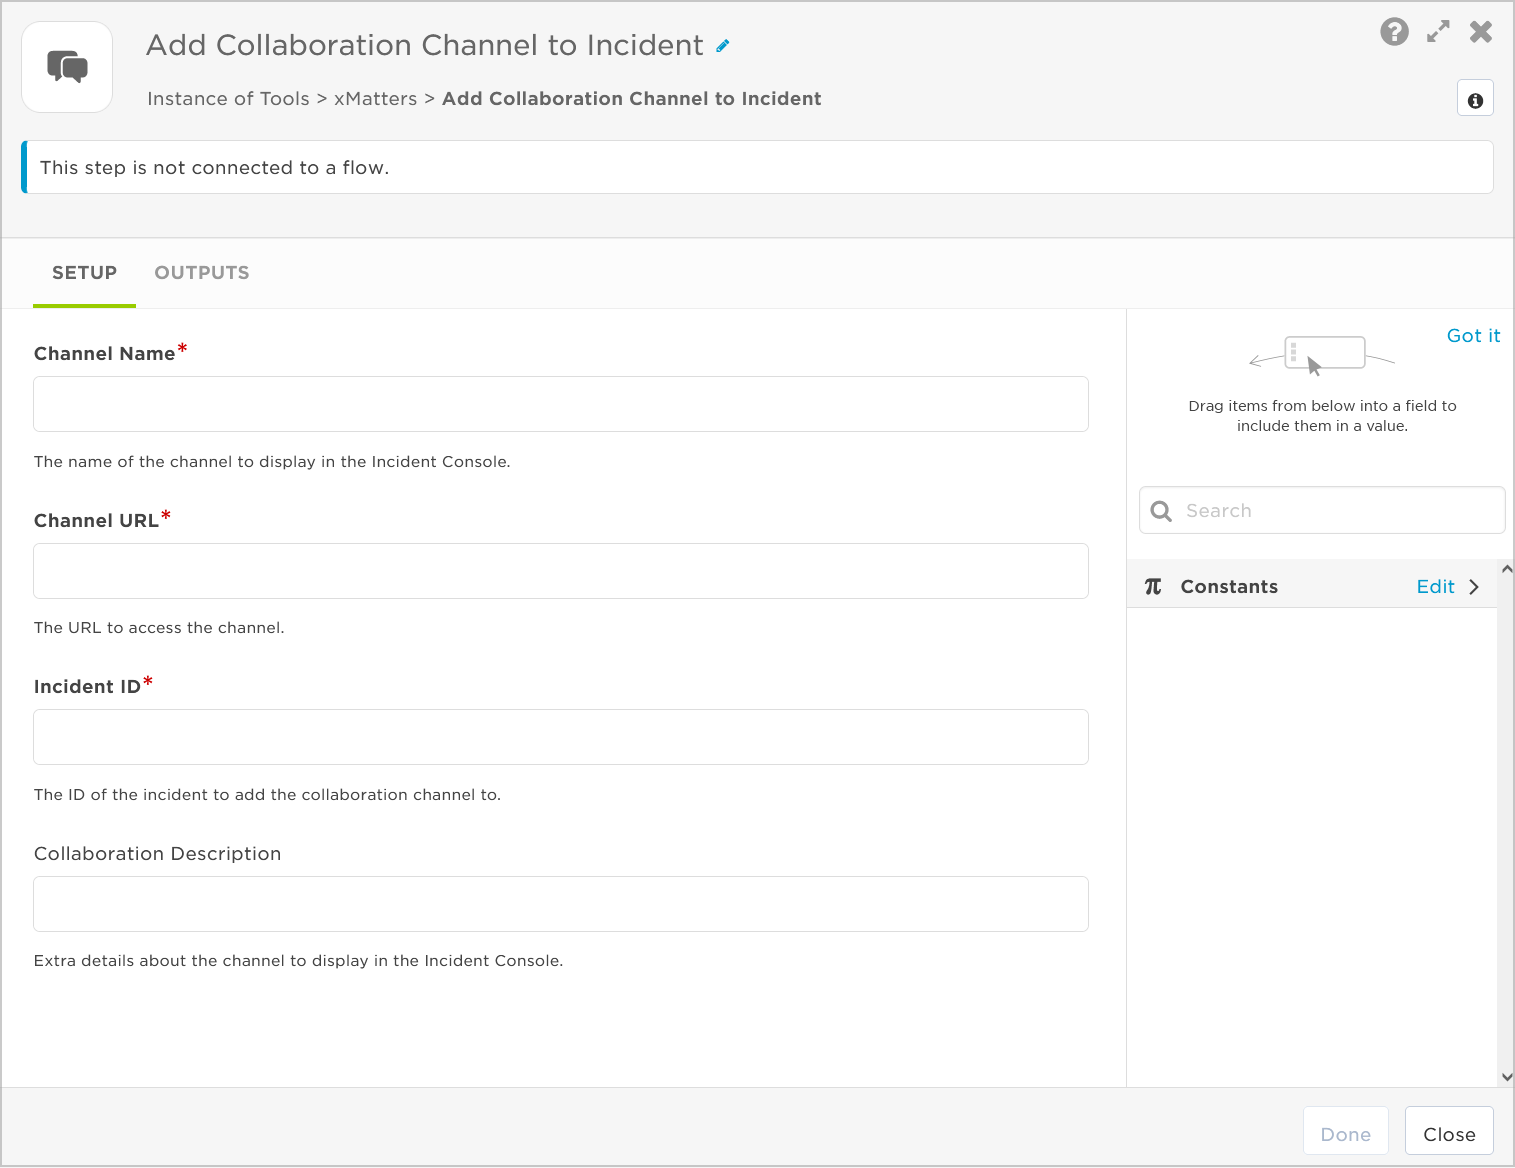
Automatically add other collaboration channels to an incident
By automatically creating collaboration channels as part of your incident resolution workflow, you allow resolvers to get straight to work when an incident is initiated. But what if xMatters doesn't currently offer a Flow Designer step for your team's preferred collaboration tool? Rather than designing your own custom step to do the job, save time and instead use the Add Collaboration Channel to Incident step.
Like Other Collaboration Channels that you manually add through the Incident Console, you can use this step to add any type of channel that has a URL:
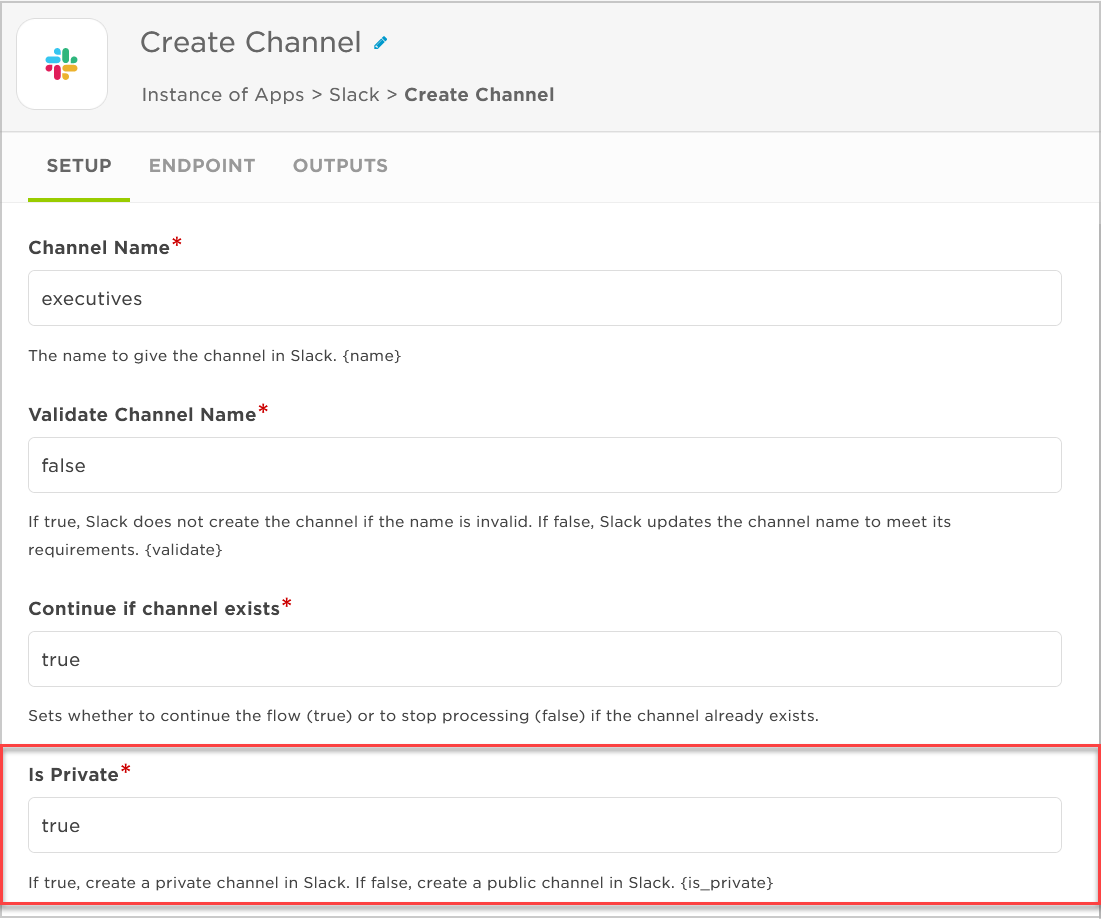
Create & display private Slack channels
Do you use Slack to collaborate during incidents, but prefer to work in private channels? You can now manually add private Slack channels to an incident by providing their URLs, or automatically add them to an incident when it's created using the Slack Create Channel step in Flow Designer. Simply specify the channel 'Is Private' when configuring the step:
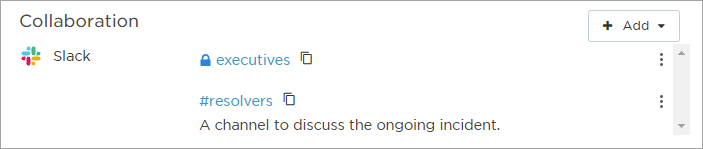
To make sure it's easy to differentiate between public and private Slack channels in the Incident Console, we've added a lock icon before the names of automatically created private channels:
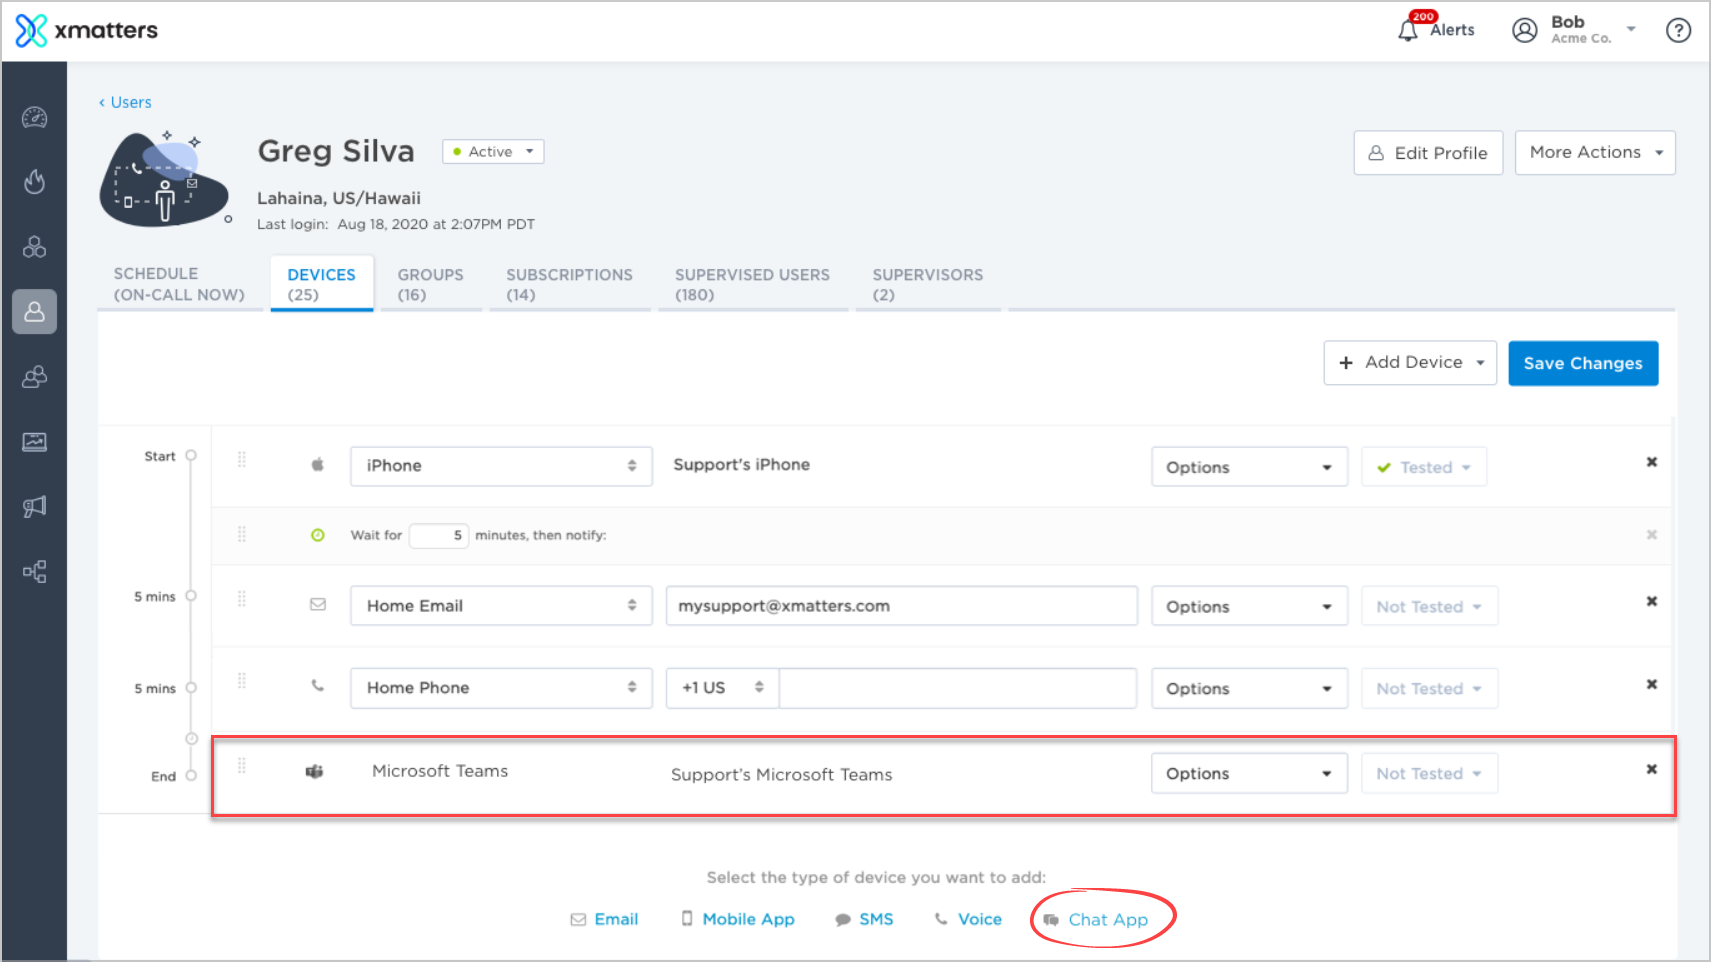
Sneak peek: Use your Microsoft Teams account as a device
xMatters makes it easy to receive notifications on your preferred devices, including Email, Voice, Mobile App, and SMS — and we'll soon be adding 'Chat App' to that list! This new type of device will allow you to receive notifications as direct messages in your preferred chat applications, starting with Microsoft Teams:
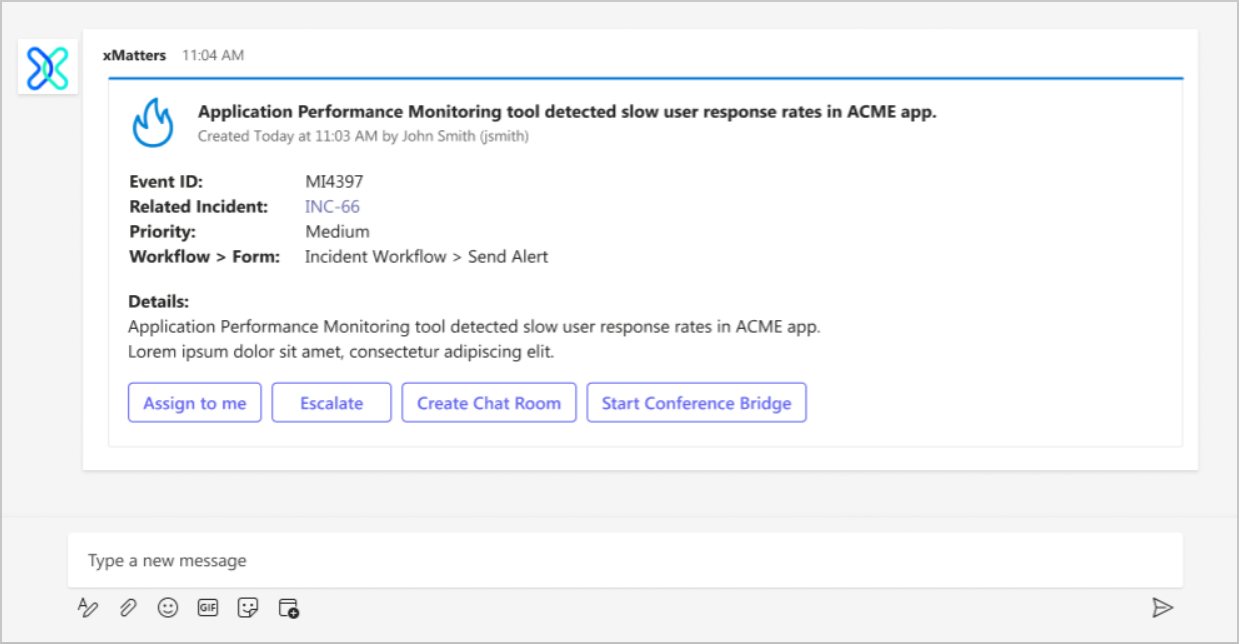
Many organizations use Microsoft Teams as their internal communication and collaboration app. By adding Microsoft Teams as a device, users won't need to disrupt their workflow to check an email or open xMatters to collaborate. They'll be able to receive xMatters notifications, view incident details, and respond to alerts right in their Teams chat:
This new feature is in addition to the existing ways we already integrate Microsoft Teams into your incident response, including: a bot to help you in Teams, a Meeting plug-in to view and update incidents inside of a meeting, and Flow Designer steps to create channels and post into them.
Automation
In this release, we laid the groundwork for automating your digital and business response to major incidents, added exciting steps and low-code workflows for getting integrated with new products and services, made a bunch of great usability enhancements to Flow Designer, and added new services endpoints to the xMatters REST API.
Flow Designer
Flow Designer is the user interface for our integration platform. Its goal is to provide an all-inclusive visual canvas that allows users of any technical ability across the enterprise to integrate and create incident resolution workflows with ease.
New & updated steps
Events in the digital sphere can have wide-ranging business impacts. Wouldn't it be great if you could use Flow Designer to automate your business response to critical digital events, just like you do with the technical resolution of incidents? We certainly think so! Our major focus this release was adding new automation capabilities to be able to integrate with other components of the Everbridge platform.
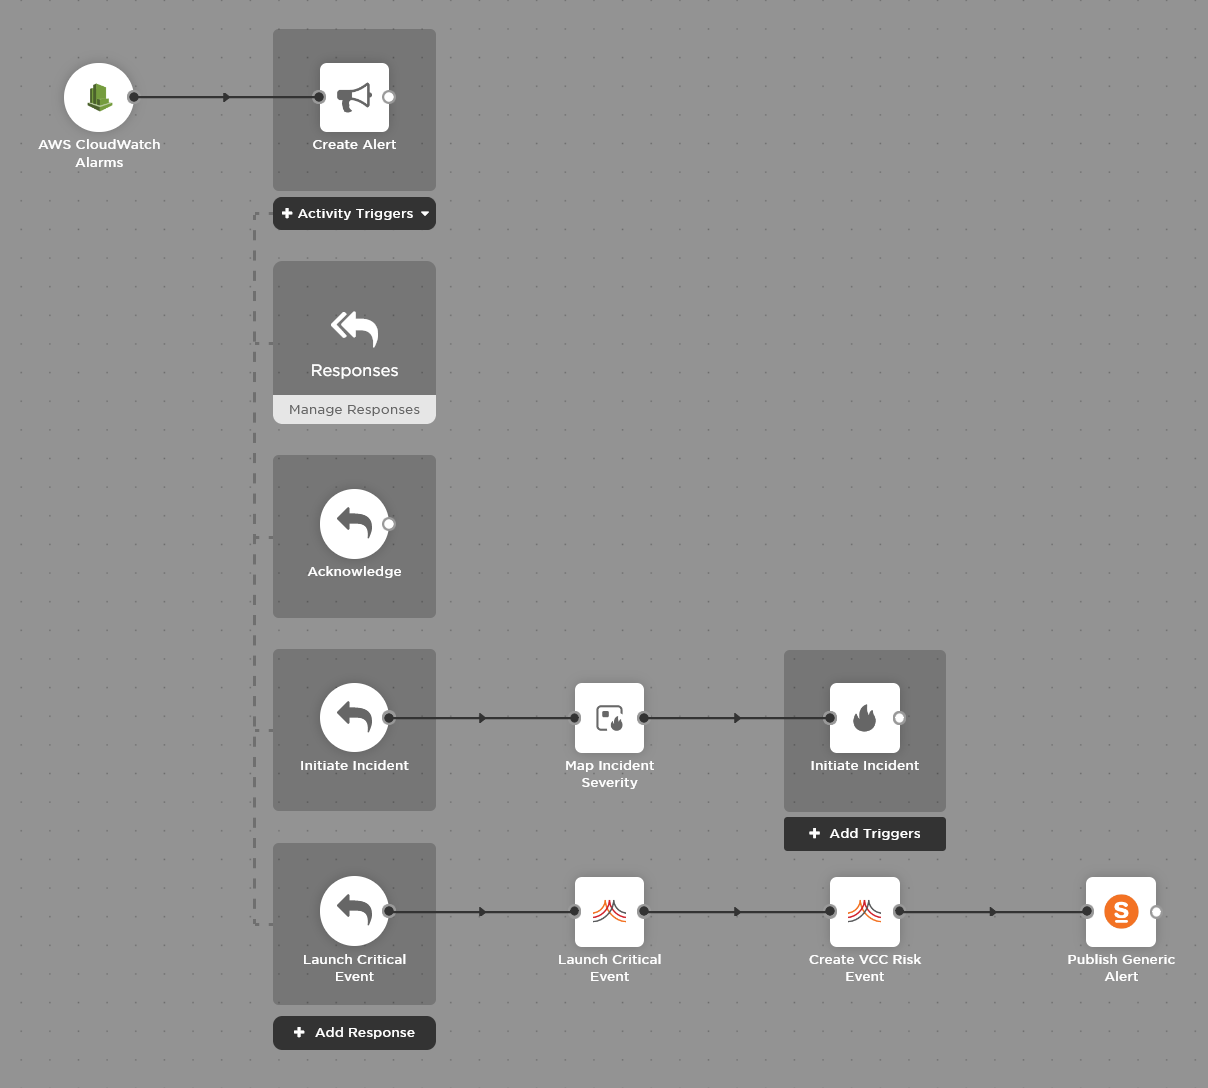
Everbridge & SnapComms
As of this release, you can now leverage the automation and on-call capabilities of xMatters in tandem with the critical event management templates of Everbridge Suite and the immediate messaging capabilities of SnapComms. This powerful combination lets your business jump on issues before they hit your bottom line or erode customer trust.
As we'll show in the example below, you can include the following steps in your flows to take action in Everbridge or SnapComms, using information from previous steps in your flow to dynamically populate the steps' inputs:
Everbridge steps
- Launch Critical Event: Launch a new critical event in Everbridge using a specified critical event template.
- Create Risk Event: Create a new risk event in Everbridge Visual Command Center.

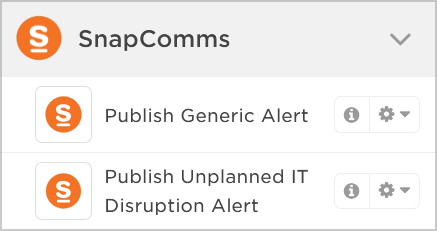
SnapComms steps
- Publish Generic Alert: Publish an alert using any organization template.
- Publish Unplanned IT Disruption Alert: Publish an unplanned alert using an organization template based on the built-in IT Communications template.
An example flow
When your monitoring tool sends a signal that something is going sideways in the web user interface, xMatters notifies the team that owns the service. Upon reviewing the information included in the notification, the on-call responder initiates an incident in xMatters so DevOps responders can swarm on the response.
Next, they launch a critical event using a pre-built, vetted template in Everbridge Suite, making business stakeholders aware of the issue so they can run their playbooks to manage reputational, regulatory, and financial risk.
The automated flow then posts the critical event details to the Visual Command Center, which alerts watchers in their operations center and publishes a message via SnapComms to give support staff more context about the influx of calls they're about to receive.
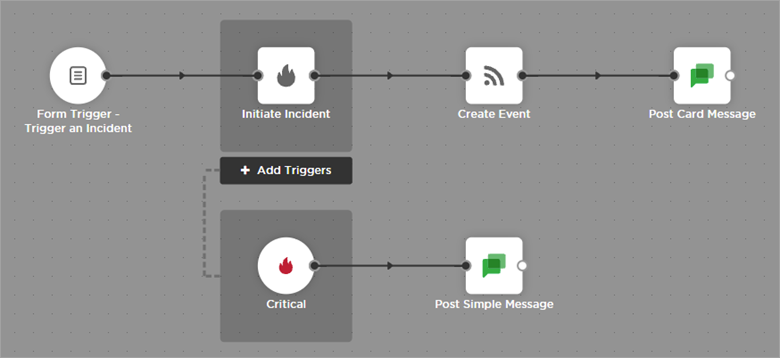
Send Google Chat messages
Seamlessly integrate Google Chat into your workflows with our built-in Google Chat steps:
- Post Simple Message: Send a simple text message that appears inline like any other chat message.
- Post Card Message: Display a card in chat with a title, sections, subtitles, images, and other widgets.
For example, you could configure a card message to be sent when an incident is initiated in xMatters, and follow up with a simple message if the incident's status is updated to Critical:
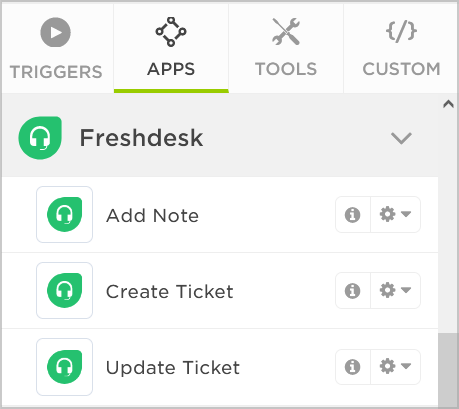
Create & update tickets in Freshdesk
To support our new Freshdesk workflow, we've added the following built-in steps to the Apps tab of the Flow Designer palette. You can add these steps to any of your automated workflows to integrate with Freshdesk:
- Create Ticket: Create a new Freshdesk ticket.
- Update Ticket: Update a specific ticket in Freshdesk by modifying the input values.
- Add Note: Add a note to a specific ticket in Freshdesk.
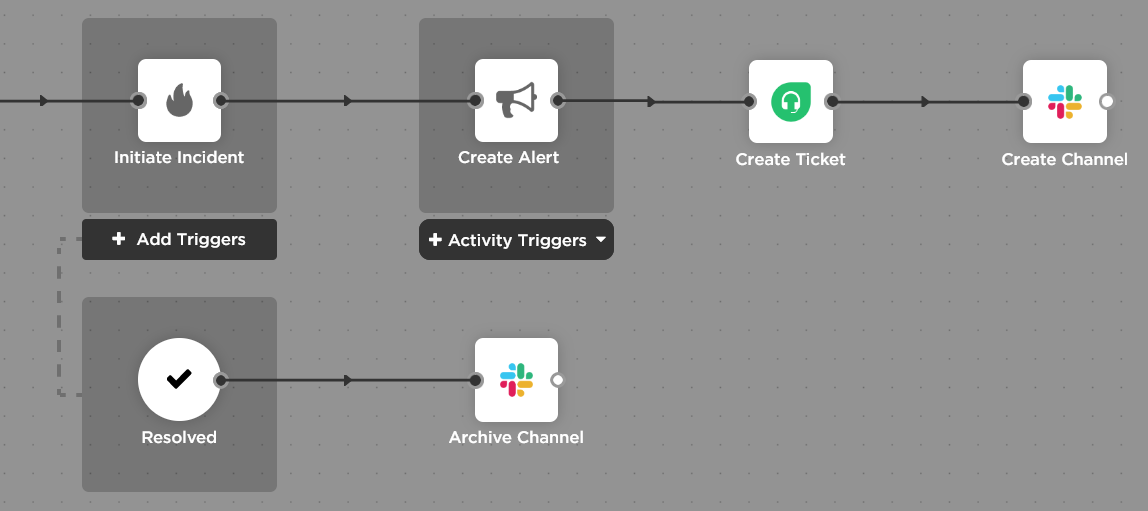
Archive Slack channels
Estimated Availability: November
Flow Designer makes it incredibly easy to create Slack channels as part of your automated processes, but who cleans them all up later? With our new Slack Archive Channel step, you don't need to worry about old channels cluttering up your workspace — you can automatically archive them as part of your flows:
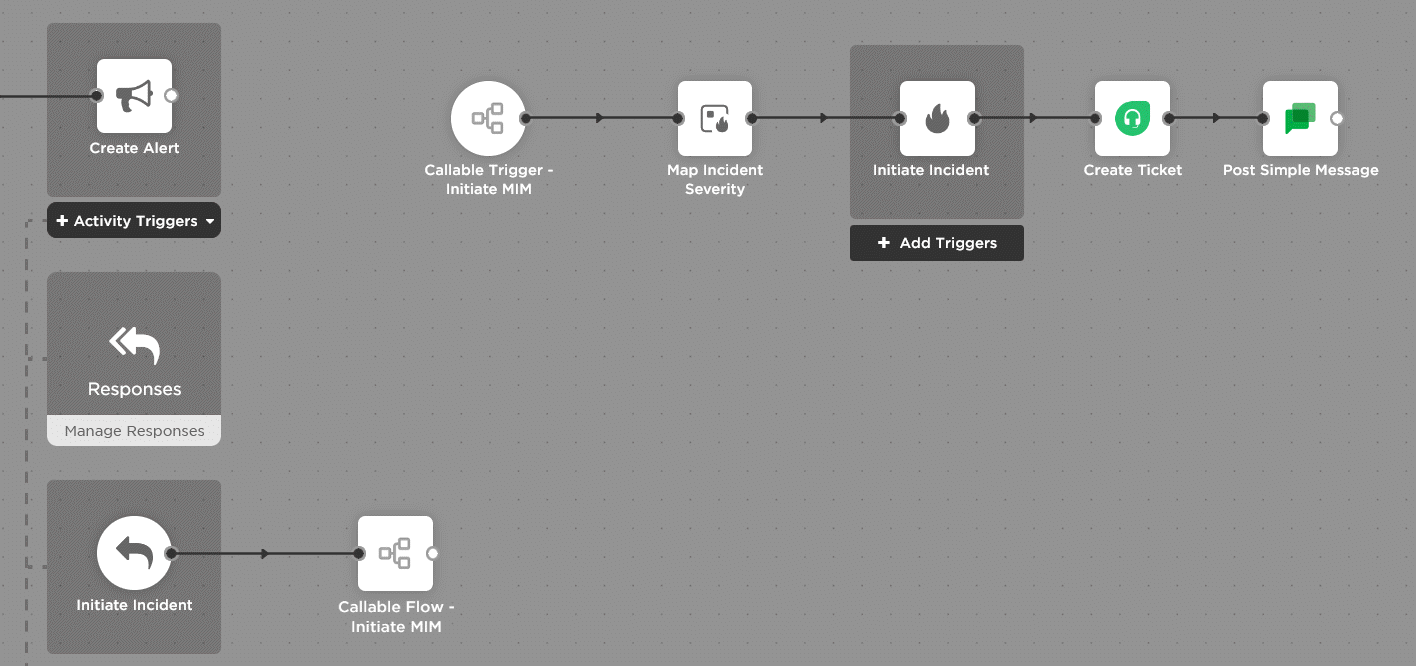
Sneak peek: Call a flow
We're currently working on a new type of 'Callable Flow' step that you can add to your flows to call a sequence of steps. This means you'll be able to reuse the same sequence of steps in multiple flows, making your flows easier to maintain, and more readable.
Here's how it works
A callable flow step works in tandem with a 'Callable Trigger'. You use the callable trigger to build the sequence of steps you want to run and to define the information needed as inputs from the flow that's going to call it.
Next, you can add the callable flow step associated with your trigger in any of your flows — they don't even need to be on the same canvas (but they'll need to be in the same workflow). When that step runs as part of your flow, it'll call your trigger to run the sequence of steps.
New & updated workflows
This release we added two new low-code workflows, upgraded the permissions of the xMatters App for Slack, and certified the xMatters application for ServiceNow for their Rome release.
Low-code workflows (& triggers, too)
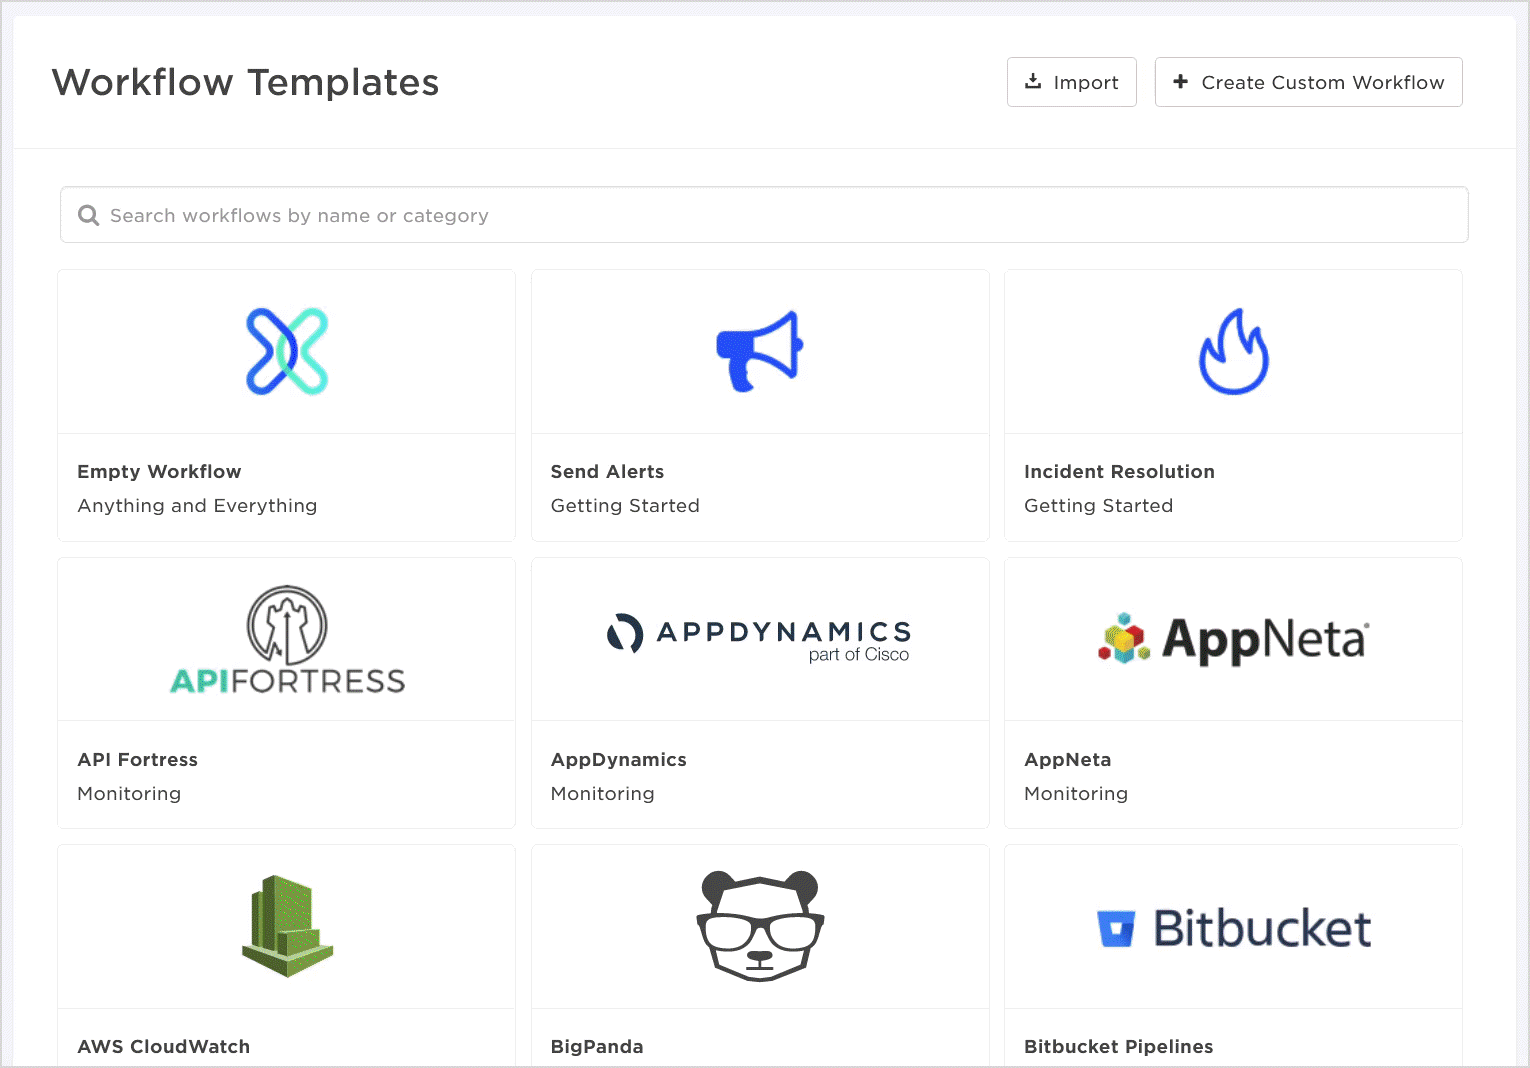
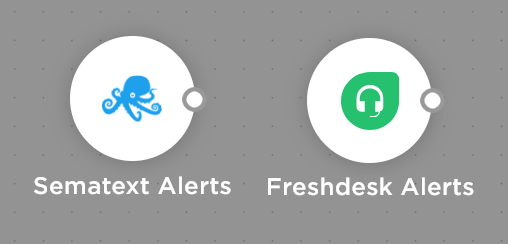
Our initiative to make it easier to get integrated with xMatters continues again this release, with the addition of low-code workflows for Sematext and Freshdesk. Instead of having to download and import a .zip file, you can install these workflows directly from within xMatters — just select the workflow from the list of available templates and click 'Install':
These workflows include new App triggers to accept the incoming signal. The triggers are connected to a pre-built flow that creates an alert when xMatters receives a signal from the external system. When on-call resources respond to the notification, they have the option to initiate an incident. You then have the option to use Flow Designer's powerful visual interface to further customize or enhance the workflow's functionality to meet your organization's specific needs.
|
Sematext Trigger flows, initiate alerts, and notify recipients when Sematext sends a signal. |
|
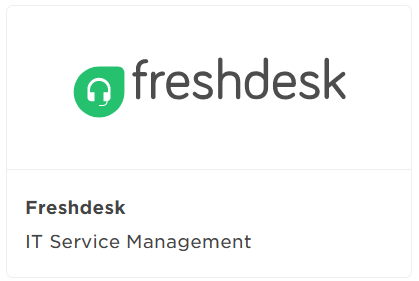 |
Freshdesk Trigger flows, initiate alerts, notify the right on-call agent or group about a new ticket in Freshdesk, and assign the ticket to a responder. |
New App triggers
Our workflows are built using triggers and steps and we also release these for usage in your workflows. That means you can take advantage of new App triggers for Sematext Alerts & Freshdesk Alerts to build your own custom signal handlers in xMatters.
Upgraded Slack permissions
Earlier this year, we updated our Slack endpoint and Flow Designer steps to use Slack's new permissions model. Since then, we've also updated the xMatters App for Slack to use the most up-to-date and recommended permissions.
ServiceNow Rome certification
The latest version of the xMatters Actionable IT Alerts for ServiceNow is certified for Orlando, Paris, Quebec, and now Rome!
Usability improvements
Flow Designer may be the premier low-code automation tool for digital service reliability, but that doesn't stop us from looking for ways to make it better for users. In this release, we made it possible to dynamically define response redirects using flow variables, reorder and add descriptions to your step outputs, customize the icons for your workflows and add documentation links, and made it easier to read long step names in the palette.
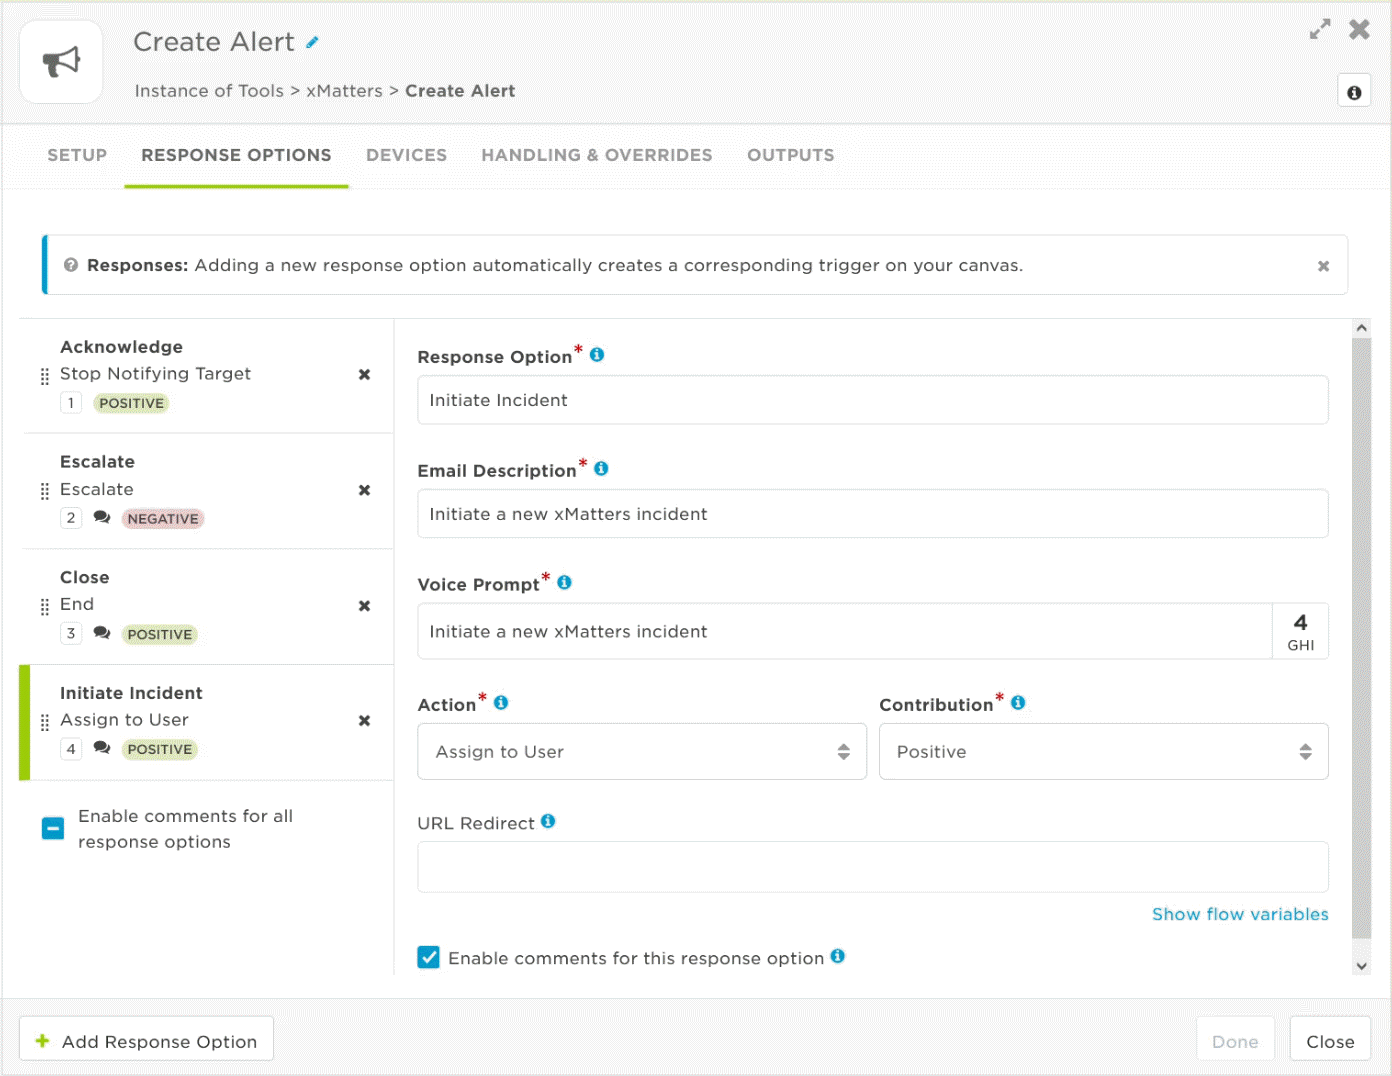
Create dynamic response redirects
Response options in the Create Alert step now support constants and variables from previous flow steps — so you can dynamically build URL redirects based on information in your flow!
Click 'Show flow variables' to open a side panel with the constants and variables you can drag into the URL Redirect field (once you're done, click 'Hide flow variables' to close the side panel):
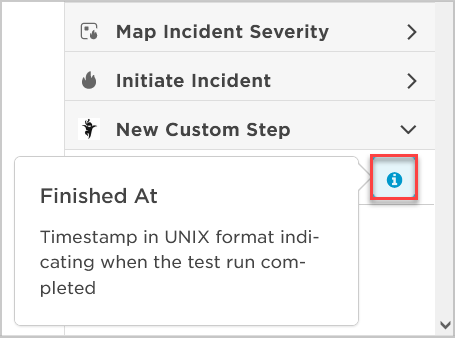
Reorder & add descriptions to step outputs
Wish you could reorder the outputs of your custom steps and custom triggers to bring the most important ones to the top of the list? Now, regardless of the order you created them in, you can drag outputs to any position in the list:
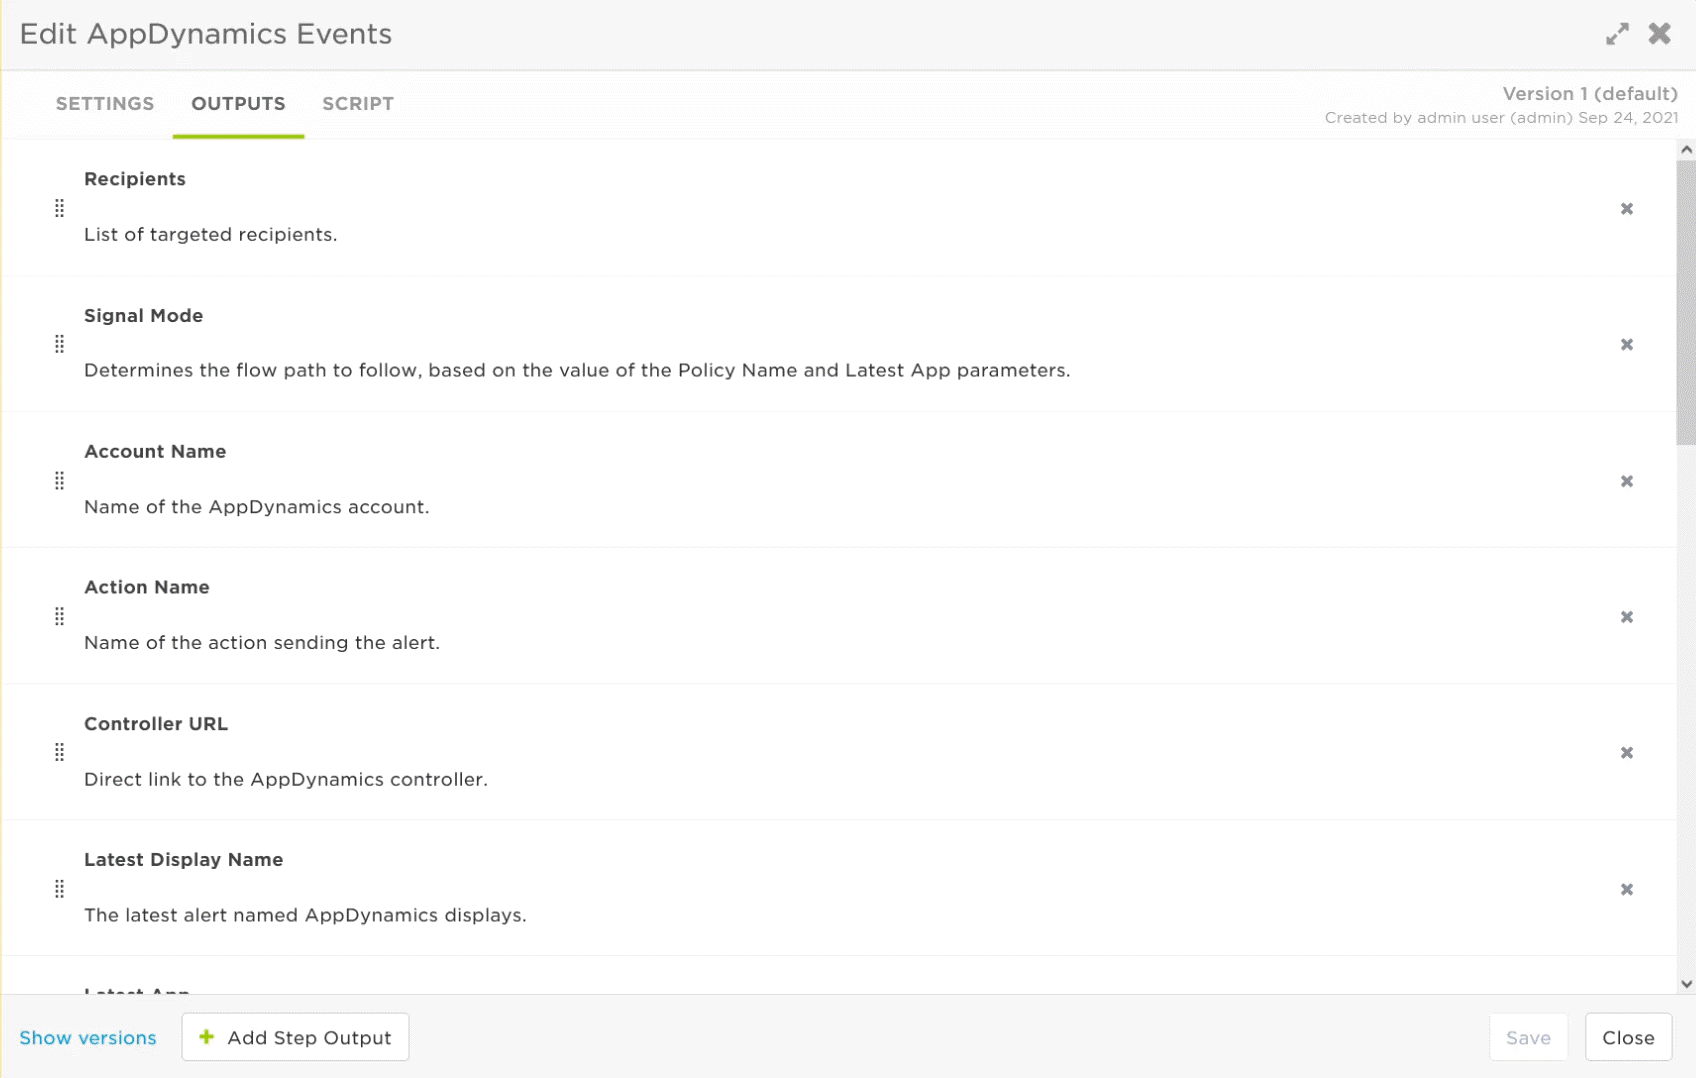
Also, when you design a custom step (or when you make a copy of a built-in step), you can add or edit the descriptions for its outputs:
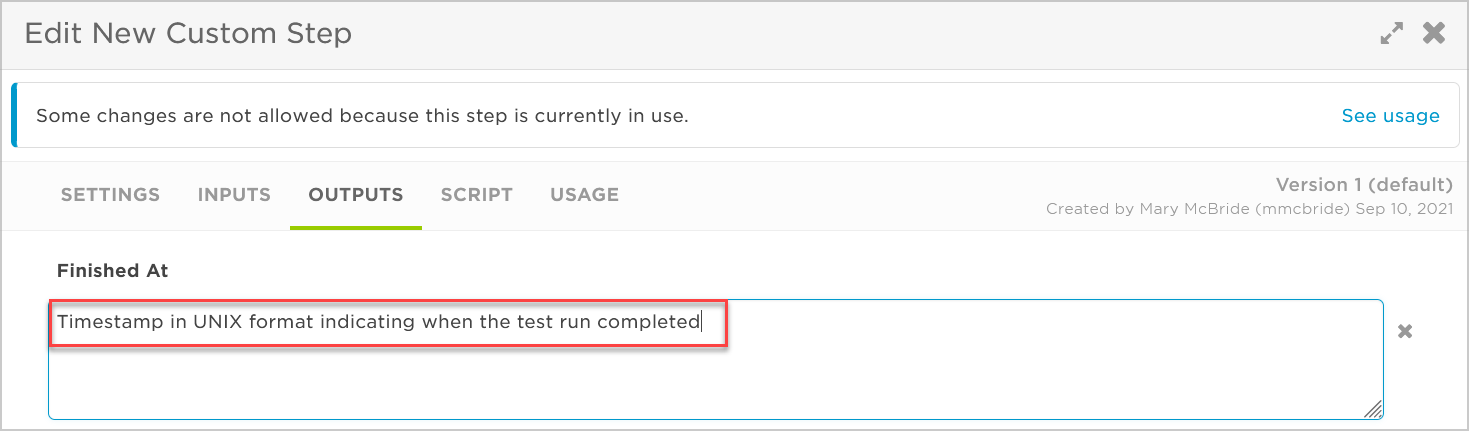
This can help anyone using your step understand what information the output provides and why they might want to use it in their downstream steps:
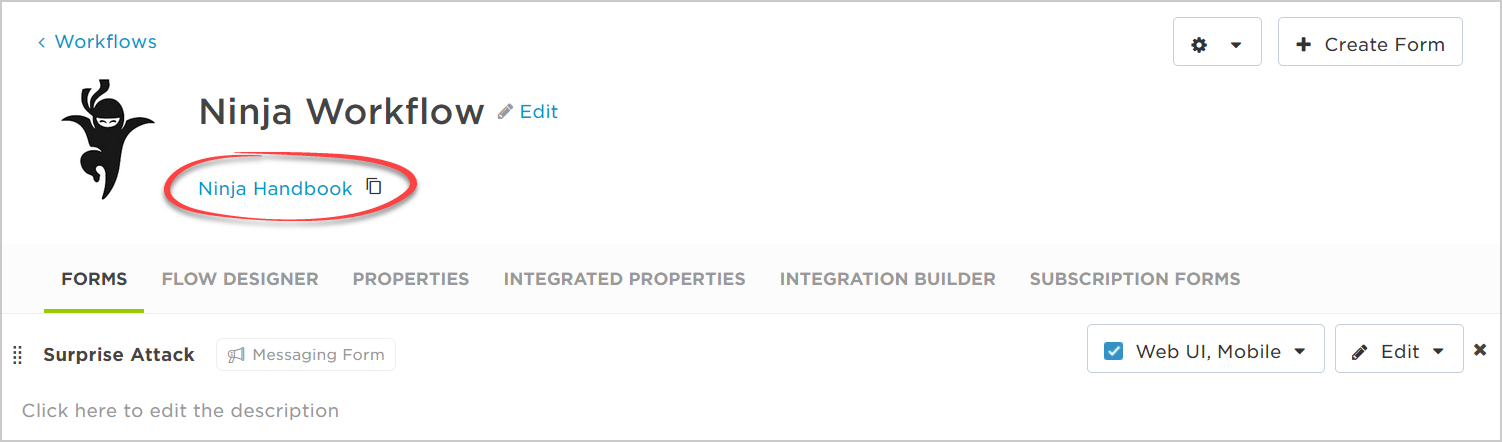
Customize your workflow's icon & documentation link
Want to make your workflows easier to find and use? When you edit any of your existing workflows — or add a new custom workflow — you can upload an image to use as its icon (like the crafty ninja below) and optionally add a link to instructions you've prepared for using the workflow:
![]()
Your custom icon makes it easier to find your workflow in the Workflows list:
![]()
And, any documentation you linked is easily accessible from the top of the workflow (right below its name and description):
Easily view long step names
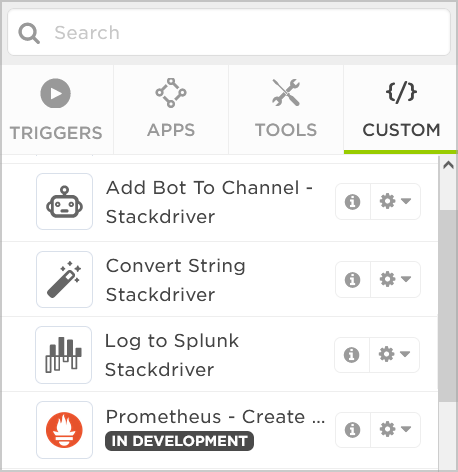
Instead of getting truncated in the palette, long step names now wrap onto a second line! This means you can easily read the full name of most steps without having to hover over them to get a tooltip (an exception to this is when we need to display the status of a step version below the step's name):
xMatters REST API enhancements
We continually enhance our xMatters REST API calls to support new features and functionality, and to replace existing SOAP and older REST methods. These calls not only support customer integration needs, they're also the foundation for data access by our mobile clients, the web user interface, and other key xMatters services. In this release we added new endpoints for creating and managing services — the ideal endpoints to synchronize your CMDB or service catalog into your xMatters instance.
New endpoints
Get services
The GET /services endpoint lets you retrieve a list of the services in your xMatters instance. You can use query parameters to search for services based on keywords in the name or description, or you can search for services by their owner:
GET /servicesGET /services?search=ninja&fields=DESCRIPTIONGET /services?ownedBy=Tecmo
Get a service
To return a single service, you can specify the service's unique identifier:
GET /services/ab1d6091-7d58-41e2-af72-49c69b3d9b65
Create or modify a service
You can use the POST /services endpoint to programmatically create or modify services by specifying or updating a service's name, description, or owner.
Delete a service
Finally, you can use the DELETE /services endpoint to delete a service from your instance by specifying its unique identifier:
DELETE /services/ab1d6091-7d58-41e2-af72-49c69b3d9b65
Updated endpoints
Which services do my groups own?
Our /groups endpoint now includes a list of owned services in the information returned for a group.
Which services are impacted by the incident?
We've also updated the /incidents endpoint to return a list of the services impacted by the incident.
What's next?
Over the next quarter we’ll be making enhancements to some of our existing REST web services. We'll continue to add more endpoints for Incidents that will include both incident the timeline and collaboration channels. We'll be improving text-based searching across many different endpoints to support literal search terms. We're also planning additions to our API calls for users, including filtering by device status, failsafe devices, and more.
You can learn more about the xMatters REST API in our online help.
Reporting
In addition to adding a new Incident Activity widget for monitoring incidents by services from Communication Center dashboards, we've continued our drive to consolidate and improve the usability of alert reporting in xMatters.
Rename 'events' to 'alerts'
We've been teasing this for a while now, but we're making the move in Ninja to change the way we talk about events and alerts. To sum it up, what was previously referred to as an 'event' in xMatters, well... wasn't really an event. So we're making the necessary corrections, and starting to use the term 'alert' to refer to the way xMatters responds to incoming signals or any other time notifications are required. For a full overview of what's changing in this release, see Alert! Alert! Read all about it!
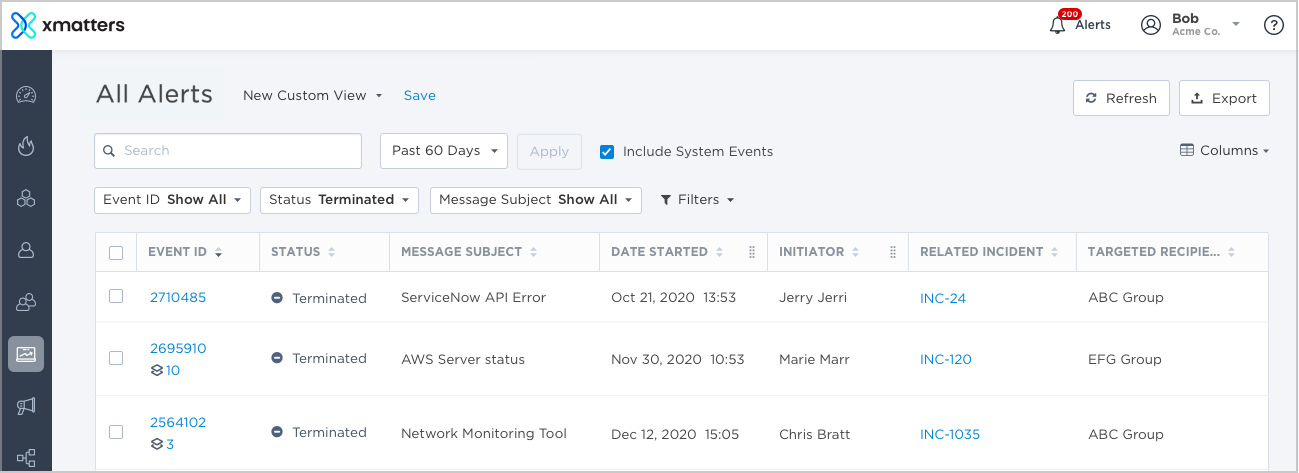
Unified alerts reporting
In our Missile Command release, we announced that we'd started work to consolidate the Recent Events and All Events reports into a single interface (the Alerts report), with a goal of making it easier to manage alerts and troubleshoot signal-to-notification workflows in your system:
We continued that work this release, by adding some of your favorite functionality to the unified alerts report:
- Filter by notification stream: View alert data for users targeted directly by a notification vs by subscription.
- See responses associated with comments: Comments in the report now include their associated response choice, if applicable.
- Track response fill counts: Monitor whether the required number of responses are met.
- Access attachments: Download any attachments included in the alert.
- Stay up to date: The Overview tab automatically refreshes while an alert is active.
And, we add a couple of new enhancements by popular demand:
- Get context on the notification escalation path: See how users were notified (e.g., targeted directly, as a member of a group or subgroup, or by subscription) on the User Delivery tab and 'Who Was On Call' info card.
- View detailed alert information: Diagnose if things didn't play out as expected by viewing site recipients, handling, and device filter input properties.
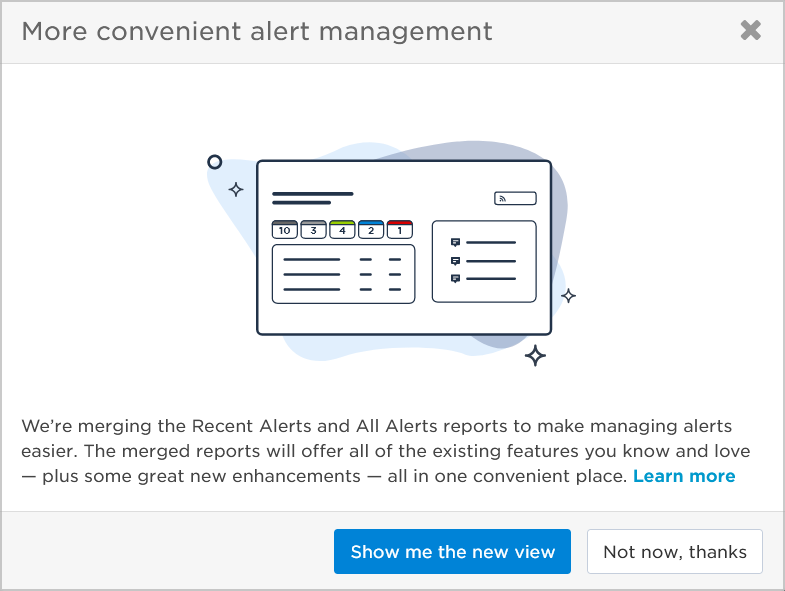
Yes, you can opt out (for now)
We get it — big changes can take a little while to get used to. You can start using the new unified report now if you're ready or opt to continue using the previous report for the next few months while we fully transition over. You'll see the following notice in the web user interface about the change, and you'll be able to switch back and forth between the old and new views as often as you like while they're both still available:
Enhanced Alerts list
While we're focused on improving the usability of our alert reporting, we've also got a lot of great design improvements lined up for the Alerts list. For this release, these include:
- A more modern layout: Multi-select filters and columns selector you're used to in other areas of the product.
- Suppressed alert handling: Reduced noise by collapsing suppressed alerts beneath the parent alert (indicated by the 'stacked icon').
- Custom views: Save your current view of the report to quickly load it again or use on your dashboard.
And, that's just the start! You can expect to see more great updates over upcoming releases.
User experience
User experience is a major theme for many features in our quarterly releases, and this release is no exception. In this section, we'll review major improvements we've made for adding custom user information to xMatters, and for updating users' logins and password credentials.
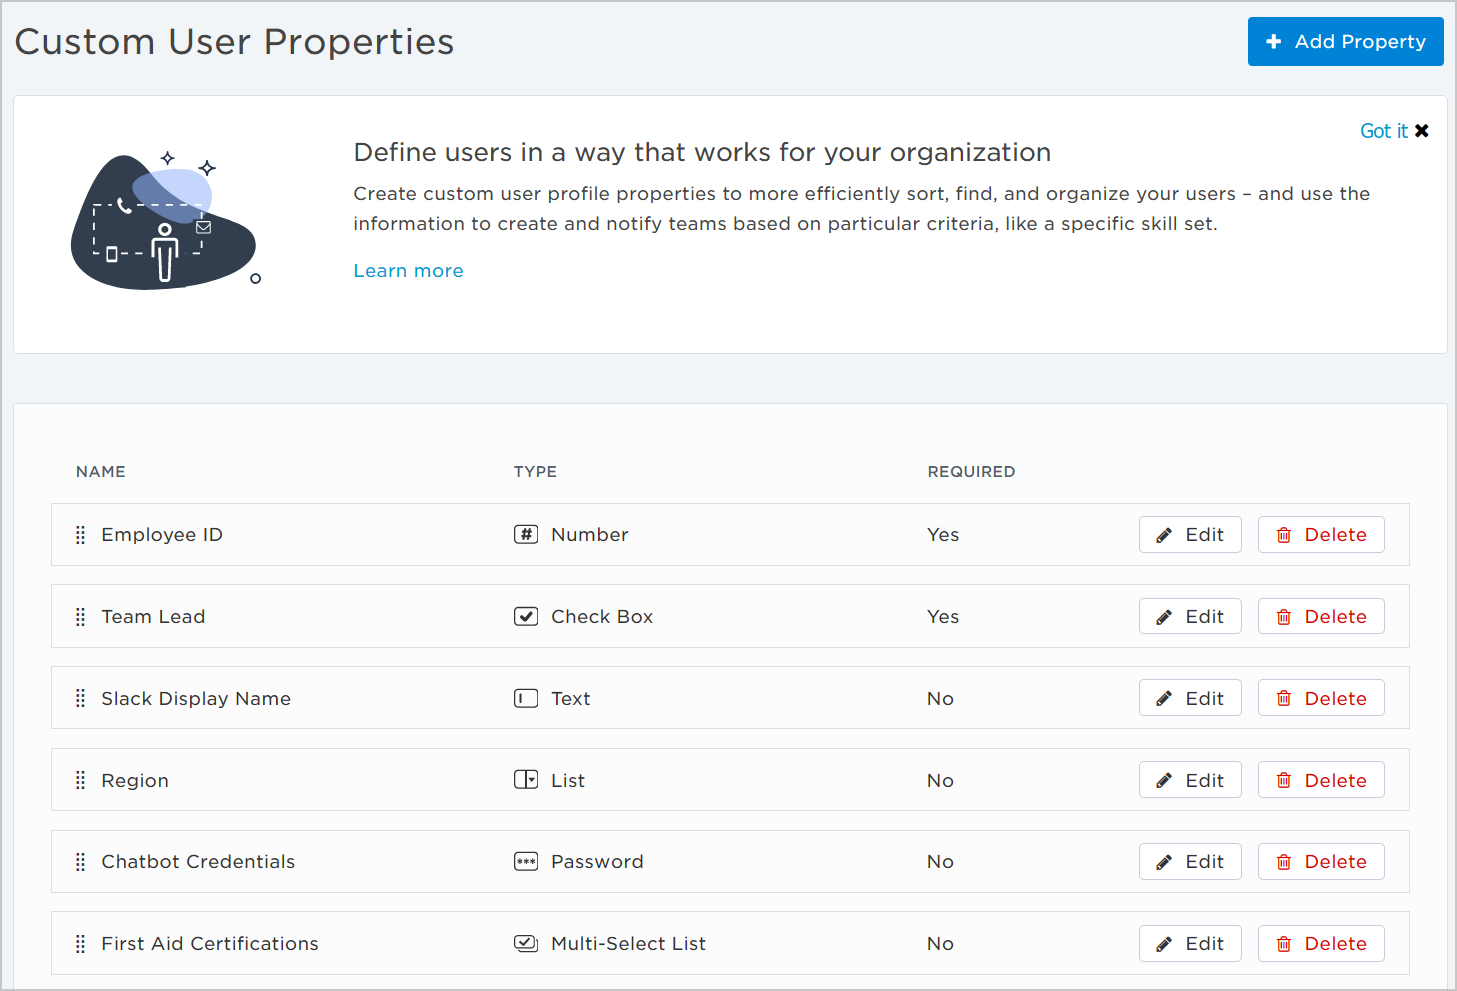
Custom user properties
Adding custom user information to xMatters is super helpful because it lets you more efficiently sort, find, and organize your users — as well as dynamically notify people based on particular criteria.
Previously, you'd need to add custom user data to xMatters using 'custom fields' or 'custom attributes', which were configured in different places in the web user interface. We've now consolidated these two elements as Custom User Properties, which you can configure from one newly designed and easy-to-use interface:
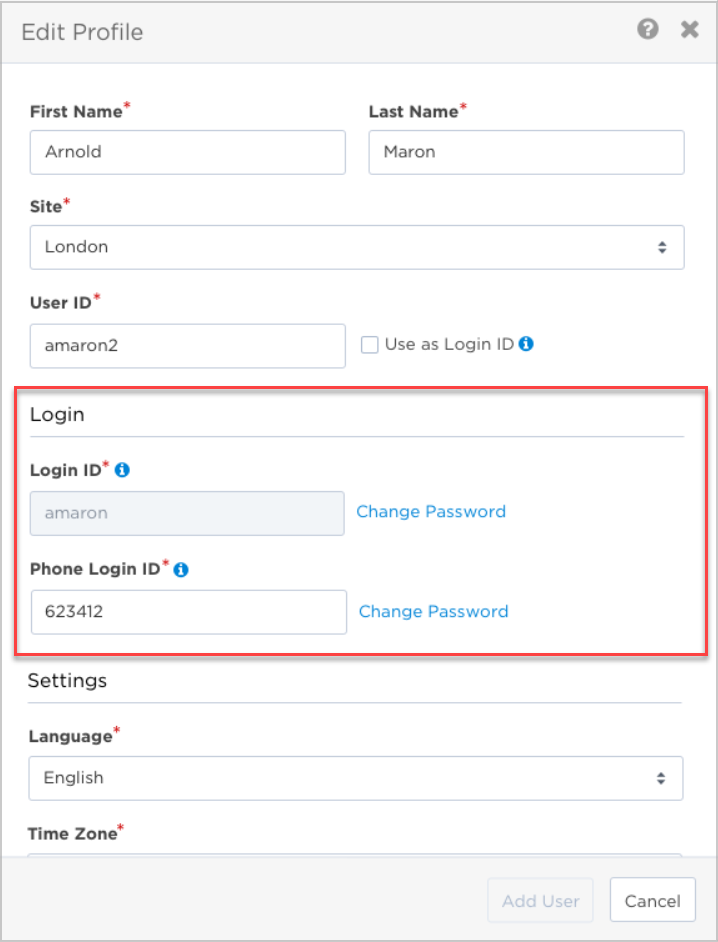
User profile: Redesigned change login & password
In our Lunar Lander release, we updated the overall design of our user profiles, and since then we've been steadily improving the usability of individual components. This release, we're updating the design of our change password screens and making them more easily accessible.
You'll soon be able to change your passwords while you're editing your user profile. We've updated the labeling and added tooltips to make it clearer that your 'Phone Login ID' is used to dial into xMatters to retrieve alerts, while you use the same 'Web / App Login ID' for the web user interface and the xMatters mobile app:
Other product updates
As with every release, we always find a way to pack in a few extra features for our customers. We think you'll find these useful:
Custom Links widget
Do you have training materials, runbooks, or other resources you'd like to make available to your teams as they're using xMatters? We've added a new Custom Links widget to the Communication Center that you can use to add curated lists of web links to your dashboards:
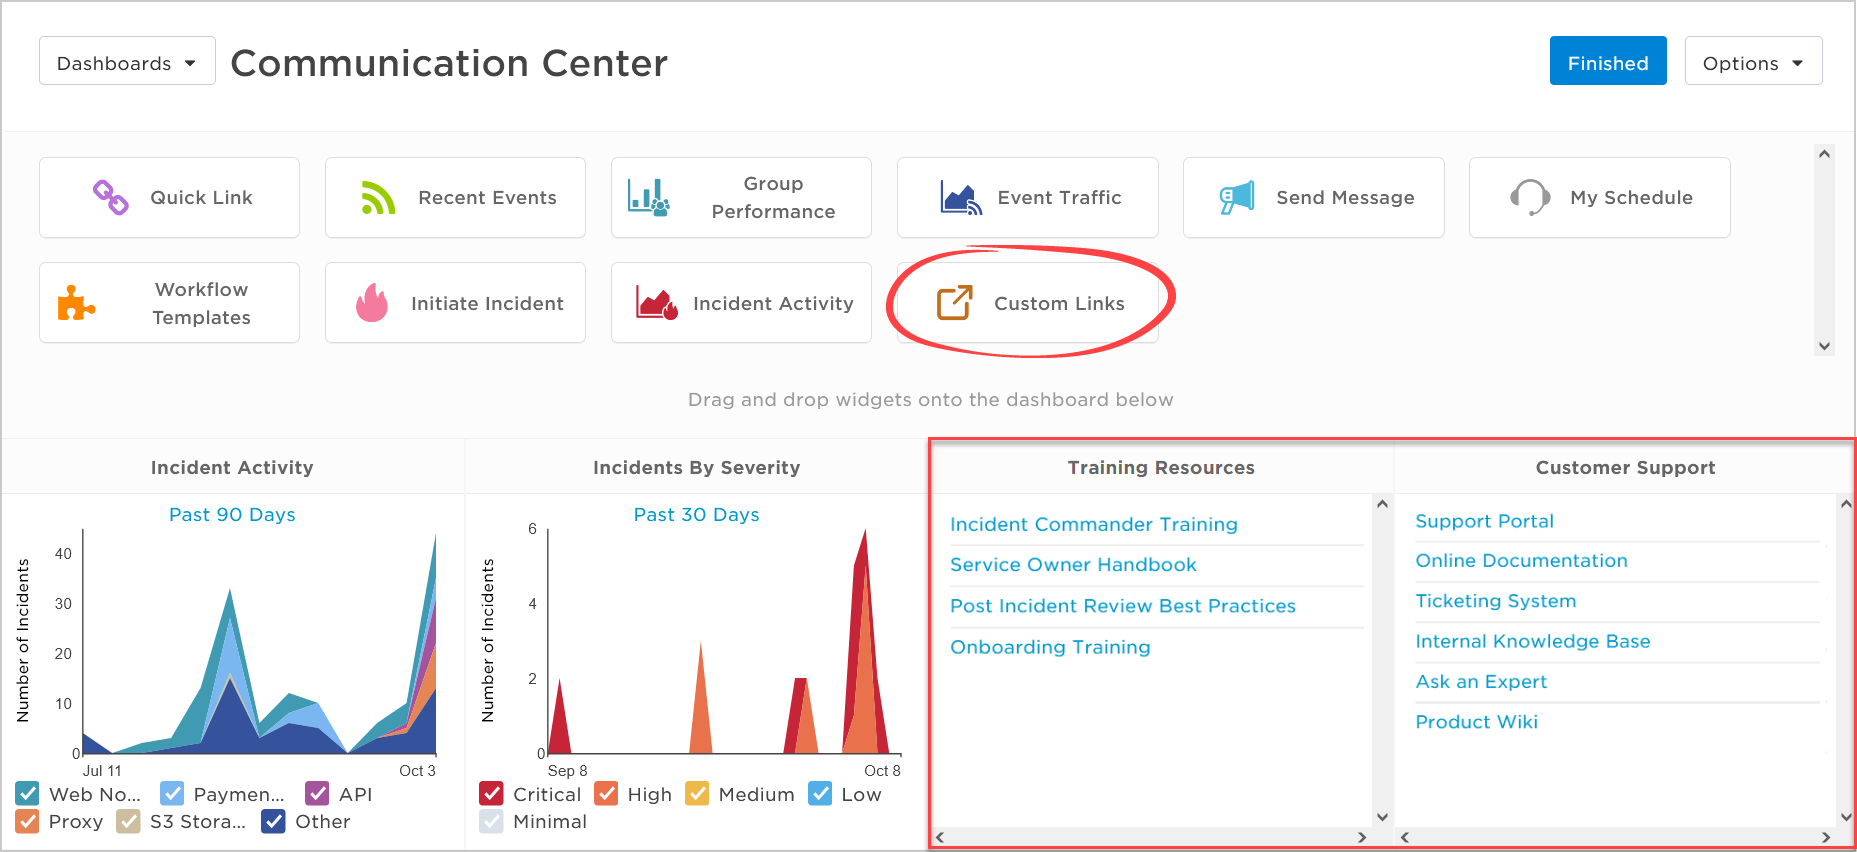
Each widget supports up to 10 custom links, and you can add multiple widgets to any dashboard. When a user clicks a link, the corresponding website opens in a new browser window.
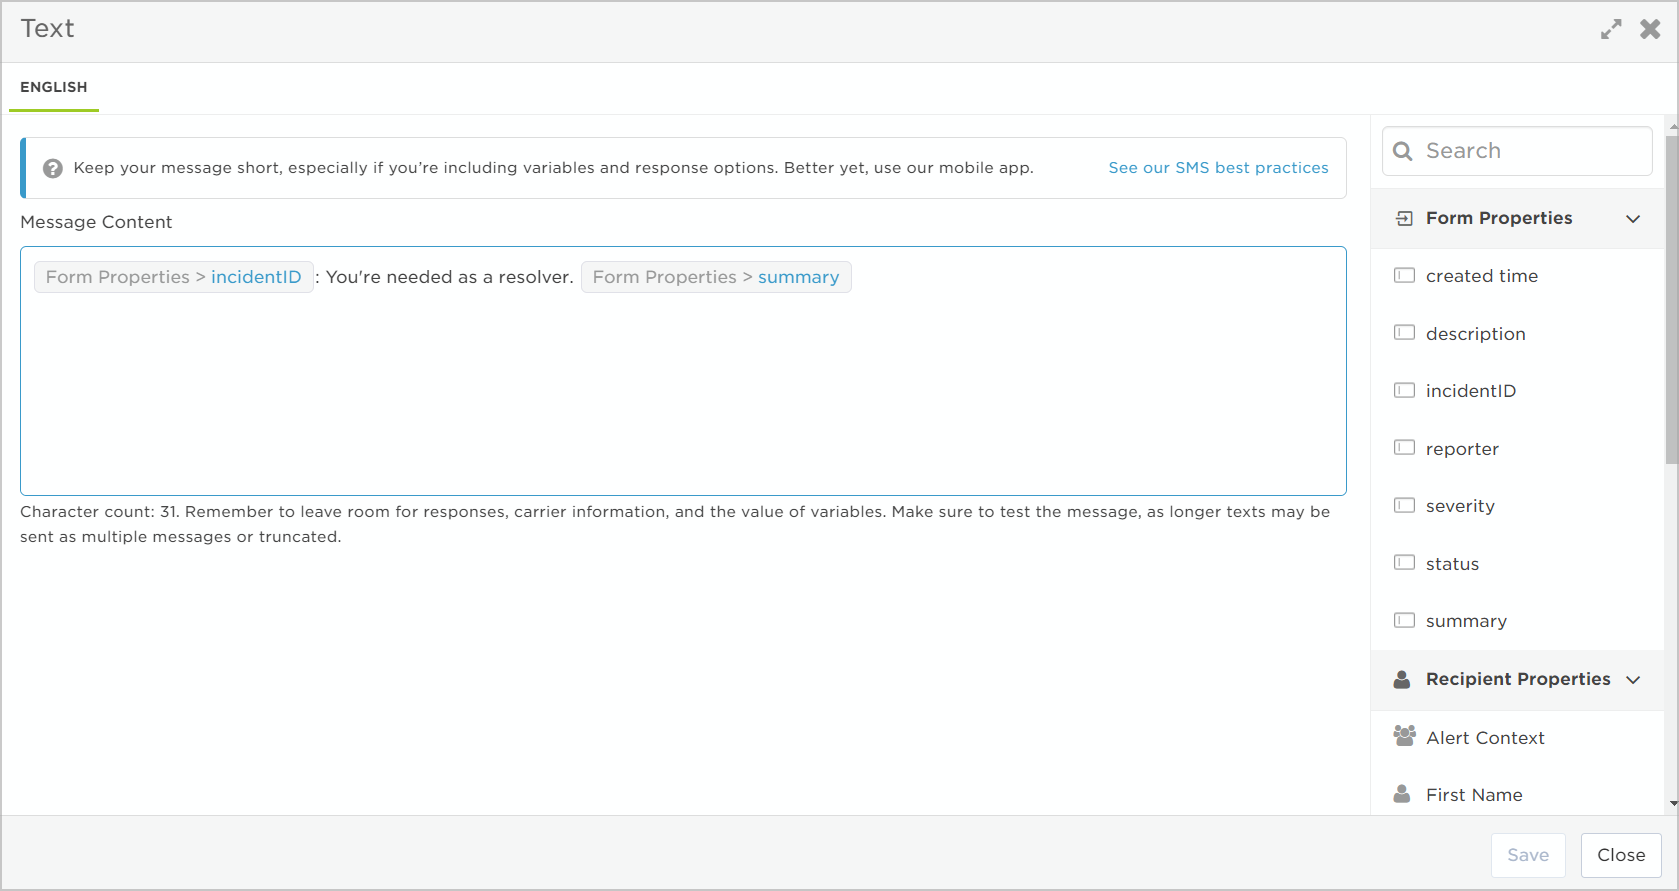
Build better text messages
The next time you compose an SMS message for a messaging form, you'll notice that we've given the text editor a facelift! In addition to improved styling, you'll now see tips about SMS best practices and helpful warning messages when your content gets too long:
More stakeholder user license enhancements (Base & Advanced plans)
In our last release, we added support to the web user interface for defining and viewing which users have Stakeholder and Full User license types:
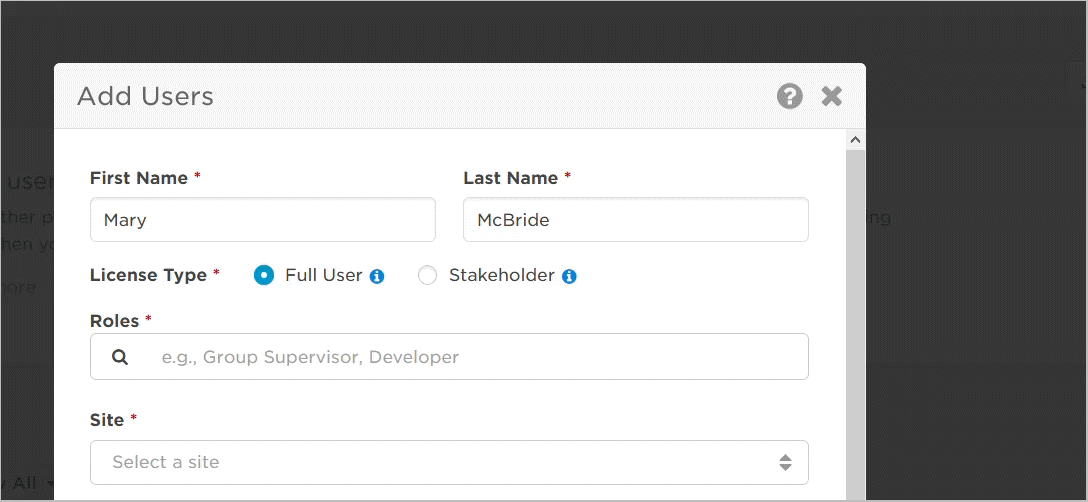
As of this release, it's now easier for Company Supervisors to see exactly how many user license types are assigned and the total number available. This information is displayed on the General Settings page for your company:

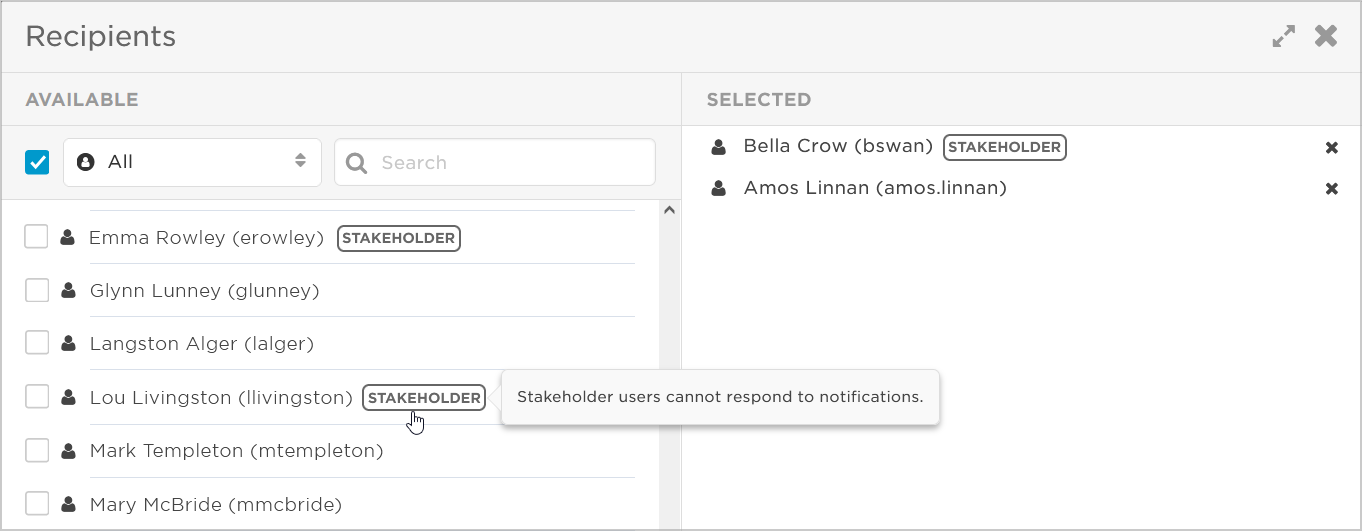
We've also added labels and messaging to our recipient selectors in the web user interface and mobile apps to let you know if you've selected users that won't be able to respond, or to prevent you from adding Stakeholder users as incident resolvers:
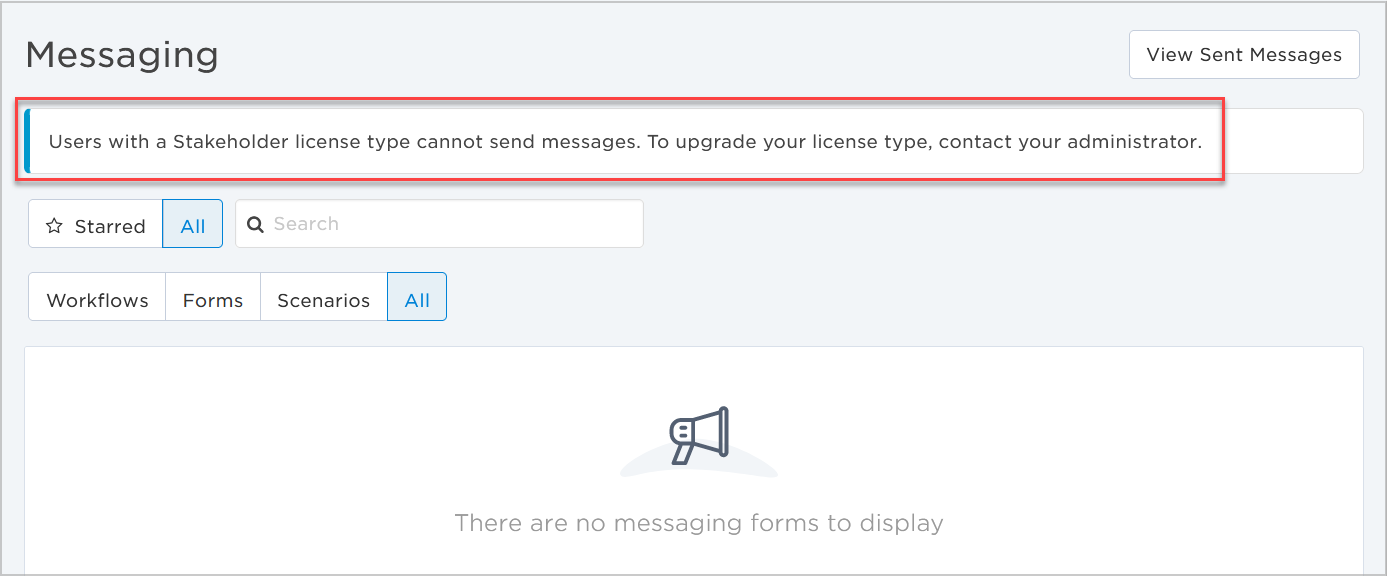
Finally, we've restricted Stakeholder users' abilities to send messages or trigger flows, and added messaging to let them know that if they require this functionality, they should contact their administrator for a license upgrade:
Mobile app updates
For this release, we've enhanced our mobile platform with features to support Mobile Device Management and Stakeholder user license types.
Select hostname on login screen (MDM)
Companies using Mobile Device Management (MDM) will now be able to automatically push the hostname URLs of their instances to the mobile app. This is helpful for onboarding employees when rolling out the app, since they can easily select their company's hostname (or hostnames) from a pre-populated list on the login screen:
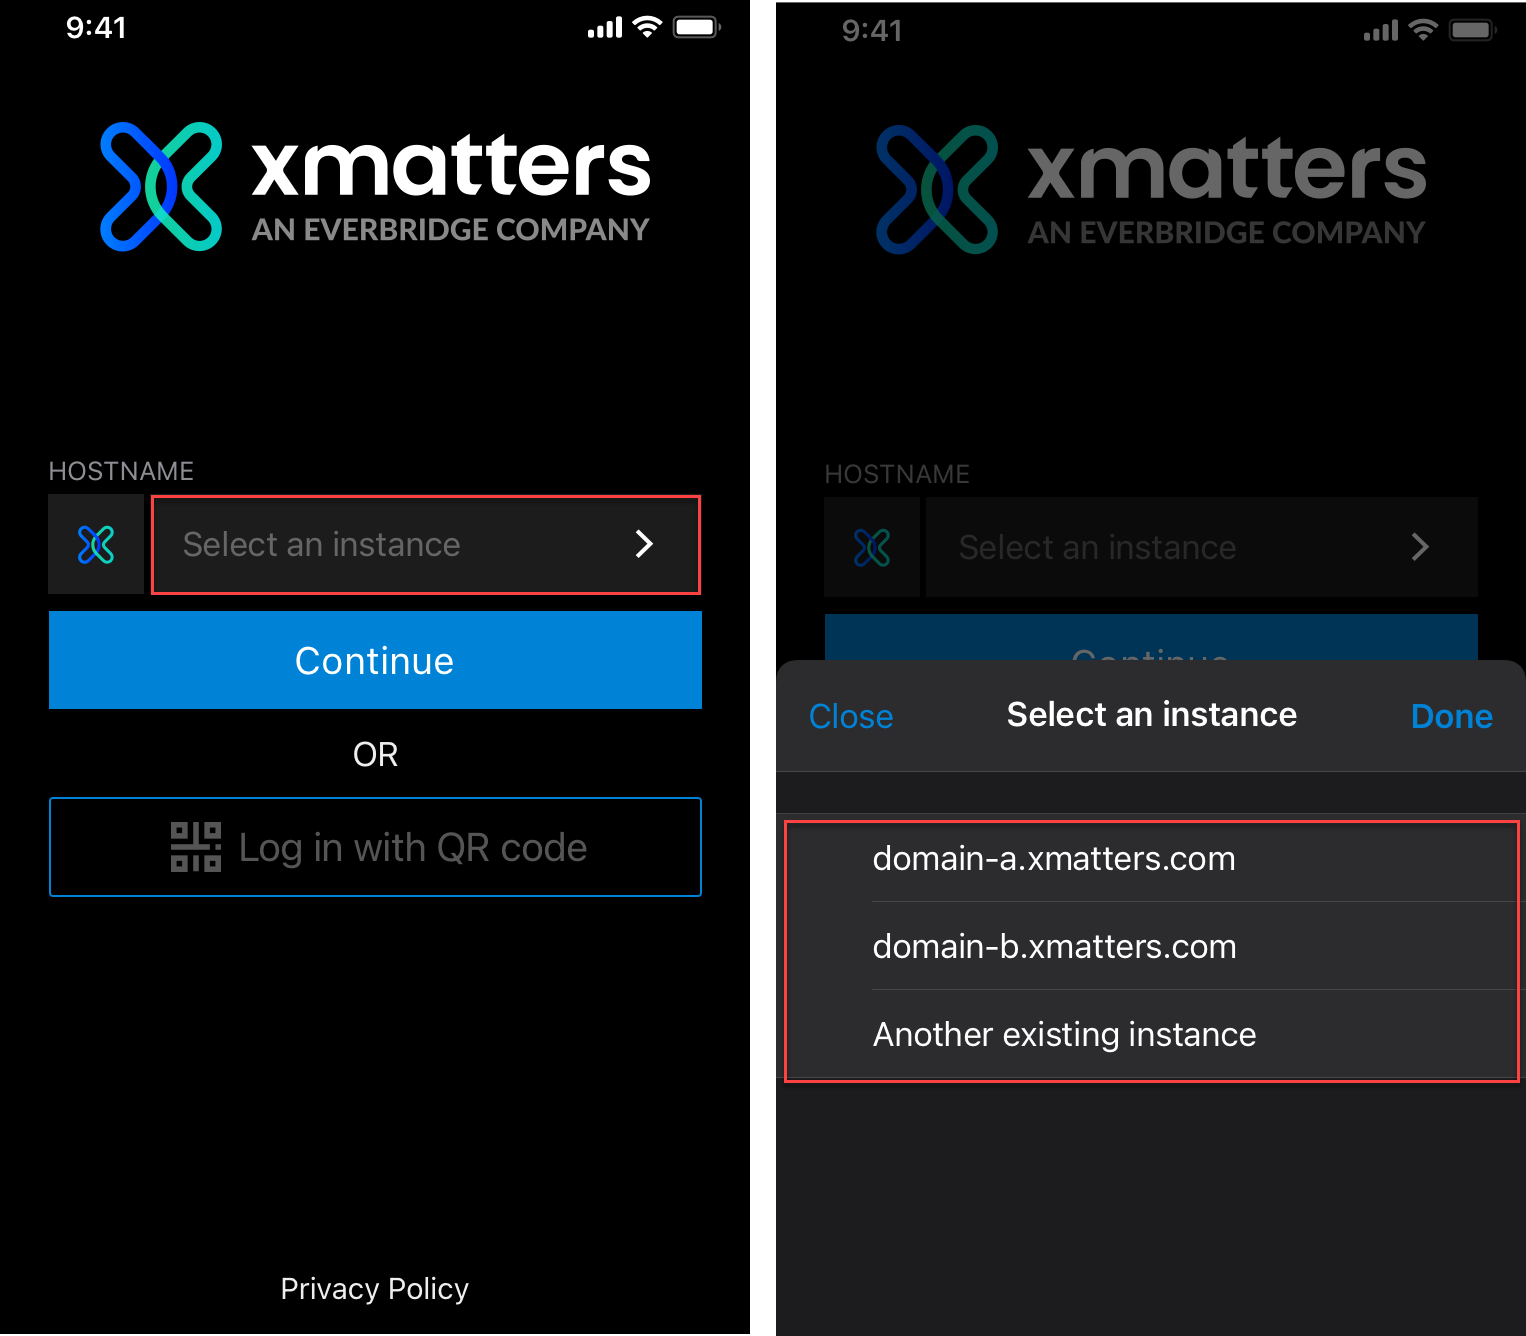
For more information about connecting the xMatters mobile app to your MDM system, see Mobile Device Management for xMatters Mobile Apps.
Mobile support for Stakeholder user licenses
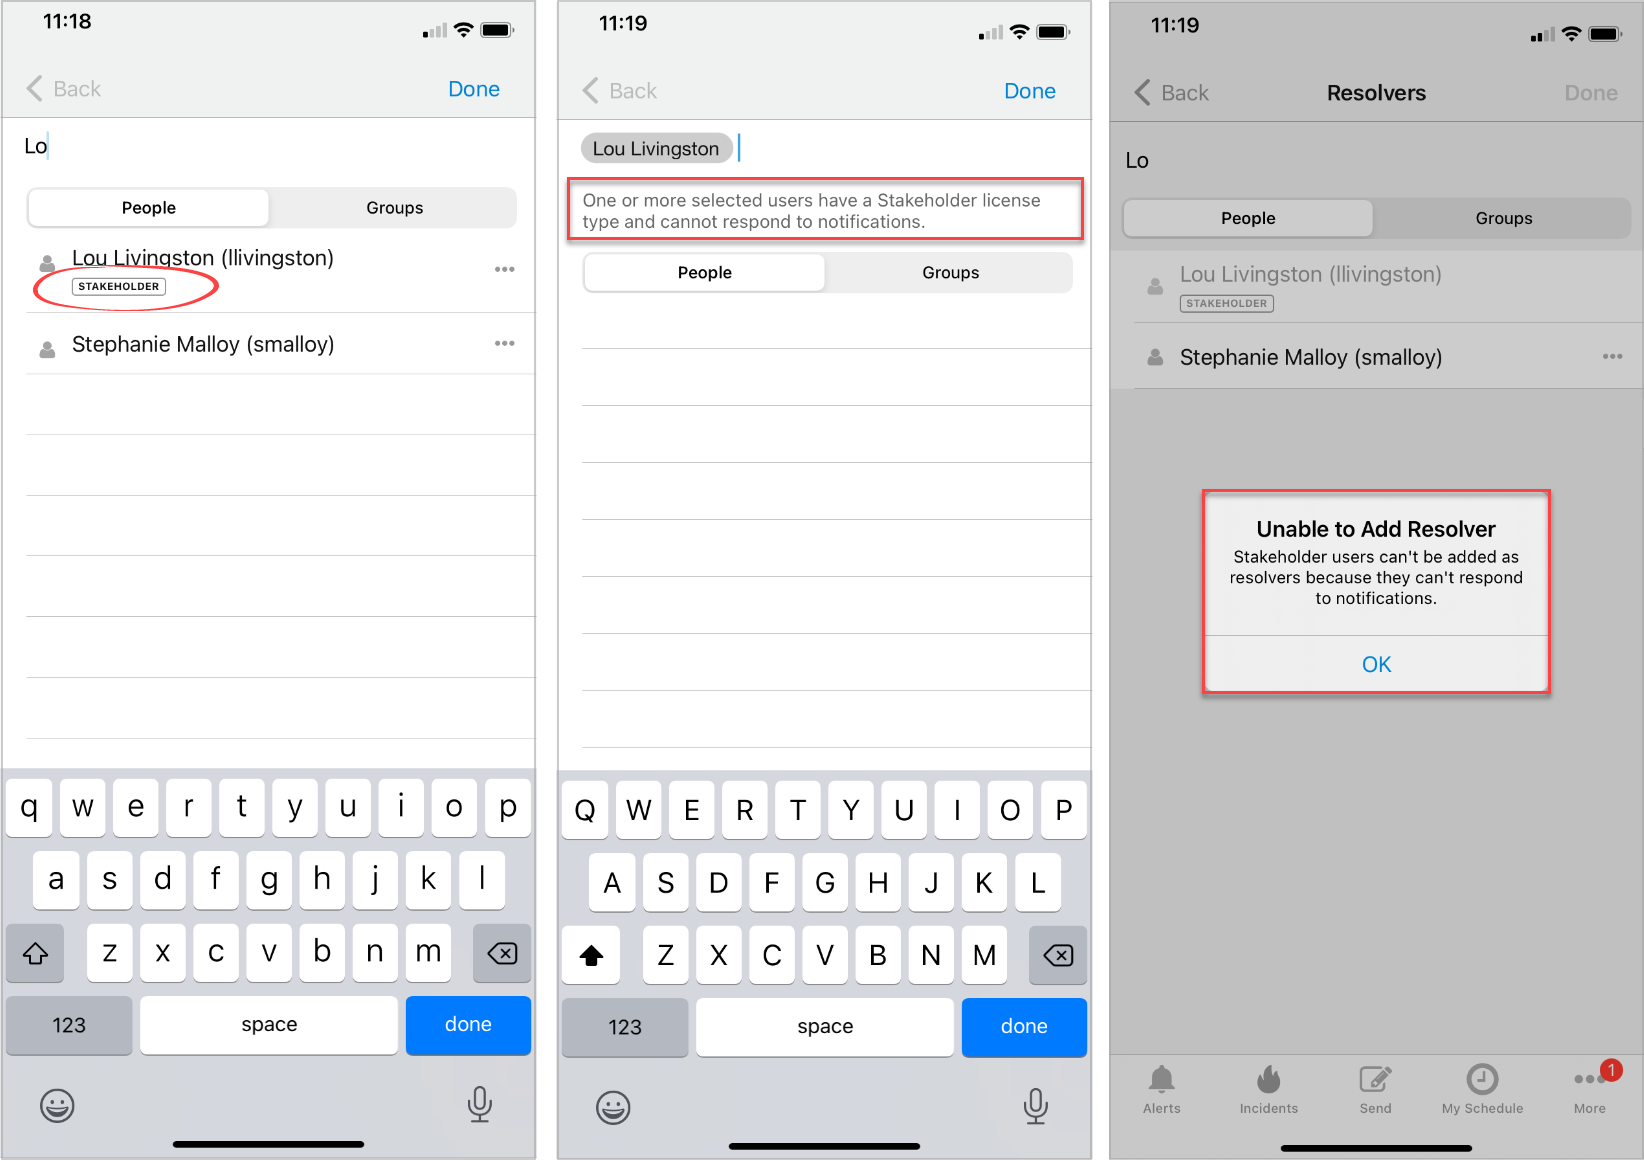
Stakeholder user license enhancements that we made for the web user interface also extend to our mobile apps. Recipient selectors in the app will let you know if you've selected Stakeholder users that can't respond, and you won't be able to add users with a Stakeholder license as incident resolvers:
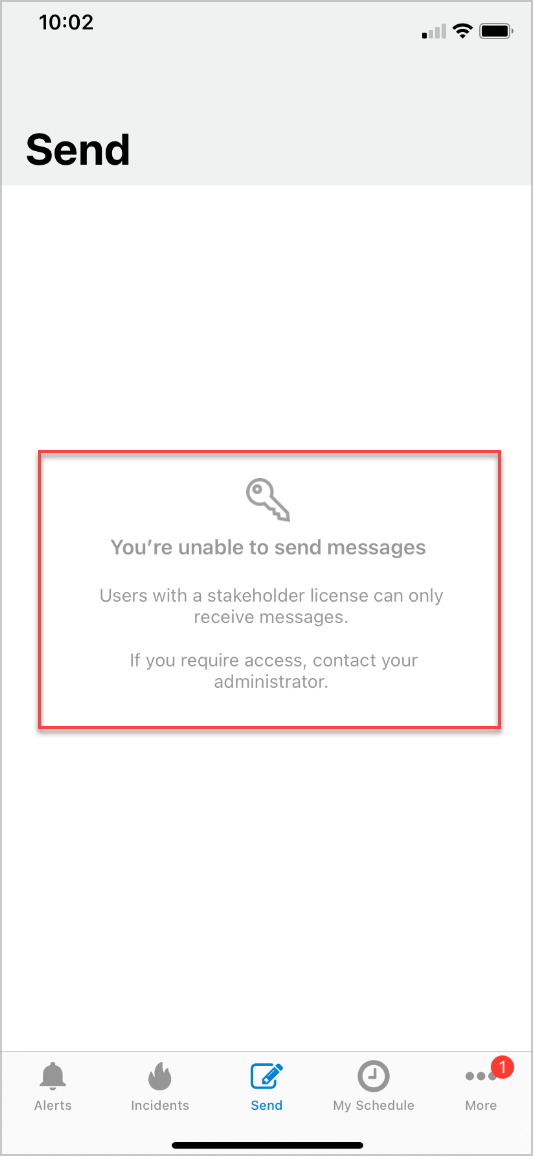
Also, users with a Stakeholder license won't be able to send messages from the app, and we'll let them know why:
Early Access Program & feature delivery update
The goal of our current delivery model is to balance feature delivery with customer change management processes. This means providing visibility into upcoming changes for customers that want it, while allowing other customers to have a more standard non-production environment that matches production.
If you aren't familiar with the current model, we release features only visible to admins/developers at a faster pace than the quarterly release process. These features should not impact end users until a customer provisions them into their workflow. Customers can opt their non-production environments into the Early Access Program to see features and functionality enhancements that impact end users before they're released on a quarterly basis. All customer non-production environments are updated two weeks prior to official quarterly production release to allow for testing and training on new features.
We regularly reevaluate and improve our deployment processes to ensure they reflect industry best practices and customer feedback. For more information about our deployment process, see our On-Demand Deployment Process and Early Access article. We'll update that document whenever we make a change, and let you know about the change through other appropriate channels.
Learn more
These are the main features for this release but be aware that there are several other small changes and enhancements we're delivering to keep xMatters looking sharp. Detailed information and instructions for using these new features will be available in our online documentation.
We hope you enjoy this release! See you next time...
Comments
1 commentArticle is closed for comments.
The Ninja release is now available in production environments.