The information in this article is the intellectual property of xMatters and is intended only for use with xMatters products by xMatters customers and their employees. Further, this intellectual property is proprietary and must not be reused or resold.
Look out, cardboard cut-out gangsters! The safety's off on this light gun, and I'm ready to take you out of the lineup! Yes, we're celebrating this release with the shoot-don't-shoot classic, Hogan's Alley. In case you were wondering, Hogan's Alley was once a shooting range for the Special Police at Camp Perry, and it's now a small simulated city - laundromat, post-office, bar, and all - at the FBI training academy in Quantico, Virginia.
Meanwhile, our Hogan's Alley lineup features our new navigation design that expands the available screen space to display reporting enhancements, and new incident response features to help you get the right people on the job as quickly as possible. It also includes great additions to Flow Designer and our integration platform, like the ability to merge flow paths, share libraries globally across workflows, and new API authentication management capabilities for service teams.
Before you dive in to learn about all the improvements, here are some important dates:
- Non-production environment access: Tuesday, February 18
- Production environment access: Tuesday, March 3 (enabled between 10:00-10:30am Pacific)
Hogan's Alley Training Webinars
For a guided Hogan's Alley tour, including tips and tricks - sign up for one of our webinars
Future feature release
As a special bonus, we'll also give you a sneak peek at a future enhancement that we'll be releasing soon:
- Event traffic widget - dashboard visibility into your system's event activity patterns.
Our Community shrinks images for convenience but allows you to click on them for a closer look. See an image or animated GIF you like? Click it.
Jump ahead
In a hurry? Here's an overview of this doc if you want to skip ahead to something awesome:
- Enhanced Navigation Experience
- Incident Response
- Integrations and Orchestration
- Reporting and Analytics
- Mobile
- Other Product Updates
- Early Access Program & Feature Delivery Update
Enhanced navigation experience
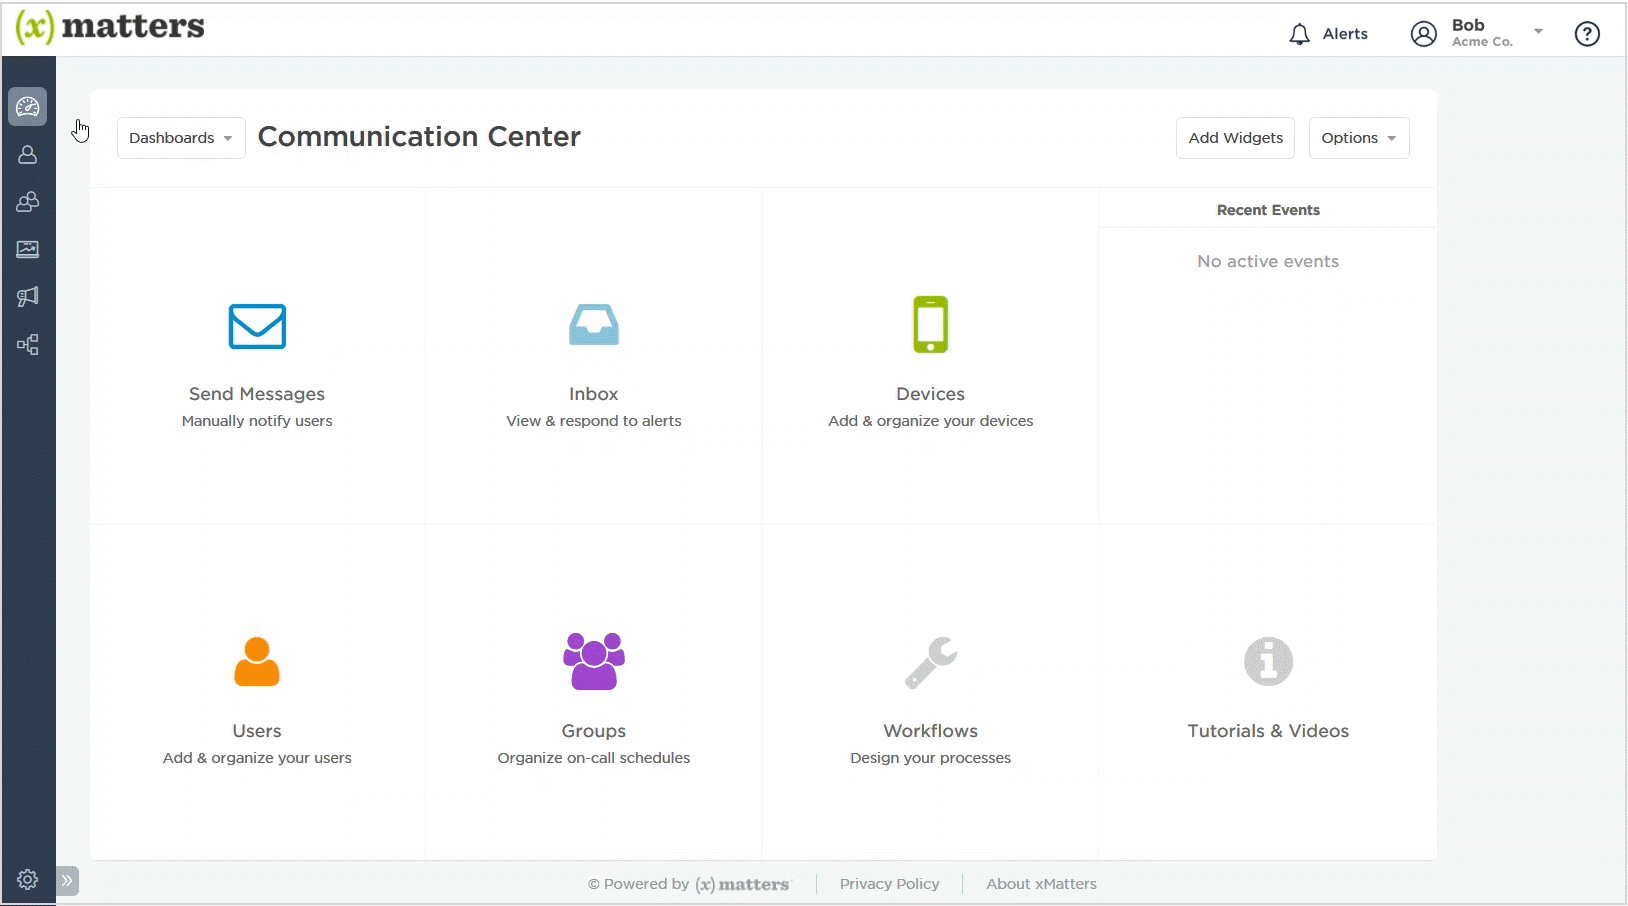
Welcome to a new xMatters! The biggest thing you'll notice about this release is that we've rolled out an improved navigation experience for our web application:

Left sidebar navigation
We've moved the main navigation to a collapsible menu on the left side of the screen. In its most streamlined view, the menu displays icons for the main areas of the product. You can move your pointer over the icons to view their labels, or if you'd prefer you can opt to expand the menu to include labels:
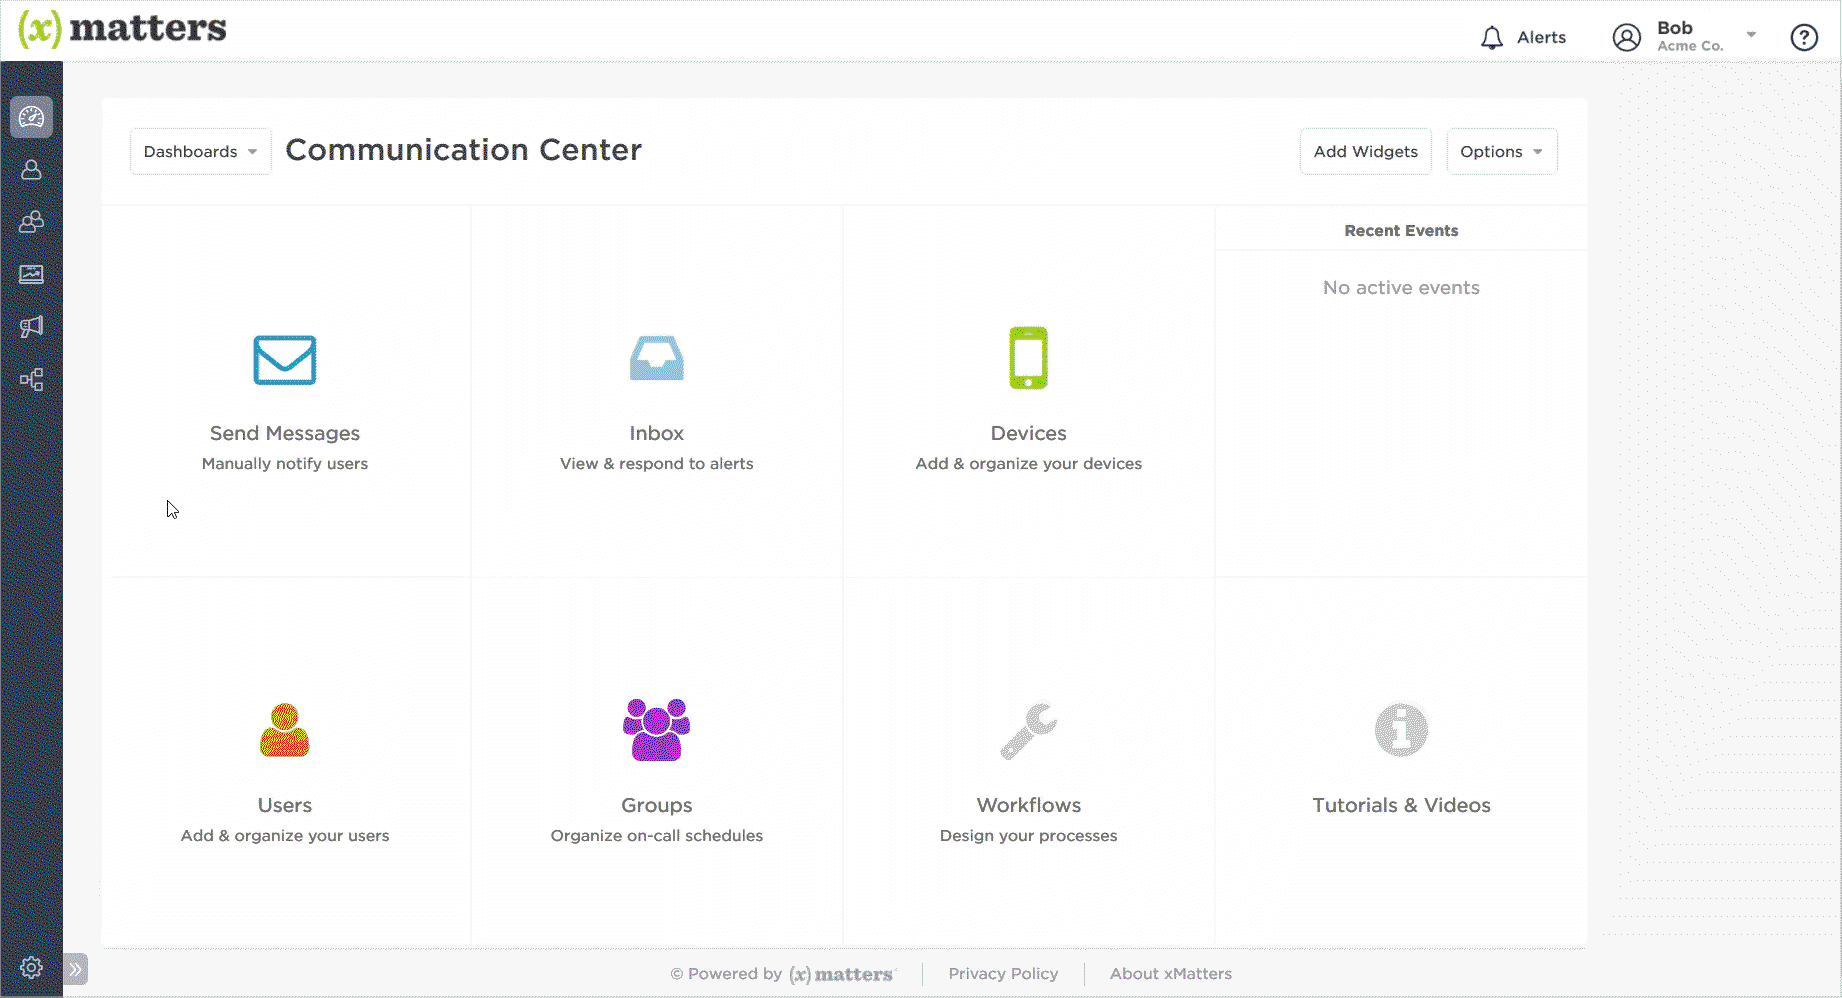
More screen real estate
The main benefit of the new navigation design - besides its slick new look and feel - is that it frees up a lot of extra screen space, giving you more room to work with your data. With all the new data columns that we've been adding to the All Events report (and some other updates we're working on in other areas of the product), we think you're going to appreciate the extra elbow room!
Getting around
To view the contents of a menu item, just click on it. You can then click on an item in the list to be redirected, or you can click the 'x' icon to remain on the current screen:
Admin controls
If you have administrative privileges in xMatters, you'll notice the Admin settings are now located under the gear icon at the bottom of the sidebar menu. This separates these settings from the other parts of the menu that you're more likely to use on a day-to-day basis.
Active alert badges
For easy access to your Inbox, we've added an Alerts notice to the top right corner of the screen, next to the user drop-down menu. A handy badge counter lets you see at a glance if new alerts have come in, or if others are resolved:
![]()
Note: You'll see the new 'Alerts' link to your Inbox as part of the initial roll-out of the Hogan's Alley release. We'll be releasing the badge counter functionality for your active alerts later in March.
Incident response
One of the most important parts of effective incident management is efficient incident response - in particular, being sure that you get the right responders on the job as quickly as possible. In this release, we've added several new features to our incident management arsenal that help you do this. Your recipients will have clearer context about which aspect of their expertise is required for a particular incident so they're ready to hit the ground running.
Recipient selector
We've redesigned our recipient selector for message and subscription forms to make it waaay easier to search for and select multiple related recipients at the same time:
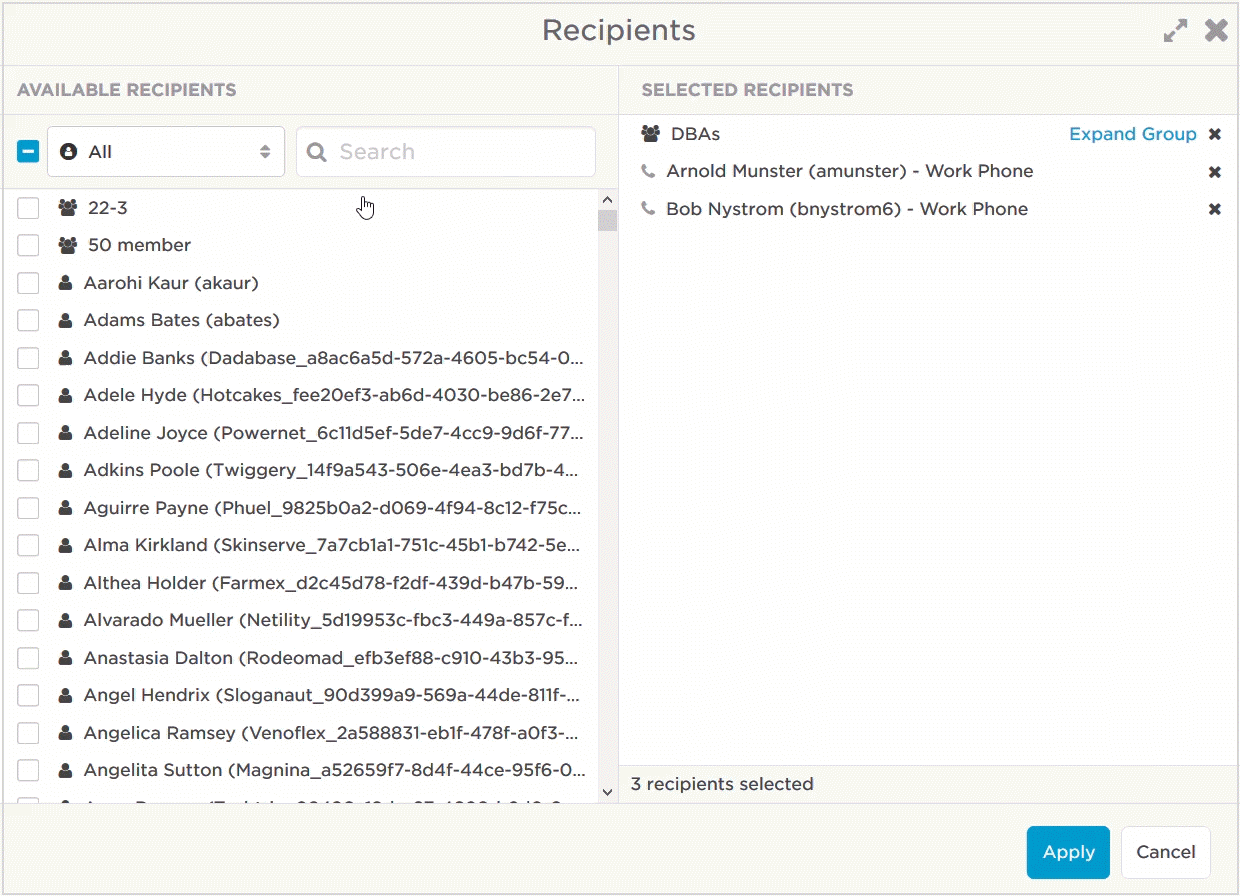
Like our previous recipient selector, you can filter by the type of recipient you want to search for, including All, Users, Groups, and Dynamic Teams:
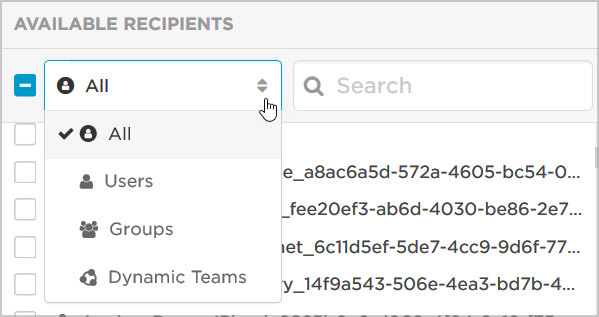
You'll notice that when you select 'Users' from the available recipients drop-down, you now have a separate option to search for Devices:
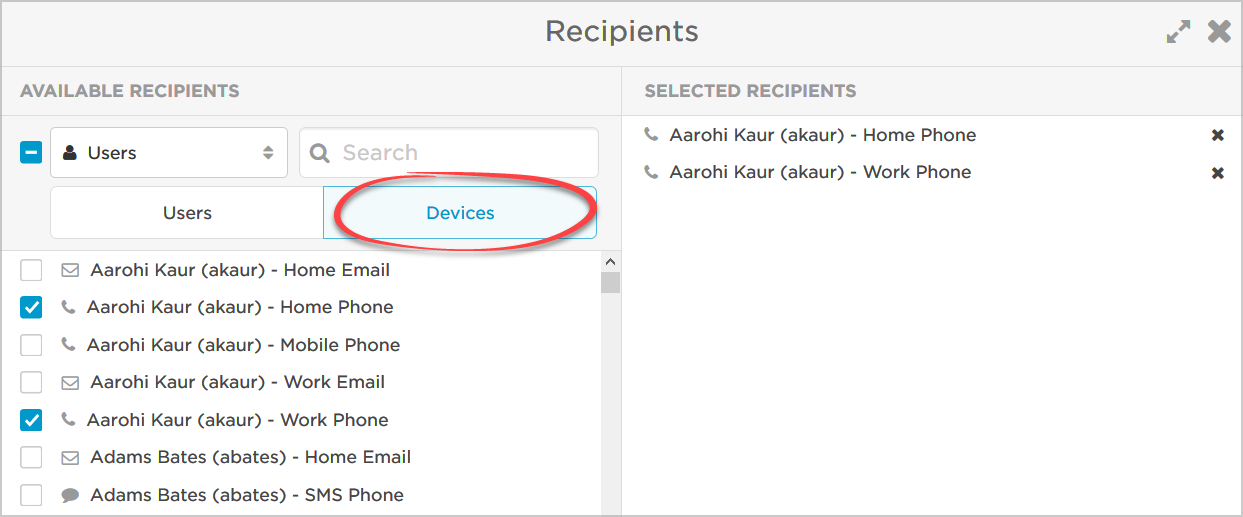
Separating users and devices prevents you from unintentionally selecting a user's device - like their home phone - as a recipient, instead of their username (which is what you'd want to do the majority of the time so that xMatters contacts them according to their configured device preferences - like order, delays, and timeframes).
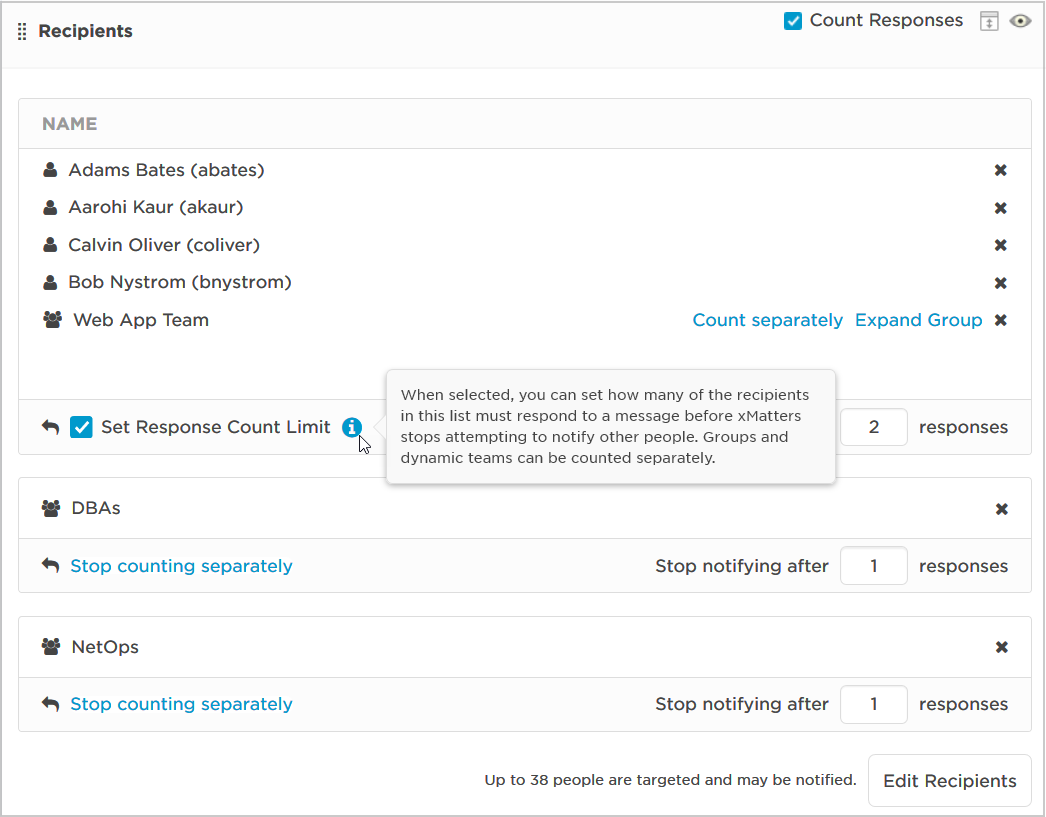
Improved response counts
As part of our work on the recipient selector, we also improved the usability of specifying response counts. In case you're not aware, you can use response counts to specify the number of recipients that must respond to a message before xMatters stops attempting to notify a group.
With a little rearranging, more descriptive labels, and helpful tooltips, we think you'll now find this feature more straightforward and intuitive to use:
Longer group descriptions
We've upped the length of the group description field from 200 to 1024 characters. This gives you more room to add descriptive keywords for your groups, like the service name or key responsibilities:

Having more keywords makes it easier to find the right resources when you're sending messages using our new recipient selector, since it includes group descriptions in its search (as do the xMatters REST API calls and our integration chatbots in products like MS Teams and Slack):

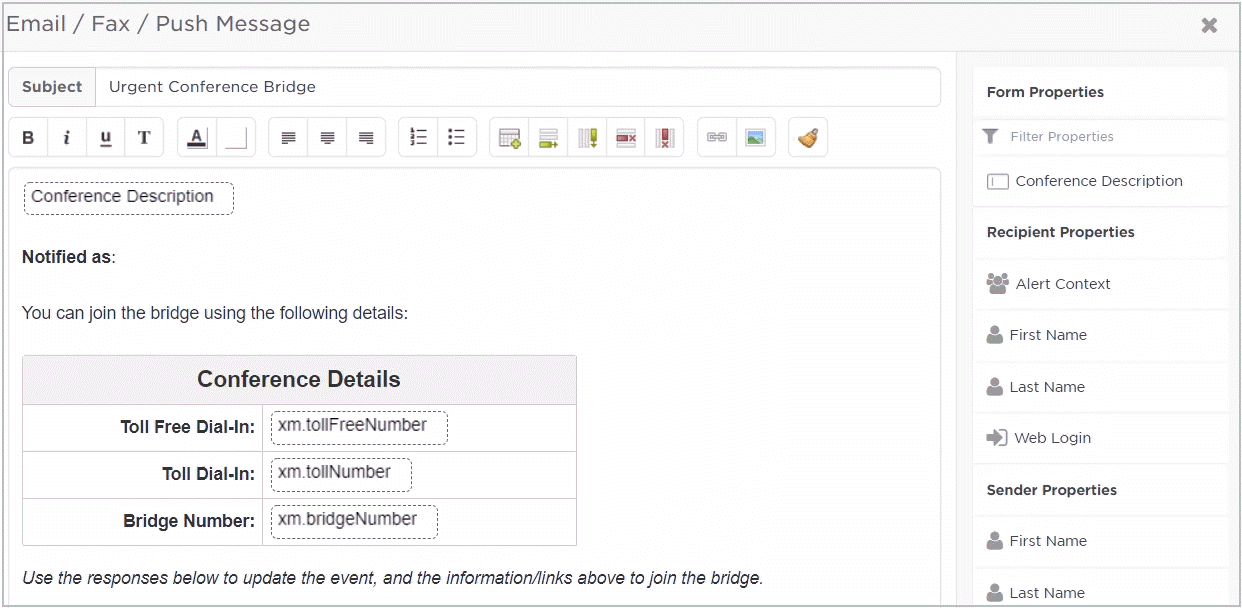
'Alert Context' property
As a message recipient, it's often useful to have more context about why you're receiving a notification. Are you being paged because you're part of the "Message Queue" service team or because you're trained as an "Incident Commander"? By knowing if you were targeted directly, by one of your subscriptions, or because of your membership in a particular group, you'll have better insight into your role and responsibilities in the incident resolution process.
To help with this, we've added a new Alert Context property to our message editors that you can include in your messages to show recipients how they were notified for an event:
Can I get more context, please?
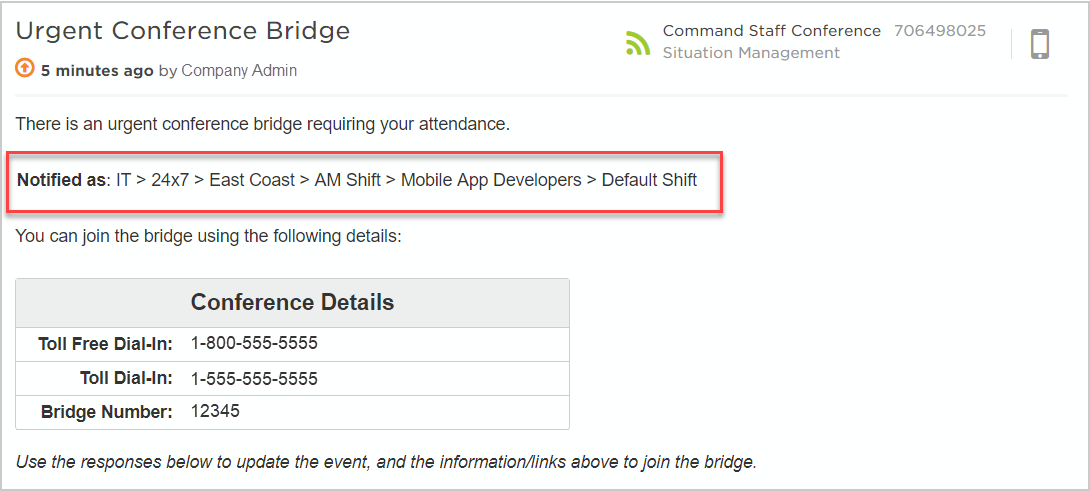
When the message is sent, xMatters replaces the Alert Context property with the path used to notify you, as shown in the examples below:
- Directly targeted: "Direct Notification"
- As part of a group: "DBAs > P.M. Shift"
- As part of sub-group: "Campus D > Default > DBAs > P.M. Shift" etc.
- Subscription notifications: "Product Recalls Subscription"
- Group subscription notifications: "Product Recalls Subscription > DBAs > P.M. Shift"
So as you can see below, even though Mary McBride is a member of several different groups in her organization (like IT, First Responders, and Party Planning) she knows she's been invited to the conference bridge for her IT expertise in developing mobile apps - not to help with this year's holiday party:
Integrations and orchestration
For this release the major focus of our integration platform work was continuing to build features and enhancements for Flow Designer, and to bring you a new API key management system that's optimized for service accounts. But that's not all: we also made updates to the xMatters Agent and the xMatters REST API, and added several new workflows to our collection of workflow templates.
Flow Designer
Flow Designer is the newest user interface for our integration platform. The goal of Flow Designer is to provide an all-inclusive interface that allows users of all levels of technical ability across the enterprise to integrate and create incident resolution workflows with ease.
Merge flow paths
It's now possible to connect multiple paths of a flow to the input port of a single step. This is useful when different segments of your flow follow the same series of steps. By merging them into a common path, you reduce duplicated configuration and simplify the layout of your canvas:
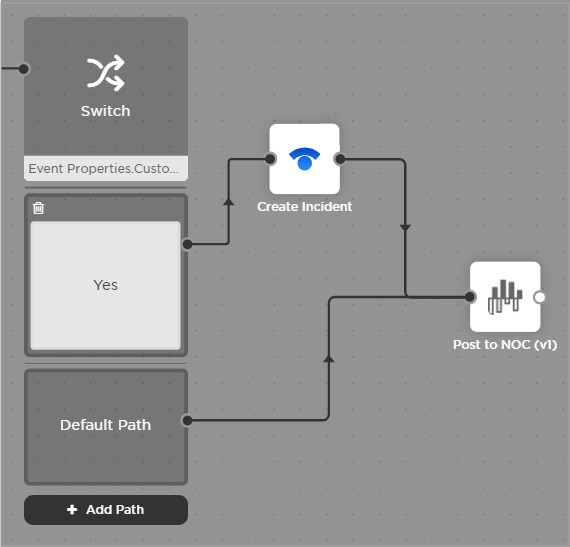
In the example above, the flow uses a switch step to split the flow based on a customer_impacting event property. A value of "Yes" creates a Statuspage incident and then posts to a NOC dashboard, while any other value just posts straight to the dashboard. Joining both flow paths directly to the same 'Post to NOC' step removes a duplicate step from the canvas and saves configuration time!
When you connect multiple paths to the input port of a step, only constants and the outputs of individual steps common to all joined flow paths are available as inputs to this step. Event properties are available as inputs when the flow uses only Event activity triggers.
Libraries
Estimated Availability: April
In this release, we continue our work transitioning components for managing integration behaviors to Flow Designer, with the addition of Libraries (previously known as "Shared Libraries" in the Integration Builder). You can use libraries to store common code functions that you've created or imported (like moment.js) and use them globally in any workflow in your deployment. If you need to update a function later, you can modify it in a single location, and it'll be updated wherever it's being used.
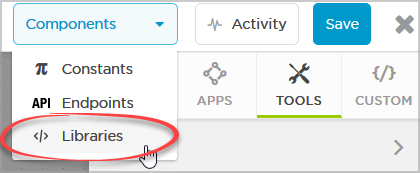
Access libraries
As shown below, there are several ways to access libraries, depending on where you are in the Workflows UI. At the highest level, you can access libraries and other flow components (endpoints and constants) from the Flows tab of a workflow:

When you're in Flow Designer, you can access libraries above the palette, from the Components menu:
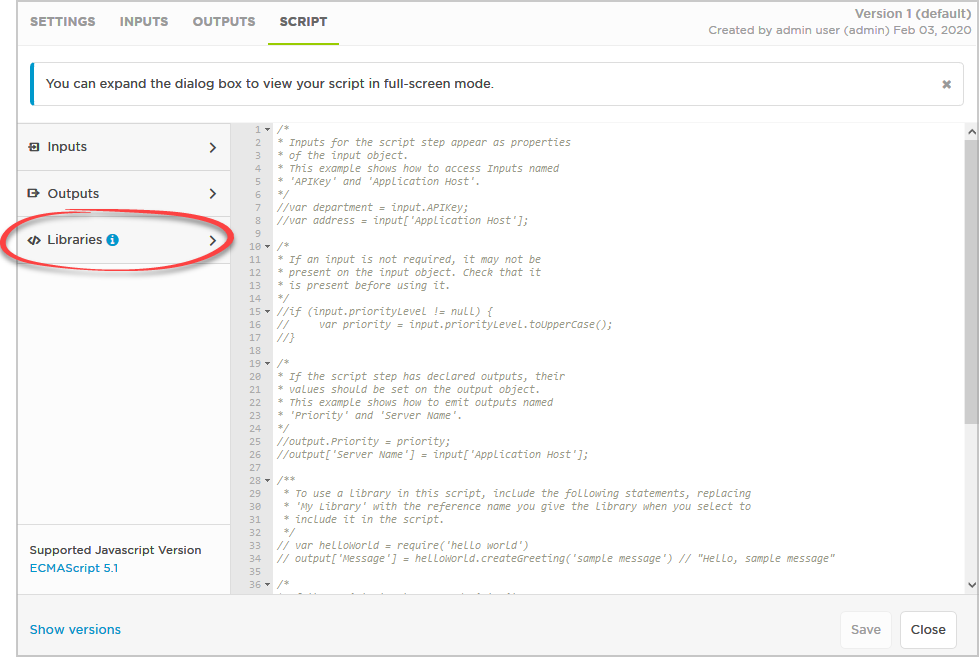
And finally, you can access libraries from the sidebar of the Script tab in a step:
Library reference names
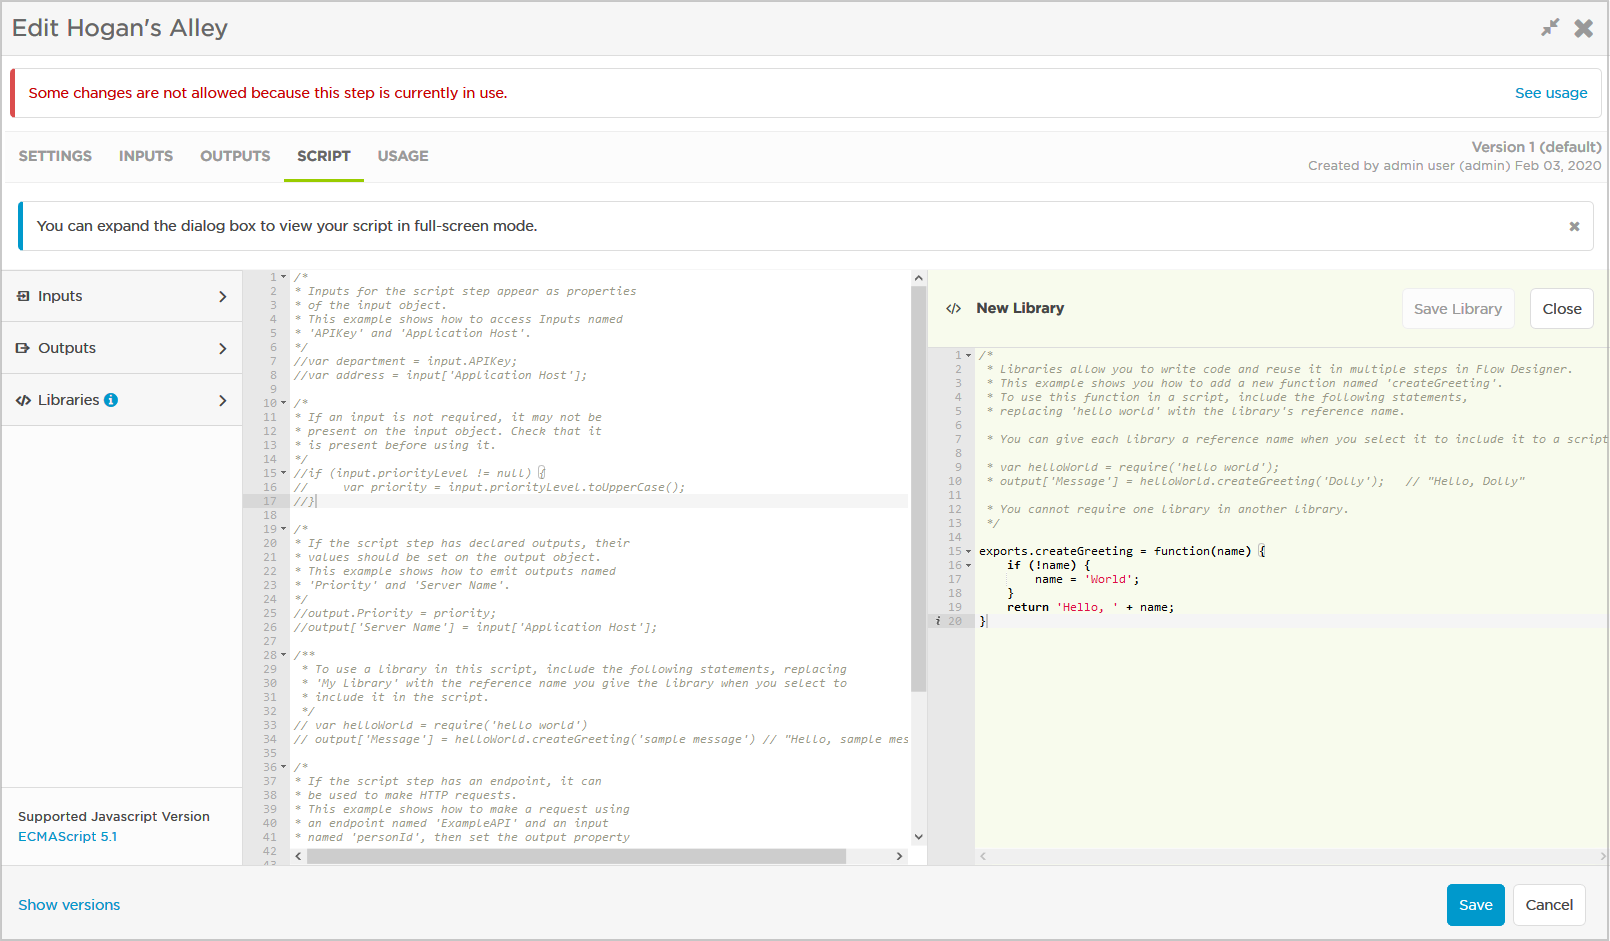
One of the cool new ways we've enhanced this feature in Flow Designer is with the ability to give libraries custom reference names, which you can use to require them in your script. The benefit of this is that you can change the name of the library without updating every script using that library.
When you select a library to use in your script, a field appears where you can specify a reference name. In the script editor, you can then use the reference name in a require statement to call the library:

Script tab layout
As you may have noticed in the previous images, we've updated the layout of the Script tab to make it more efficient for managing your scripts. The variables that you're able to use in your script - inputs, outputs, and libraries - are now available from a sidebar on the left. This opens up more screen real estate for a split-screen view for when you'd like to be able to see or edit a library as you're building out your script:
Manage libraries
Like other steps in Flow Designer, you're able to copy, share, and change ownership of libraries. When you export a workflow, the libraries that you've selected to use, and the custom steps they're used in, are included in the export.
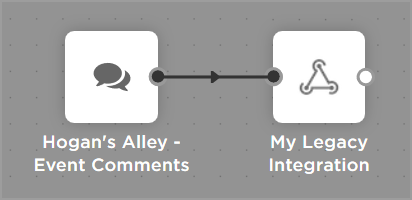
Access and edit legacy outbound integrations
The initial release of Flow Designer didn't include all the functionality of our integration platform's original user interface, the Integration Builder. We're continuing to incorporate that remaining functionality into Flow Designer, so that it includes full end-to-end integration support. In this release, we made it possible for you to access your existing outbound integrations in Flow Designer, so you have the option to convert them to flows and take advantage of the benefits that Flow Designer has to offer.
Send a webhook
We've automagically migrated your 'Send a webhook' integrations into flows that consist of an Event Activity trigger connected to a webhook step:
This combination of a trigger and webhook continues to function the same way your integration did before. The webhook step uses the existing endpoint and any appended path specified in the integration, and any properties you set to be included in the outbound integration are automatically included in the webhook payload.
A note about the webhook body:
We've migrated the body of the outbound integration webhook request to a special 'Body' variable, used only in the body input of the webhook step in the converted flow. If you delete this variable from the input of the webhook step, you can't add it again - you'll need to re-create the payload you want to send, adding it to the Body input of the webhook step. Similarly, if you delete the trigger, the webhook step, or the connection between them, you'll have to recreate the payload.
However, this change also means you can replace the Body variable with a new payload tailored to your needs, giving you more control over what information gets sent in the webhook.
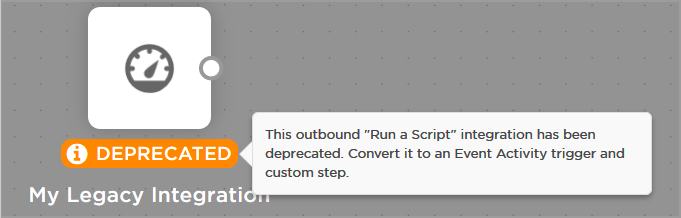
Run a script
We don't automatically convert 'Run a script' integrations to flows, since we can't easily tell exactly what steps are hidden in your script. But your integration will appear as a trigger on the the canvas, so that you can edit your integration's script in Flow Designer.
To convert your outbound 'Run a script' integration to a flow, you can recreate the steps hidden in your script as steps on your canvas. By breaking your script into its constituent steps, you can more easily manage, reuse, and troubleshoot - especially if you're not a developer.
If you don't convert the integration, it'll continue to function even though it's flagged as 'deprecated'.
Send to Integration Agent
Estimated Availability: April
Your 'Send to Integration Agent' outbound integrations are now also available as deprecated - but still functional - triggers on your Flow Designer canvas. Instead of going to the Integration Builder to access your integration, you can now edit its settings from within Flow Designer:

We'd also encourage you to convert the trigger to run on the newer xMatters Agent, which was designed to replace the Integration Agent with management and integration capabilities that are easier to use. As shown above, we've included a "Learn how" link on the Integration Agent configuration screen where you can get more information about how to do this.
New & updated steps
As usual, this release includes a number of either new or updated steps for some of the common tools used in incident management workflows, including the addition of event and phone handling settings to the xMatters Create Event step, a new built-in trigger for Zendesk, and the ability to update the status of a Jira issue as part of a flow.
Create Event step updates
Estimated Availability: March
The xMatters Create Event step includes a new Handling & Overrides tab where you can fine-tune event behavior and how recipients react with voice notifications:
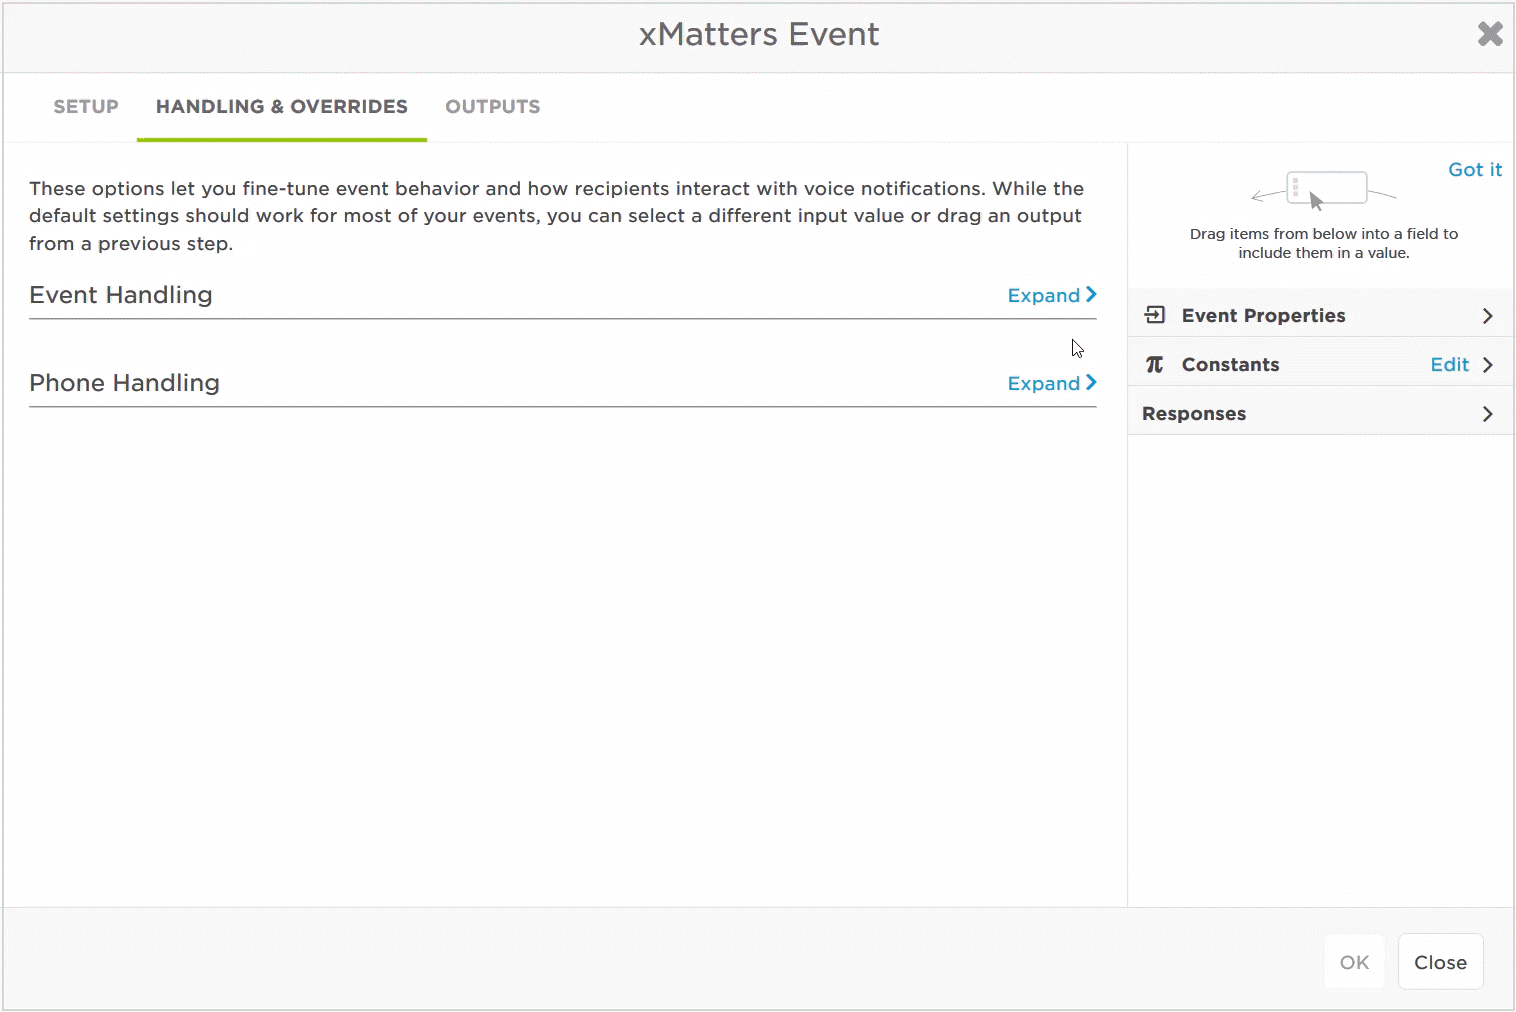
For each setting, you can either select or specify a value. When you select the option to 'Use Output or Constant Value', you'll be able to drag an output or constant from the sidebar as the value for that setting, or type in the value that you'd like to use.
What about my existing notification handling options?
The settings on the Handling and Overrides tab reflect any notification handling options that you've already set up for the form that's associated with your Create Event step. If you want to make any changes to your settings, make sure you do that in Flow Designer, as the values specified on the Handling and Overrides tab will override the settings in your form layout.
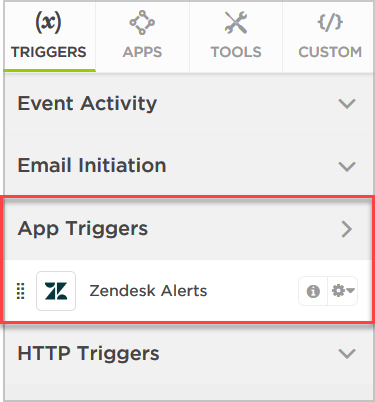
Zendesk trigger
We've added a built-in Zendesk Alerts trigger to Flow Designer, available from a new App Triggers section on the Triggers tab of the palette. You can drag this trigger onto the canvas and use it to initiate flows when Flow Designer receives requests from Zendesk:
Jira Cloud & Jira Server: update status
Our built-in steps to update issues in Jira Cloud or Jira Server now include the option to change the status of the issue. This means that as an incident progresses, you can keep its status up to date in Jira (for example, you could change its status from "To Do" to "In Progress" to "Resolved").
Usability improvements
One of the main goals of Flow Designer, with its codeless drag-and-drop functionality, is to make it easy for anyone to set up an integrated toolchain. This means usability is the central theme for every new feature or enhancement we add - but also for making the things we already have in place even better. Here are a few of the usability improvements we've added to existing Flow Designer features.
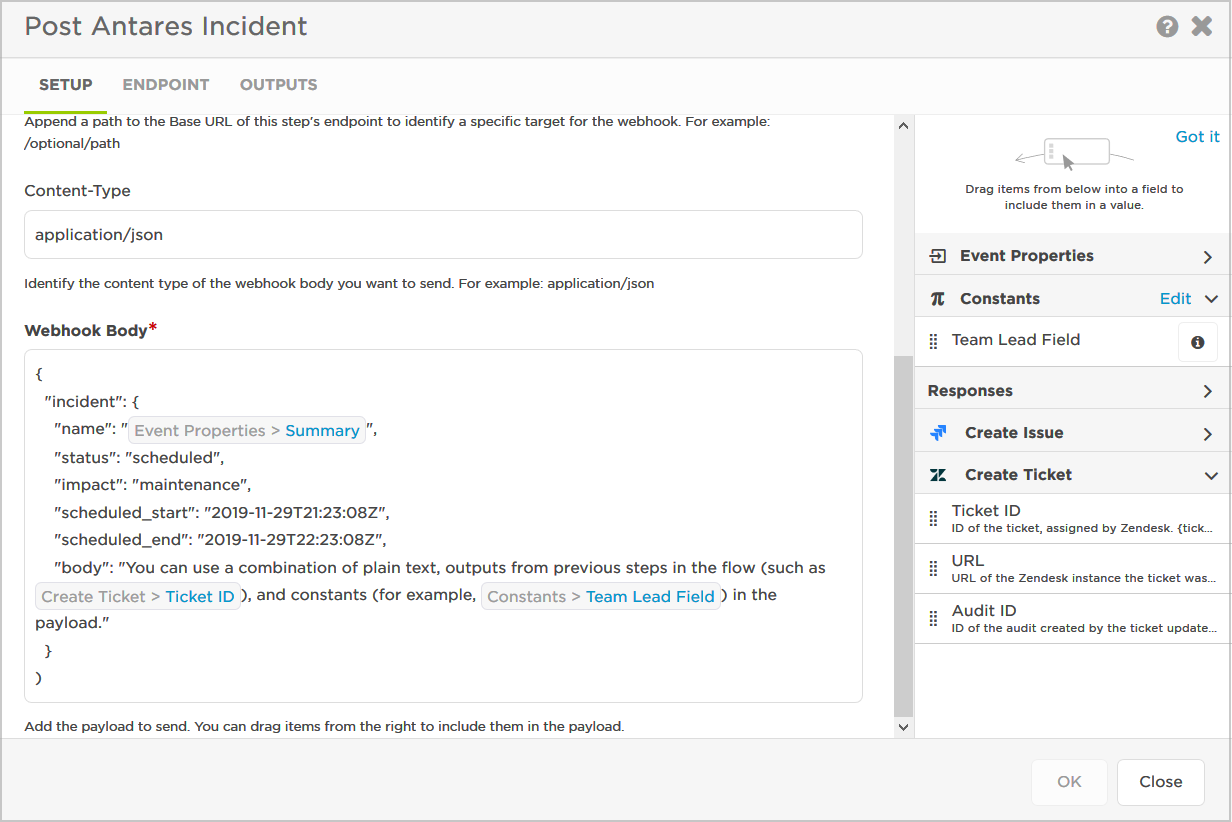
Setup tab updates
We've updated the setup tab of custom, app, and tool steps to provide you a better usability experience for building out payloads to your other toolchain products. With some artful rearranging of labels above input fields and descriptions below, we were able to expand the width of input fields to give you more room to work and for better overall legibility of your payloads.
Here's an example of how this looks for a Webhook step:
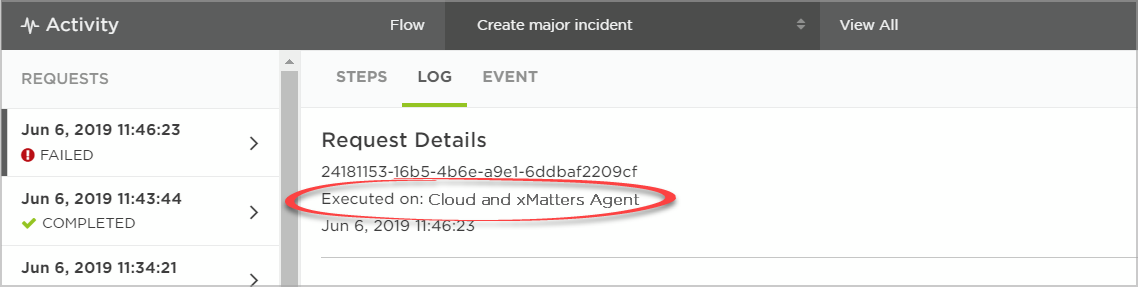
Show hybrid run location in Activity panel
The run location of a step determines where the step is configured to run, either in the cloud or on an xMatters Agent. We've updated the Activity panel in Flow Designer (and the Activity Stream in the Integration Builder) to support flows with hybrid run locations.
Now if your flow has steps that execute in the cloud, and others that run on the xMatters Agent, the run location is reported as "Cloud and xMatters Agent":
Palette styling improvements
You'll notice that we've made some styling updates to the Flow Designer palette to tighten things up and make it easier on the eyes. The changes are subtle, but we think you'll enjoy working with this more refined version:
ServiceNow endpoint updates
It's now easier to include ServiceNow in your incident management workflows! You're no longer required to have the xMatters app installed in your ServiceNow instance to connect your steps to the ServiceNow endpoint, which makes it a lot more convenient to get ServiceNow steps up-and-running in Flow Designer.
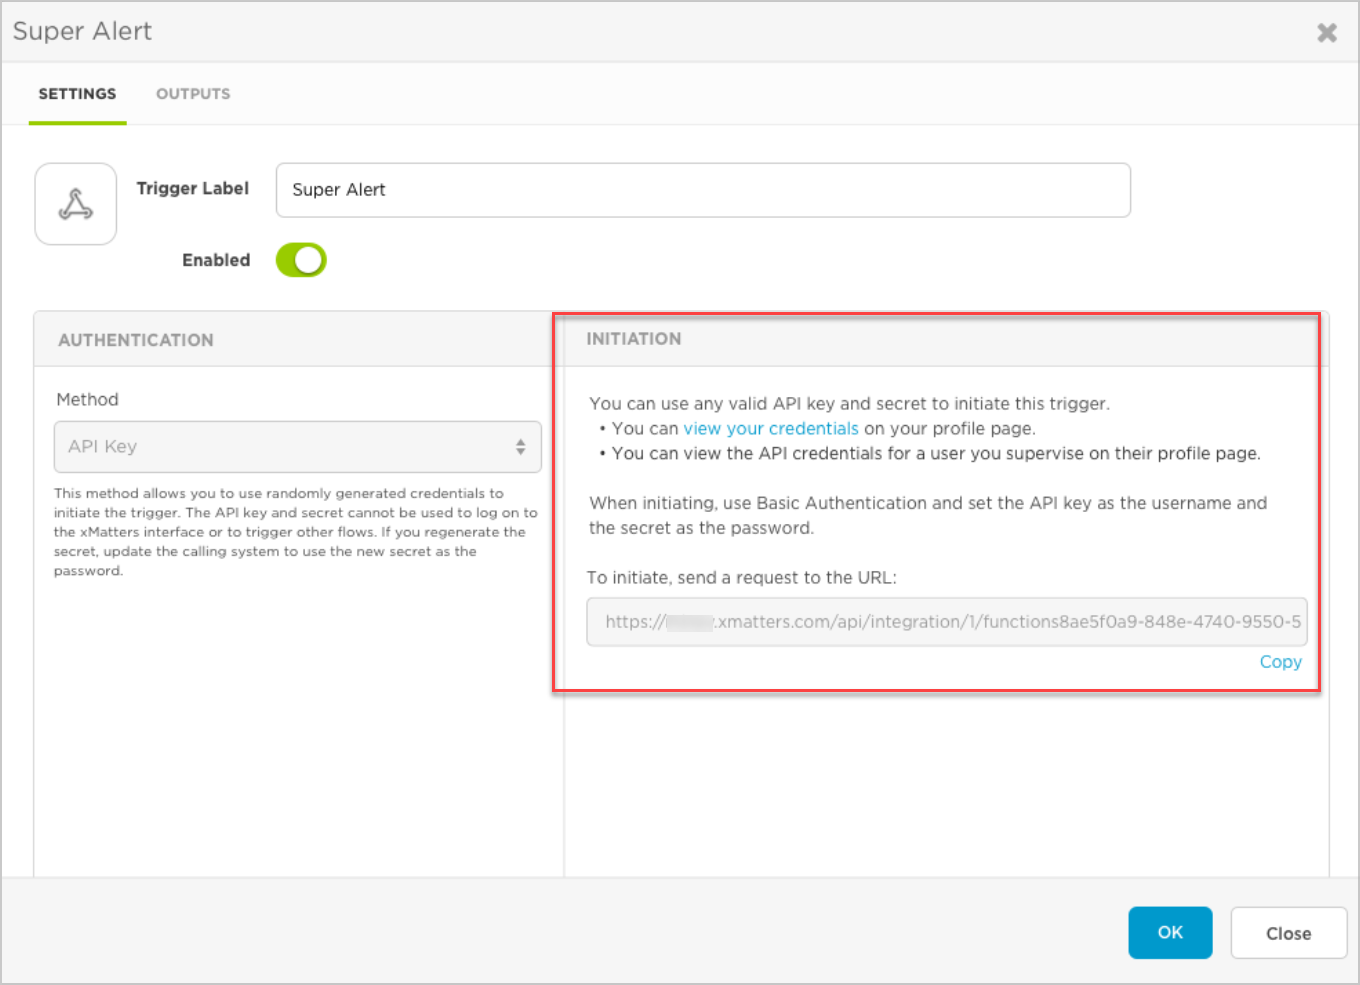
API key management
Estimated Availability: April
In xMatters, you can use API key credentials to authenticate requests to the xMatters REST API, trigger flows in Flow Designer, and initiate integrations. In this release, we've revised the management capabilities of our API authentication method to make it easier for customers wanting to use service accounts to send requests into xMatters.
User API keys
Each user or service account's profile now includes an API Keys tab, which displays their unique API 'User Key'. From this screen, you can create multiple sets of API key credentials each with a unique secret (we recommend creating one per integration). This allows multiple systems to authenticate using a single user license, while controlling each system's access separately without needing to store your username and password in multiple places.
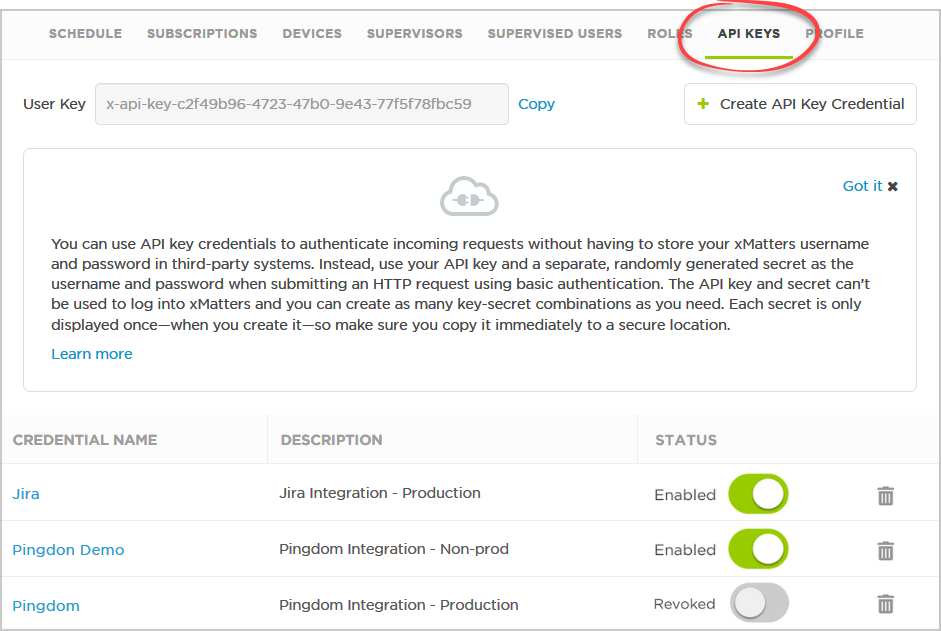
When you create a new API key credential, xMatters creates a new secret. This is the only time it's displayed, so you'll need to immediately copy it to the calling system or to a secure location:

Secrets never expire, so you won't need to update them if a user's password is set to expire in xMatters. But, if you forget or lose a secret (or if one gets compromised), you can always generate a new one - that will cause the existing secret to stop working and you'll need to update your calling system with the new secret.
Over in Flow Designer...
When you create an HTTP trigger in Flow Designer and select API Key as the authentication method, you can click 'View your credentials' to be redirected to the API Keys tab of your user profile, and either set up a new credential for your trigger, or use credentials that you've already set up. You're also provided instructions on how to view the API credentials of a user you supervise, if you're setting up the authentication using their credentials.
xMatters Agent: larger payload support
Estimated Availability: Late March
The xMatters Agent is a service you can install on a local system to process workflow logic behind your company firewall. This allows systems behind your firewall to trigger and enrich events in xMatters and enables integrations to communicate with systems that cannot be accessed externally.
In this release, we increased the size of the payload that we support when communicating with the xMatters Agent. This means that you're now able to send large messages without experiencing any connection issues with the xMatters Agent.
New & updated workflows
This release includes two new packaged workflows (Send Alerts and Zendesk Alerts). We've also added a new experimental AppNeta workflow to xM Labs, and updated xMatters Actionable Alerts for Splunk.
Zendesk Alerts packaged workflow
The Zendesk trigger we told you about above is also used in our new packaged 'Zendesk Alerts' workflow, which includes flows with pre-configured steps to update and add comments to Zendesk tickets with information from the xMatters event. Our workflow instructions also include information on automatically determining notification recipients based on their user or group assignment in Zendesk. If you're using Zendesk in your incident management processes, you'll want to check out this new workflow!

Send Alerts packaged workflow
A new Send Alerts workflow is now available from our collection of Workflow Templates. We've designed this pre-built workflow template to help you start notifying users and groups with minimal setup. It lets you create an event and send notifications by simply sending an email or HTTP request to xMatters.
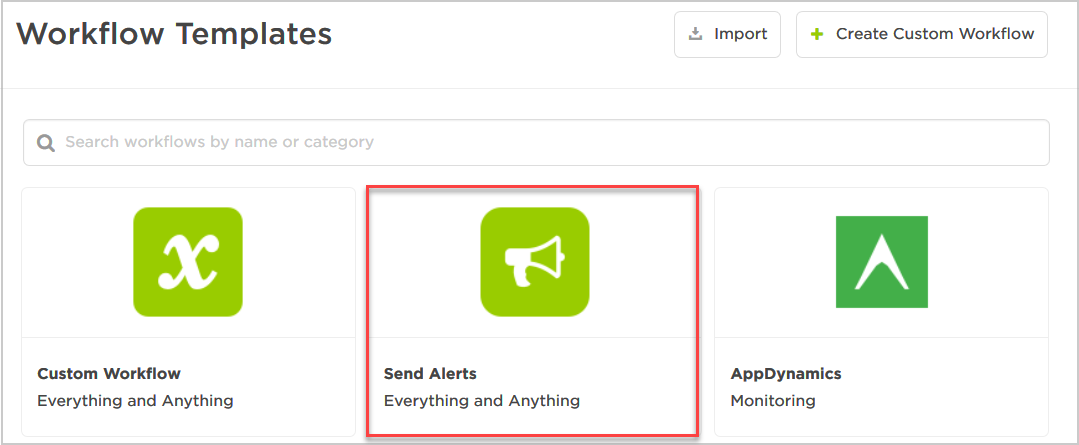
You can use this workflow to quickly send test messages, learn how workflows work, and as a starting point for creating your own workflows. To get up to speed quickly, see our Send Alerts workflow guide.
AppNeta
Although not officially supported, the following workflow available in xMatters Labs on GitHub was built by our field teams and is a great starting point for those looking to get integrated with AppNeta:
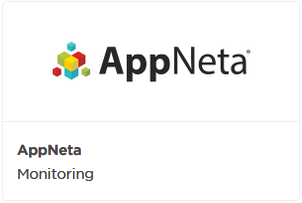 |
AppNeta provides real-time, actionable insight from remote offices, over internal networks, and across the internet, so you can quickly get to the bottom of performance issues regardless of where they occur. This integration allows you to connect your AppNeta instance to an xMatters account to showcase the ease of passing alerts to xMatters. |
xMatters Actionable Alerts for Splunk updates
A new version of xMatters Actionable Alerts for Splunk is available for Cloud and Enterprise Splunk customers. If you're updating to the latest and greatest version of Splunk (v7.2-8.0), then you'll want this update because it's compatible with Python 3.
xMatters REST API enhancements
We continually enhance our xMatters REST API calls to replace existing SOAP and older REST methods. These calls not only support customer integration needs, they're also the foundation for data access by our mobile clients, the web user interface, and other key xMatters services. In this release, we focused on improving the discoverability of some objects within our existing REST web services.
New endpoints
Get user delivery data
We've added a new endpoint to the xMatters REST API that lets you look up information about who was notified for an event. Some of our customers like to use this data to create reports in other systems such as Splunk or Tableau. Here's the new endpoint:
- GET /events/{eventID}/user-deliveries?at={timestamp} - return detailed information on who was notified for a specific event, the notification delivery status, the date and time of the notification, and which devices were contacted.
Since this endpoint queries historical data, you'll need to include the at parameter in your request. You can also optionally embed the person.properties query parameter to include the values of the custom fields and attributes assigned to each person (for example:
GET /events/{eventID}/user-deliveries?at={timestamp}?embed=person.properties).
Get, create, and modify scenarios
Scenarios allow you to save multiple versions of a form with predefined values for common or anticipated situations, making it easier to send relevant messages quickly when those situations arise. You can now use the following xMatters REST API endpoints to look up information about scenarios, and to create and modify them:
- GET /scenarios/{scenarioId} - return a specific scenario, based on its unique identifier.
- GET /plans/{planId}/forms/{formId}/scenarios - return a list of scenarios for a form in a workflow.
- POST /forms/{formId}/scenarios - create or modify scenarios for a form.
Get roles
Roles control how users can interact with xMatters, including which features they can access, whether they can send notifications, manage other users, create workflows, configure xMatters, and more. You can now use the xMatters REST API to look up the roles which are visible to you in xMatters. You can request a list of all roles, or narrow the results by searching for a role name:
- GET /roles - return a list of all roles that are visible to the authenticating user.
-
GET /roles?name={term} - return a role with a name that is an exact match to the term provided.
- To search based on a partial match, you can use the
allowWildcardsquery parameter (for examples, see the documentation).
- To search based on a partial match, you can use the
Updated endpoints
Get people that meet specific criteria
We've equipped the GET /people endpoint with the following new query parameters that you can use to programatically look up the users in your system who meet particular criteria:
-
role or roles - users in the system with a particular role (or set of roles) in xMatters. For example,
GET /people?roles={Incident Manager}orGET /people?roles={Incident Manager,Developer} -
status - users that are inactive or active. For example,
GET /people?status=ACTIVE -
devices.exists - users that have devices in their profile, or not. For example,
GET /people?devices.exists=TRUE -
devices.testStatus - users with devices in a particular test status, such as those with untested devices. For example,
GET /people?devices.testStatus={UNTESTED} -
supervisors.exists - users that have a supervisor, or those that don't. For example,
GET /people?supervisors.exists=TRUE -
supervisors - users that a specific person, or people, supervise. For example,
GET
    /people?supervisors=mmcbride,asamara
Get targeted recipients
If you're using the GET /events endpoint to return a list of events, you now have the option to embed targeted recipients. For example: GET /events?embed=targetedRecipients
To retrieve events that targeted a specific user, you can explicitly search for just the events targeting that user by identifying them by target name or UUID. For example:
GET /events?targetedRecipients=mmcbrideGET /events?targetedRecipients=c56730a9-1435-4ae2-8c7e-b2539e635ac6
Get all temporary absences
You can now use GET /temporary-absences to return the scheduled absences for all users you have access to in xMatters (instead of just a single user). We've also added two new search parameters that you can use to narrow down your results:
-
absenceType- search for absences that have a replacement user, or for those that don't. -
groups- search for temporary absences for a particular group, or groups.
New GET /audits records
The GET /audits endpoint allows you to access audit records for actions that occur in your system, such as how recipients responded to an event and the comments they made. We've been building out this endpoint over time, and you can now use it to retrieve the following auditType records for your events:
- EVENT_CREATED - when an event was created
- EVENT_SUSPENDED - when an event was suspended
- EVENT_RESUMED - when an event was resumed
- EVENT_COMPLETED - when an event was completed
- EVENT_TERMINATED - when an event was terminated
Embed text property translations
Do you have text properties configured in more than one language? If you're interested in looking up the values assigned to text properties for different languages as you're working with scenarios, you now have the option to embed translations:
GET /scenarios/{scenarioId}?embed=properties,plan,form,properties.translationsGET /plans/{planId}/forms/{formId}/scenarios?embed=properties.translations
When you include these optional embeds in your request to GET /scenarios or GET /plans/{planId}/forms/{formId}/scenarios, the xMatters REST API returns the translated text for each property with a two-letter code for the corresponding language:
    "myTextProperty": {
           "propertyType": "TEXT",
           "value": "This is urgent. Please respond.",
           "translations": {
               "en": "This is urgent. Please respond.",
               "fr": "C'est urgent. S'il vous plaît, répondez."
            }
    },
Other updates
Details for read-only access plans and forms
Even if you don't have edit permissions to all the plans (AKA workflows) and forms in your xMatters instance, it's still useful to know that they exist and to be able to see basic information about them. Now when you request information about plans and forms you don't have access to, instead of getting a 403 Forbidden error you'll receive basic information, such as:
- Plan - UUID, name, description, and whether it's enabled.
- Form - UUID, name, description, as well as the ID and name of the plan it belongs to.
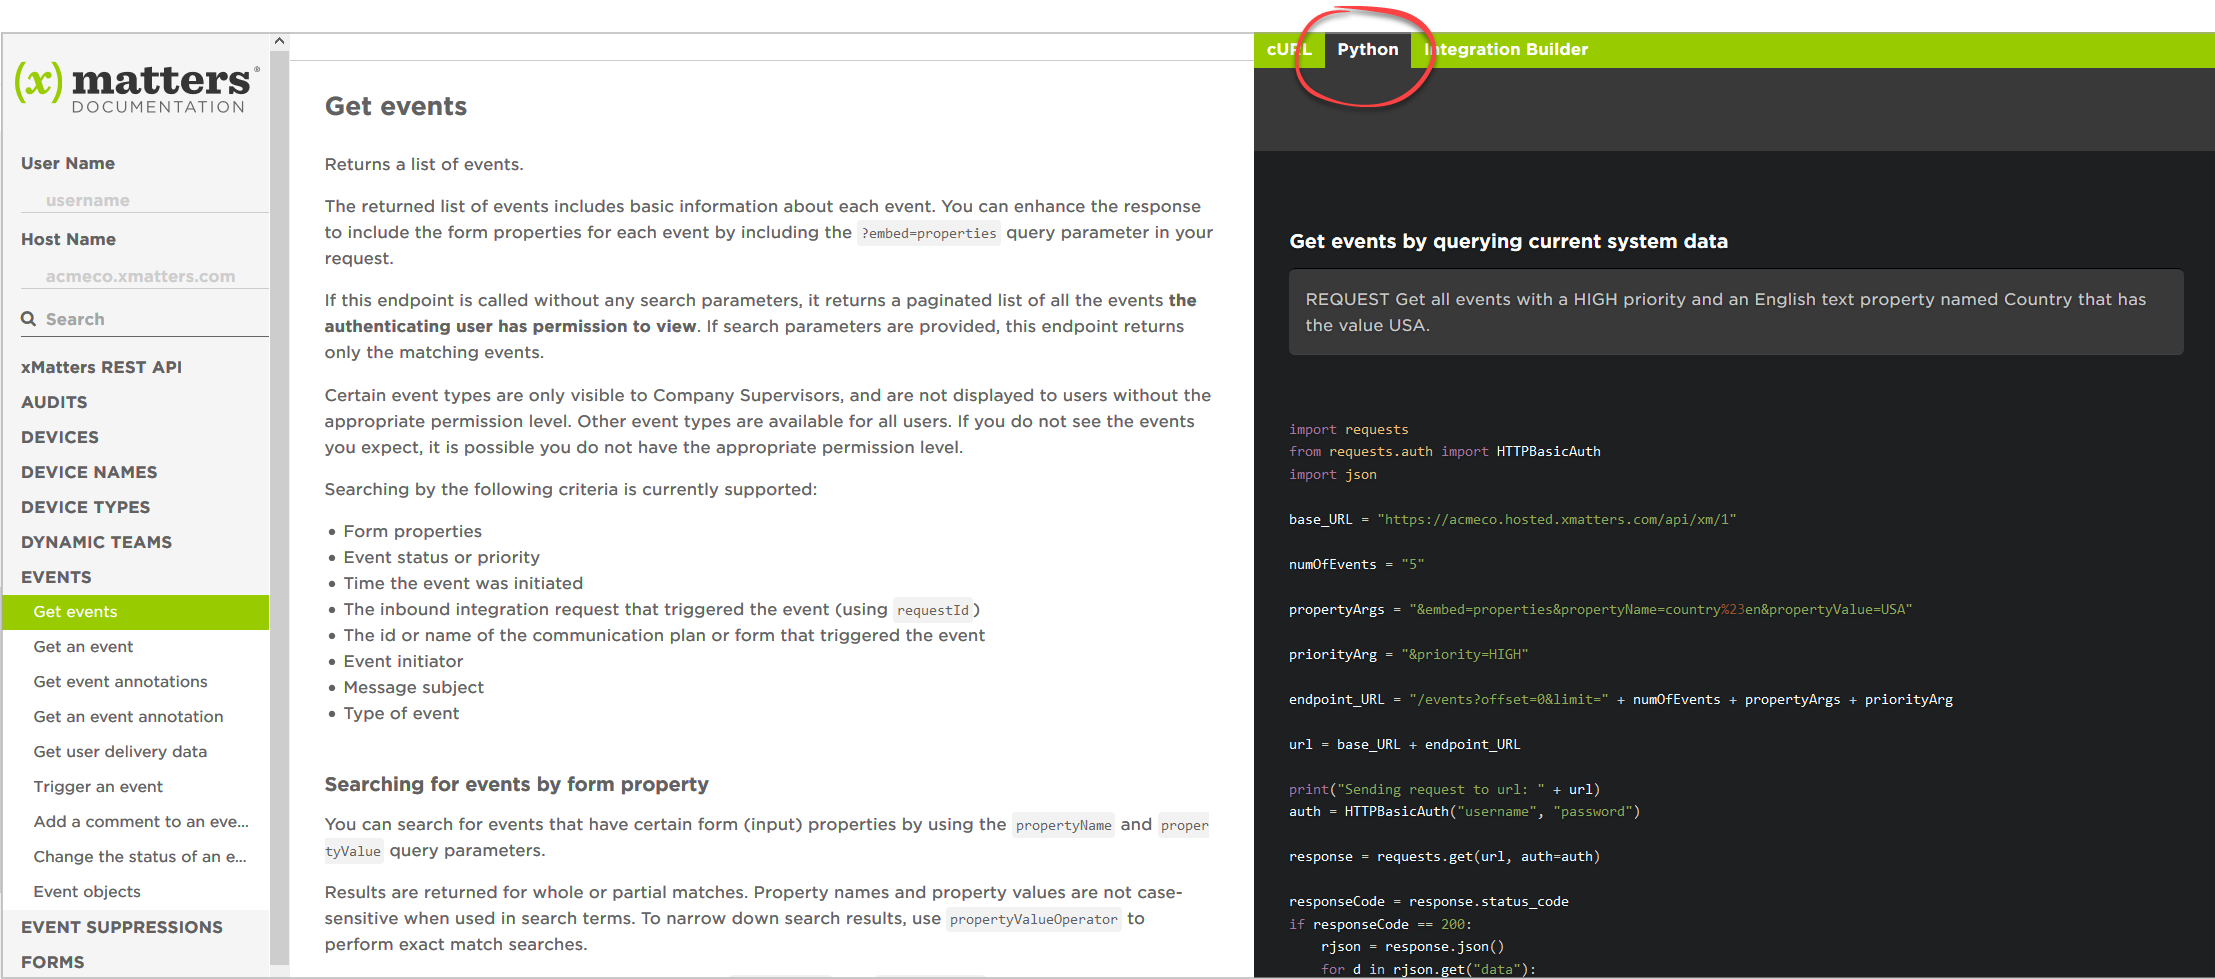
Updated Python code samples
We're pleased to announce that we've just finished updating all the Python code samples in our xMatters REST API docs to be compliant with Python 3.6. This was just in time, too, because they sunsetted Python 2 on January 1, 2020.
What's next?
Over the next quarter we’ll be making improvements to some of our existing REST web services. We’ll be adding more ways to search and filter users, groups, and dynamic teams, a new endpoint to better summarize the on-call report for a group, and continued progress on resources related to workflows, like form recipients, subscriptions forms, and more.
You can learn more about the xMatters REST API in our online help.
Reporting and analytics
Whether you're dealing with a customer-facing incident, digital service downtime, or unmanaged responses to critical issues, the reporting capabilities of xMatters provide insights and visibility across your business. In this release, we continue to build out the reporting functionalities of the All Events report, introduce a new event traffic widget, and roll-out the Historical On Call report.
All Events report updates
The All Events report gives you a window into past events, providing you with access to more of your xMatters data to support root cause analyses, address compliance requirements, and other important processes. In this release, we made several updates to the All Events report, including the ability to export events, the addition of a whole whack of new columns and filters, and usability improvements like a new permission for viewing the events of groups you supervise, and faster loading times.
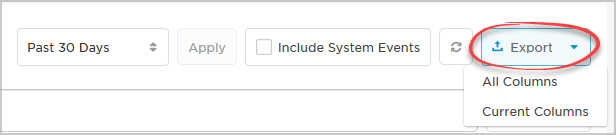
Export events
We've added a new Export option to the All Events report that you can use to export either 'All Columns', or just the 'Current Columns' you've selected to include in the on-screen report:
Export like a pro
To save yourself extra time formatting the exported spreadsheet, you can first filter, sort, and arrange the report in the web user interface. Then, when you're ready to export, xMatters preserves your formatting in the exported file!
If you selected the option to export all columns in the report, xMatters exports the current results as you've arranged them in the web user interface, and then appends any additional columns in alphabetical heading order to the right of the last column of current results.
You'll notice two tabs in the exported file:
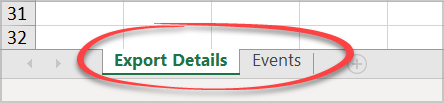
- Export Details - a summary of the report, including the date range, initiator of the export, and search filters applied to the report.
- Events - the list of events for the specified timeframe.
New columns
Looking for more context about your past events? Then you'll like the four new columns we added to the All Events report:
- Form - name of the form used to initiate the event.
- Source - name of the built-in or custom workflow used to create the event.
- Targeted recipients - users, devices, groups, or dynamic teams targeted to receive notifications.
- Priority - relative importance assigned to the message or incident in xMatters (low, medium, or high - with corresponding icons for quick reference).

New filters
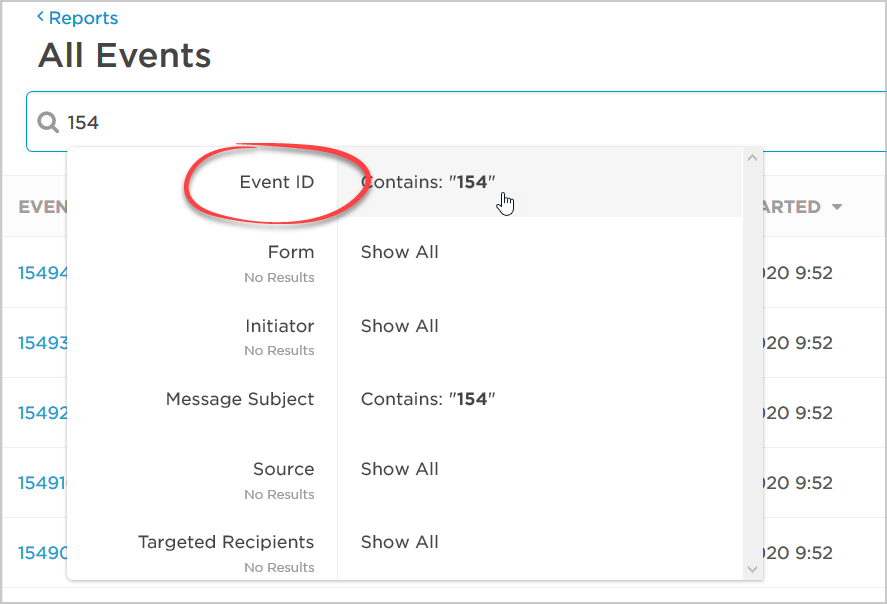
Need to find an event with a particular Event ID? Don't worry - you won't need to scroll through all your results until you find it. We've added a new filter to the All Events report that allows you to search for events by their Event ID:
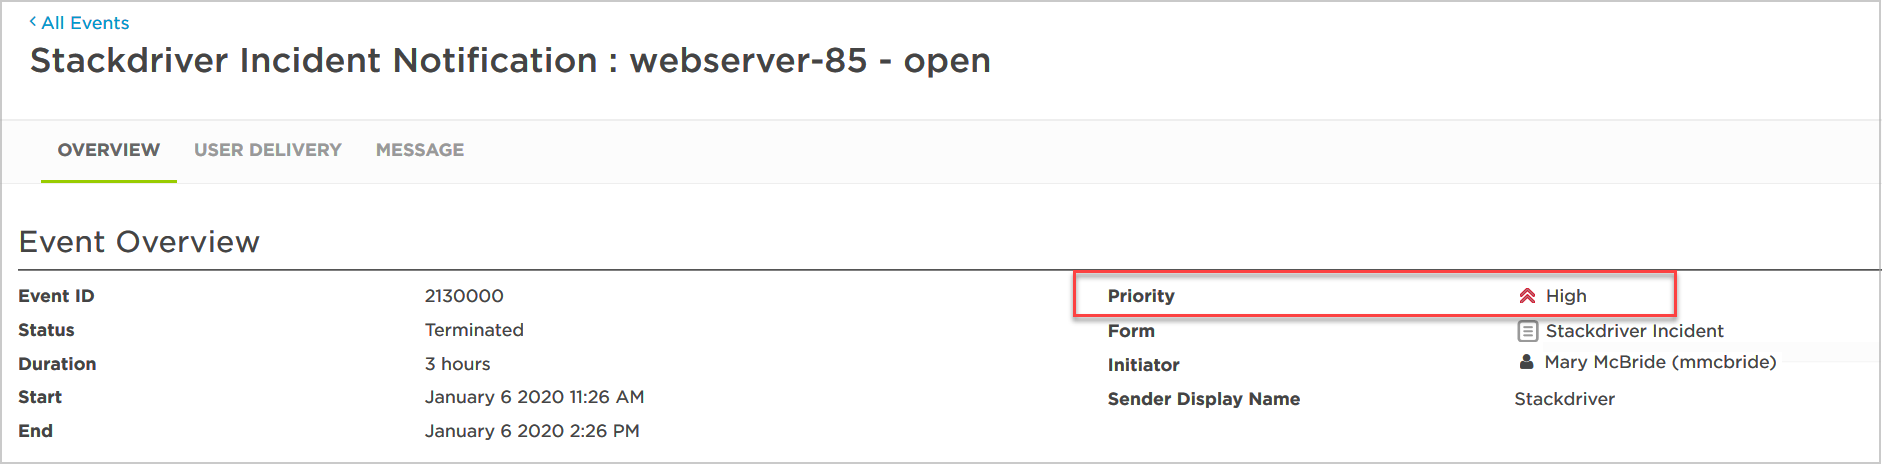
Event Overview: priority
While the All Events report provides you a high-level look at every event in your system, if you want more information about a specific event you can click on its Event ID to drill into the details. The Event Overview details now also include the priority of the event in xMatters (low, medium, or high):
Usability improvements
We've tricked out the All Events report with some great usability features to enhance your experience working with event data:
View events for groups you supervise
We added a new permission that allows you to view events for the groups you supervise. This makes it easier for Group Supervisors to stay informed and take action on any events targeting the groups that they supervise. For more information about this permission, and to add it to your company's Group Supervisor role, contact xMatters Support.
Faster loading time
Show me the data! When you open the All Events report, you want to start digging into your historical data, and not sit around waiting for it to load up. We get it and - believe us - that's what we want too! Our engineers have done some back-end magic and improved the loading time of the All Events report, so you should now be more speedily on your way to analyzing your past events.
Event traffic widget
Estimated Availability: Late March
Communication Center dashboards allow you to create customized views of your system, so you can track critical processes and quickly access the tasks you perform most frequently. We're currently in the process of developing a new widget that you can use to monitor trends in the volume and source of events taking place in your system.
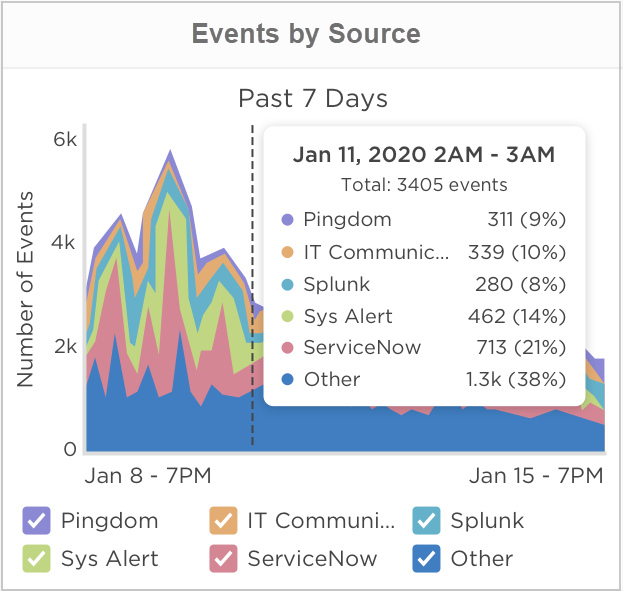
The new Events by Source widget displays a graph of the number of events that occurred over the past 7 days, from the workflows in your system. This at-a-glance view into event activity lets you identify noisy sources in your system, right from within xMatters - no need to export and analyze event data in a third-party tool!
Everyone gets the Communication Center!
Previously, Communication Center dashboards were available only with certain licensing packages. As part of the Hogan's Alley release, we're upgrading all of our customer's systems to be able to use customizable widgets, with permissions that give you fine-grained control over which roles get which dashboard capabilities. And don't forget - some license levels support multiple dashboards and dashboard sharing, so you can quickly switch context and have all members of a process working from the same page.
Historical On Call report roll-out
The Historical On Call report we announced in the Galaga Release became available this quarter. Located under Groups, the report makes it easy for supervisors to download information for on-call users in their organization and use it for compensation and planning purposes.
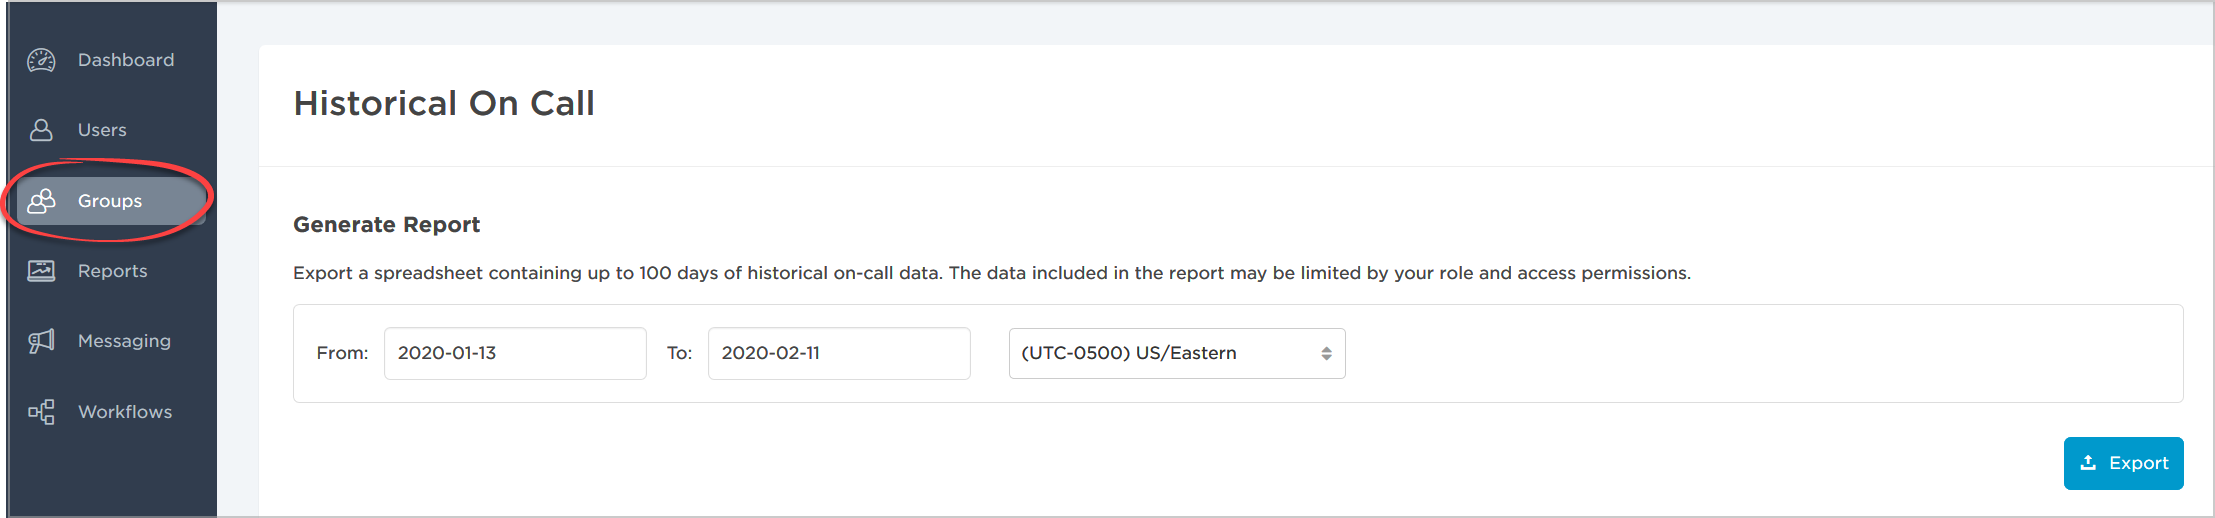
Use the 'From' and 'To' fields to export up to 100 days of historical data to a spreadsheet (.xls) file. The date selectors allow you to go as far back as data availability and your pricing plan allow.
We started populating the Historical On Call report with data on these dates:
- Europe, the Middle East, & Africa - January 1, 2020
- Asia Pacific & Japan - January 1, 2020
- North America - February 1, 2020
Making the most of your historical data
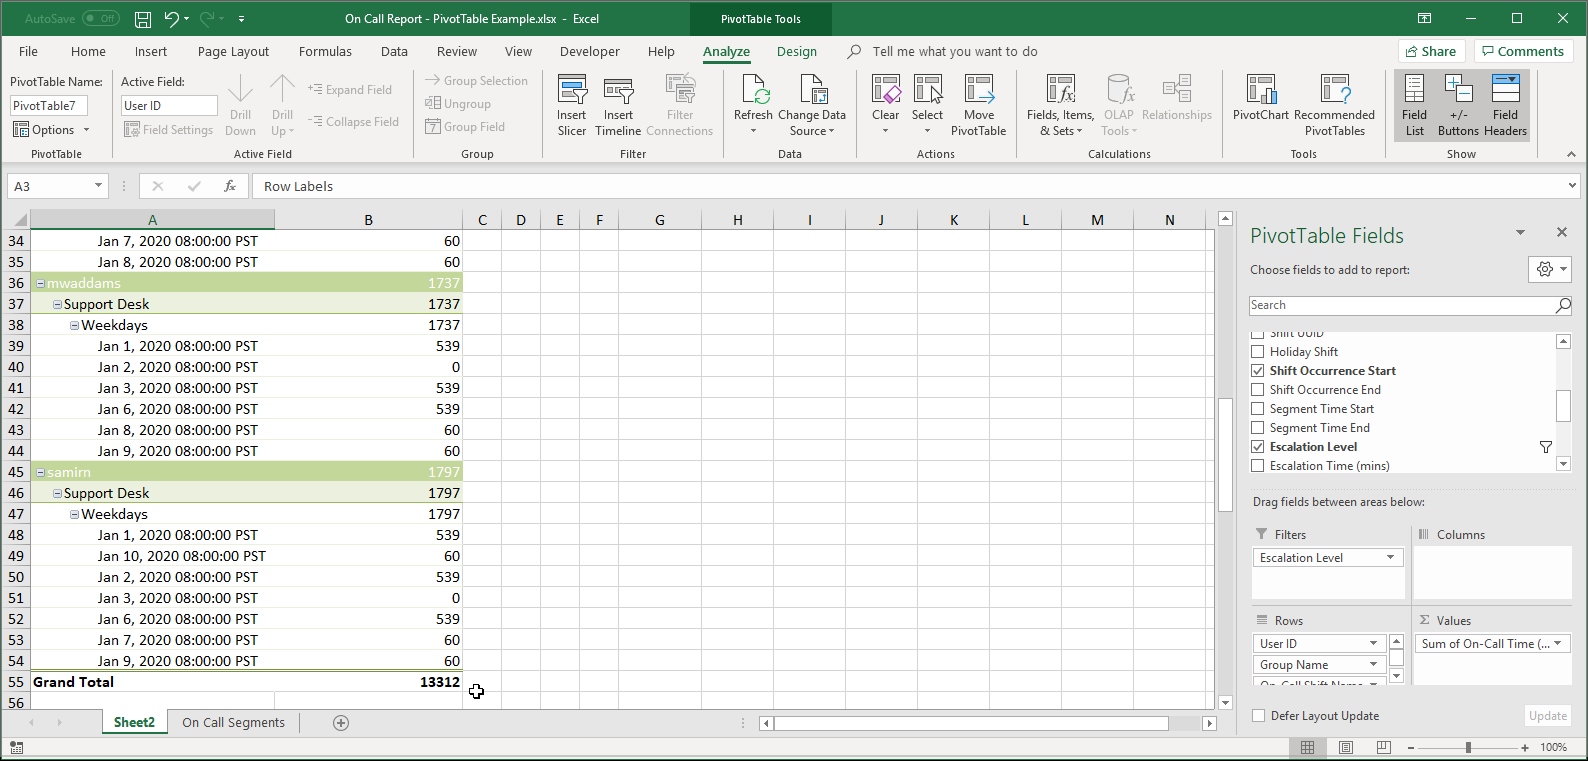
We're working on enhancing the Historical On Call report with additional features and functionality that make it even more useful, and also allow supervisors to fine-tune their data before they export. In the meantime, we recommend that you use pivot tables to summarize your data set, and extract the on call data that's most important to you.
Never heard of a pivot table? Not sure how to get started? Don't worry - we've created a great tutorial that shows you how to easily view the total number of on-call minutes that we need to be able to pay each user for and be able to validate the data by drilling down into the totals and schedules.
For more information about the Historical On Call report, see the online help: Interpret the Historical On Call report.
Mobile
The theme for mobile in this release is continued support for our end users - like the DevOps teams down in the trenches - to more effectively perform their on-call duties.
Come to the dark side...
You can't deny that 2019 was the year of dark mode, with all the most popular apps and operating systems going over to the dark side. xMatters was no exception, as we also released dark mode support for both of our iOS and Android mobile platforms. Once you've enabled dark (or night) mode on your device, the xMatters app will automatically switch to its new dark theme:
Android
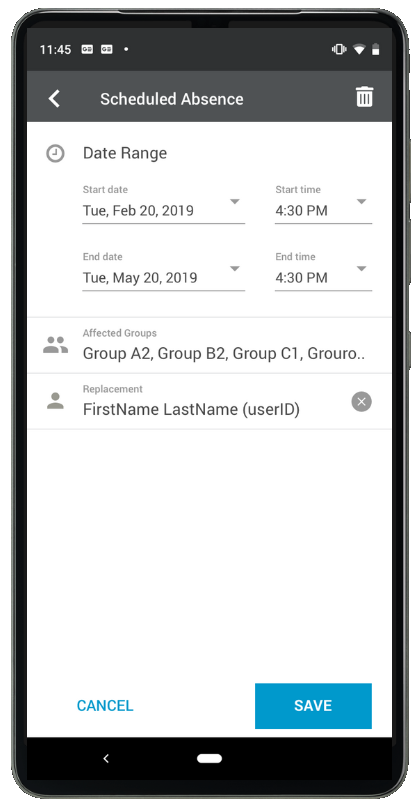
Temporary Absences
Estimated Availability: Early April
We're playing catch-up to bring the features available in our Android app to parity with our iOS mobile platform. One of the most-requested features we're currently implementing is the ability to view and manage Temporary Absences. Here's a sneak peek at our designs for this feature on the Android app:
View suppressed events
Estimated Availability: Late March
We're also working on extending visibility into our intelligent event management processes to our Android platform. With the addition of information about suppressions, you'll have insight into when event floods occur in your system, even when you're on-the-go.
When suppression occurs for an event, the Recent Events screen in the mobile app will display the suppression icon (circled in the screenshot below on the left) and a count of the number of event requests that have been suppressed under this parent event. For events where suppression has occurred, you'll also see a new "Suppressed Events" section when you drill-through to the Event report (shown in the second image below):
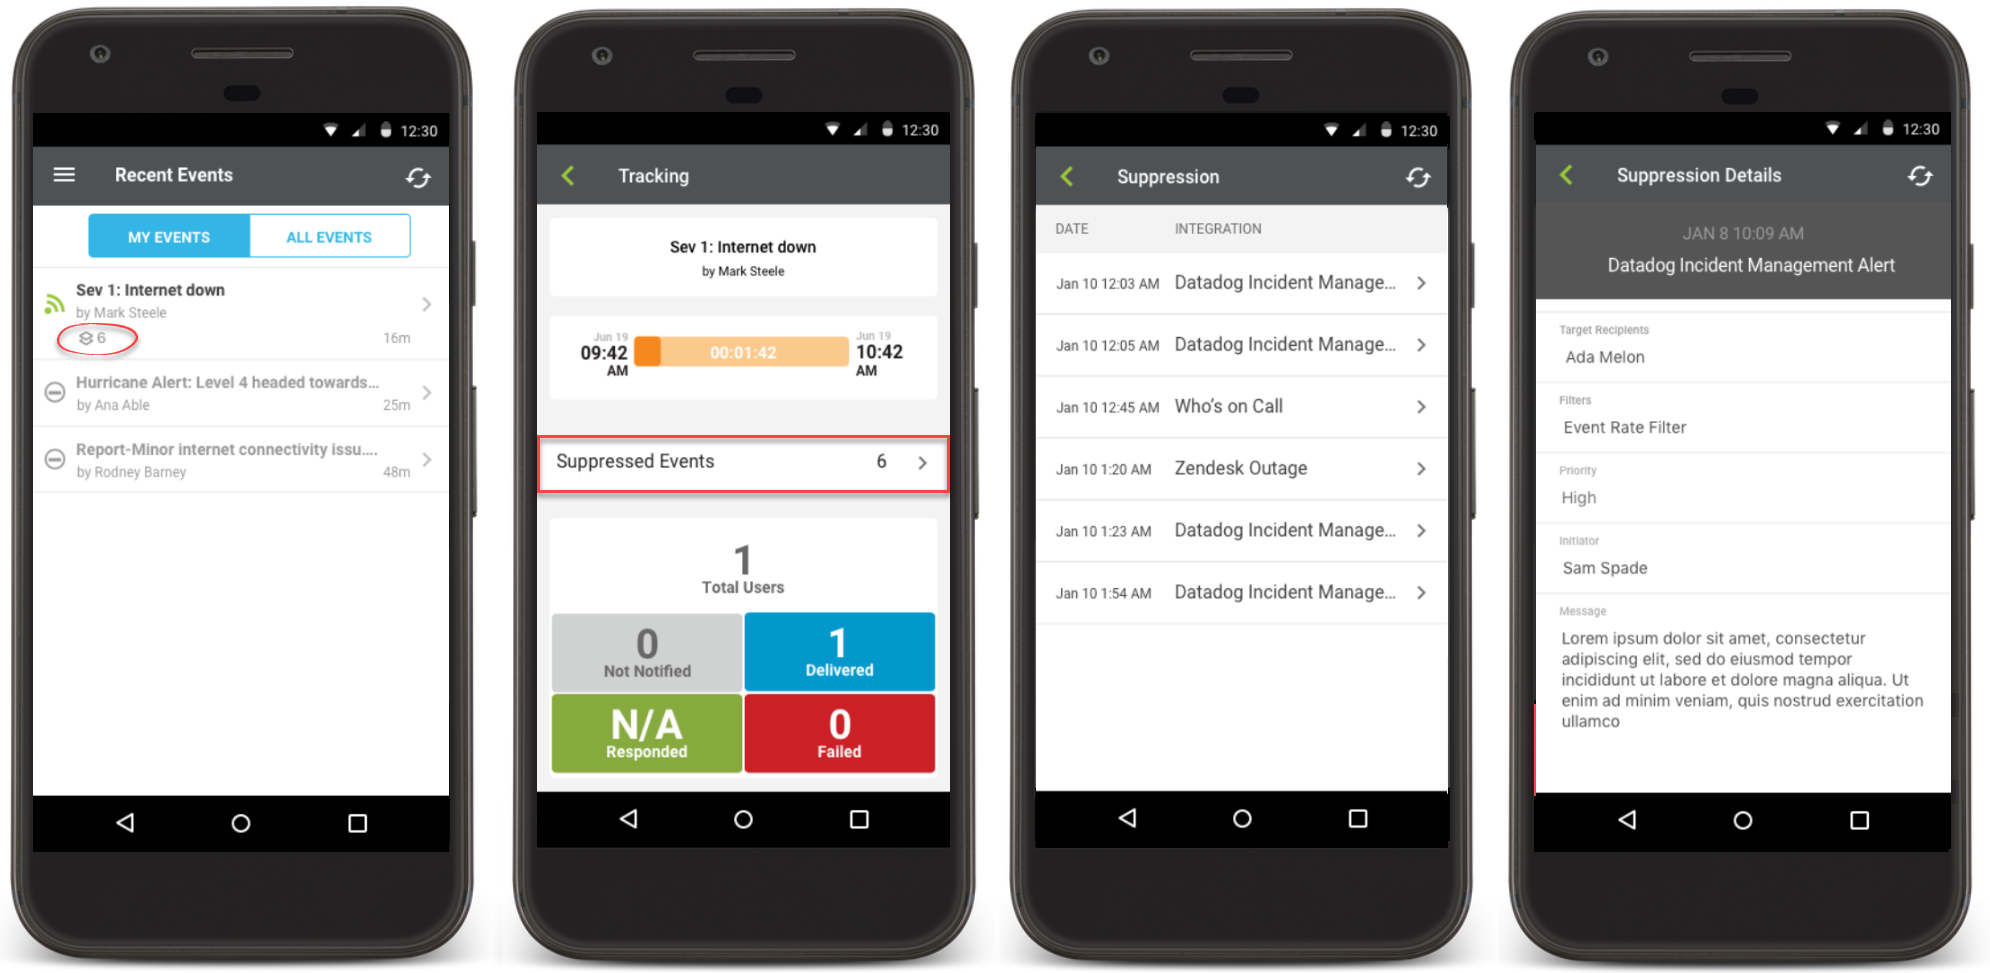
From here, tap Suppressed Events to view a list of all the individual suppressed event requests. You'll then be able to tap on any suppression to view its details, such as the targeted recipients, the event flood control rule that triggered suppression, the event priority, initiator, message content, and any event properties and their values.
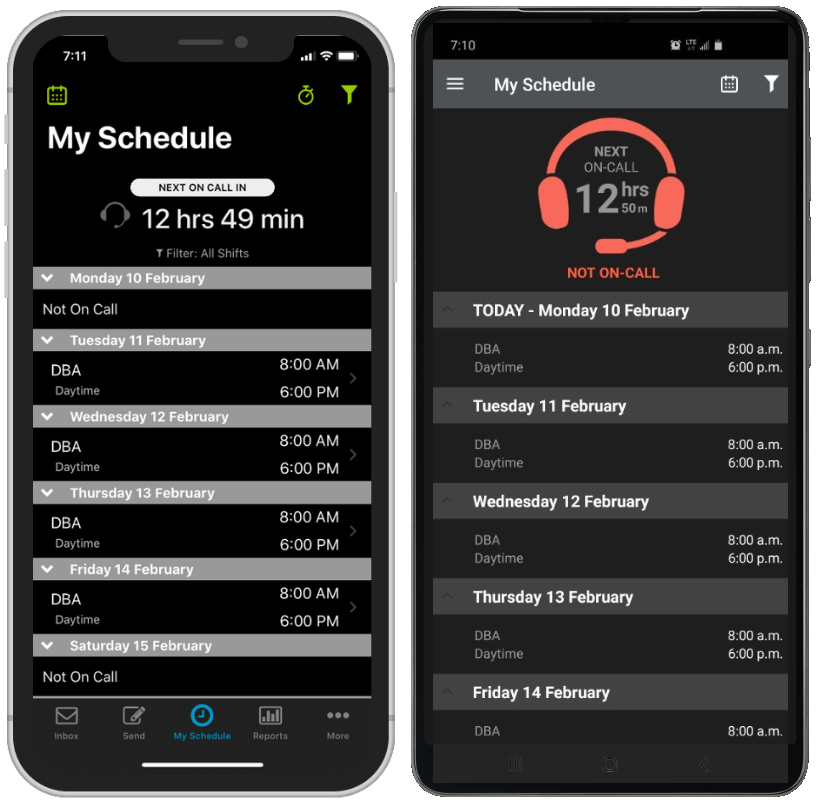
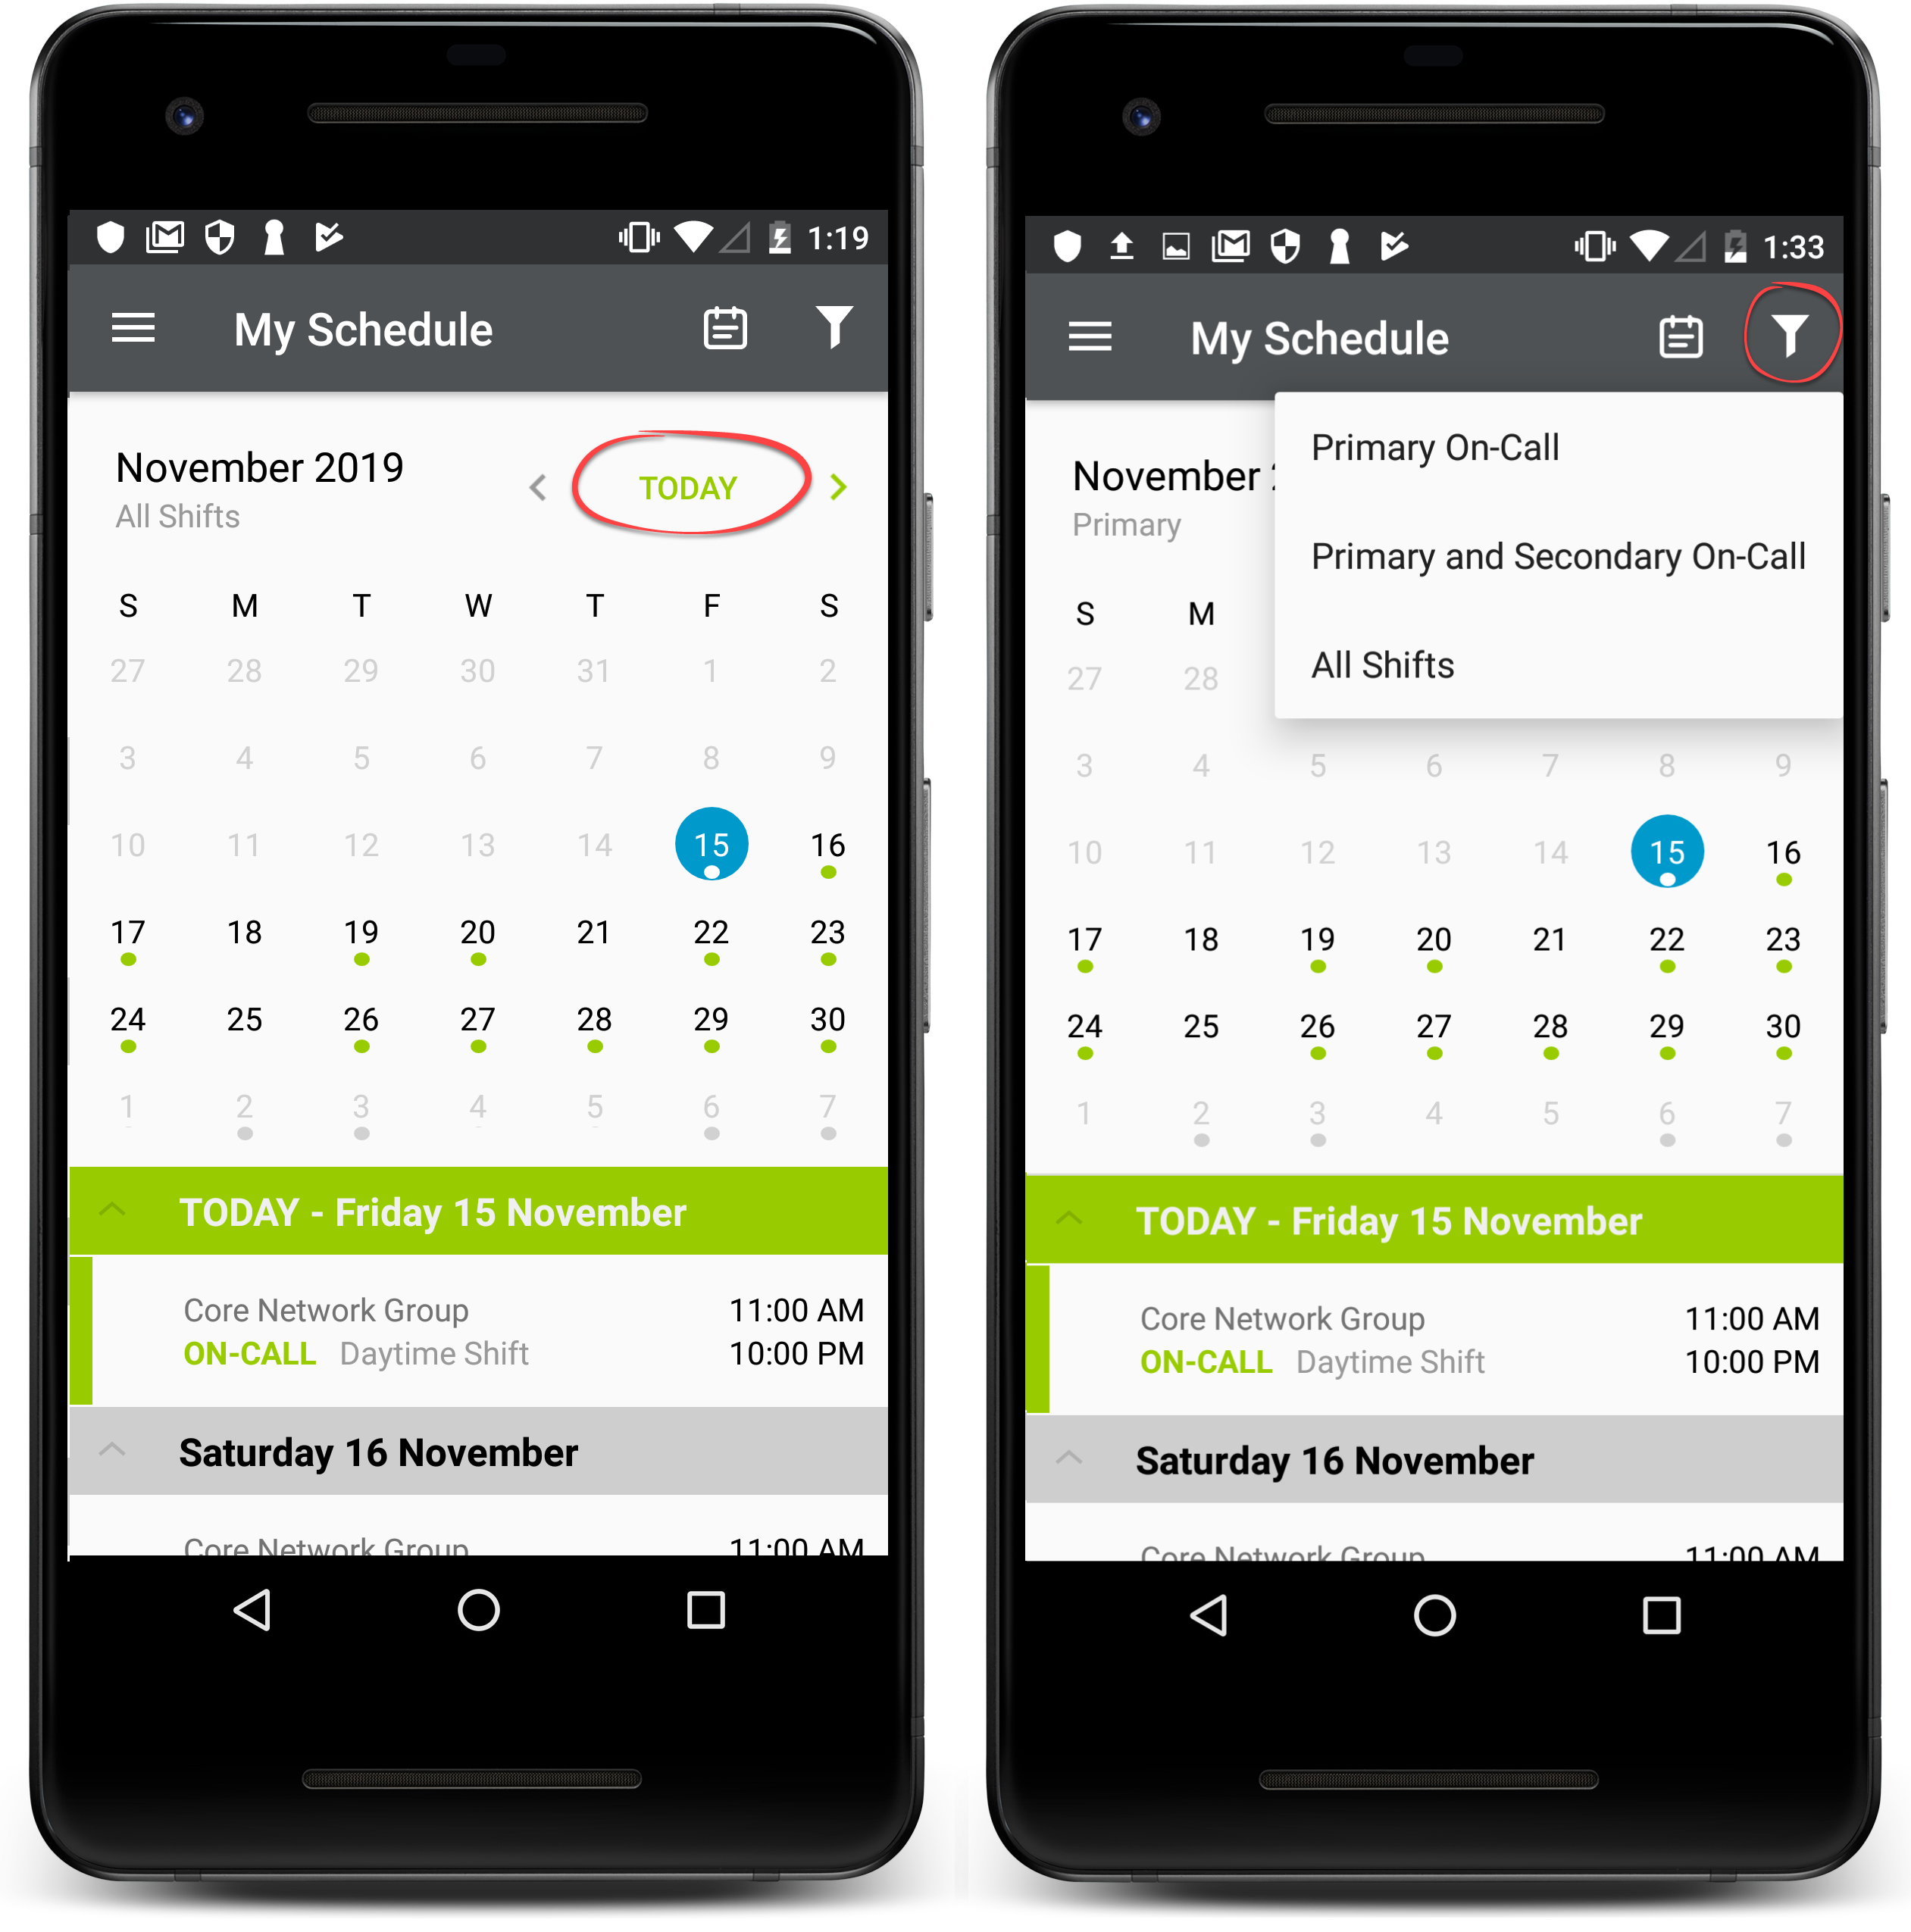
My schedule calendar view
The calendar view for My Schedule is now available on Android! You can use this view to quickly and easily look up which days you're on call. To get started, just click the calendar icon at the top of the My Schedule screen:
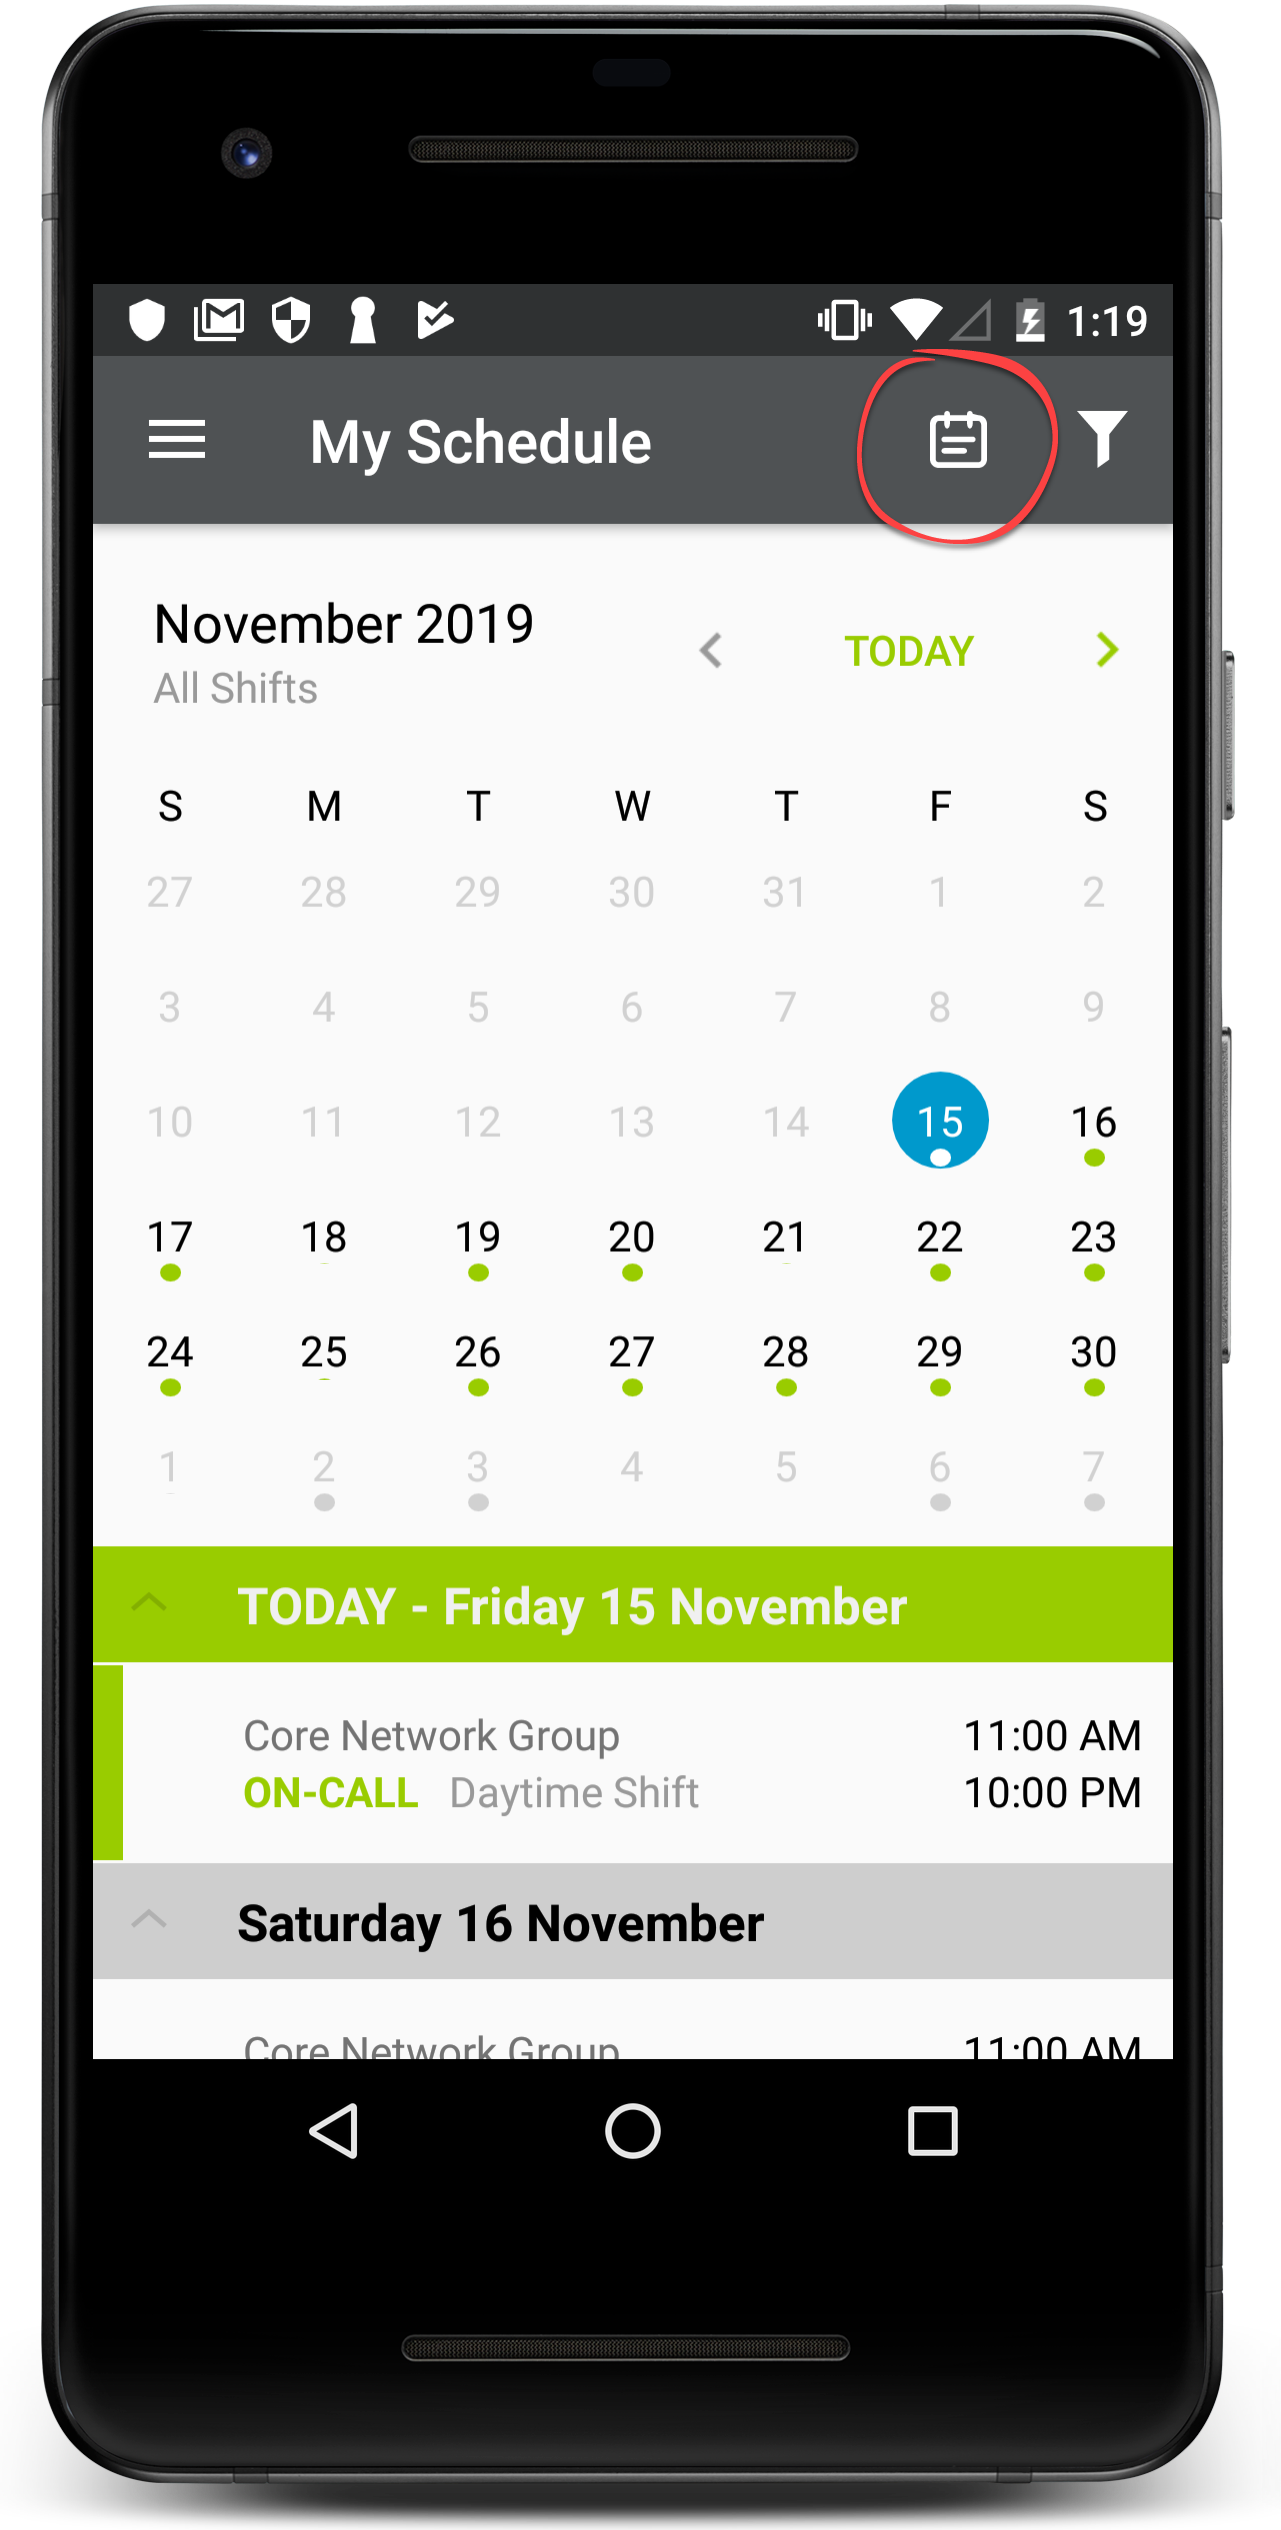
The calendar displays a green dot on the days where you're scheduled to be on call, and you can tap on any day to see your on-call shifts. As you scroll your list of shifts, the monthly calendar view collapses to a weekly view to give more screen real estate to your shift information:
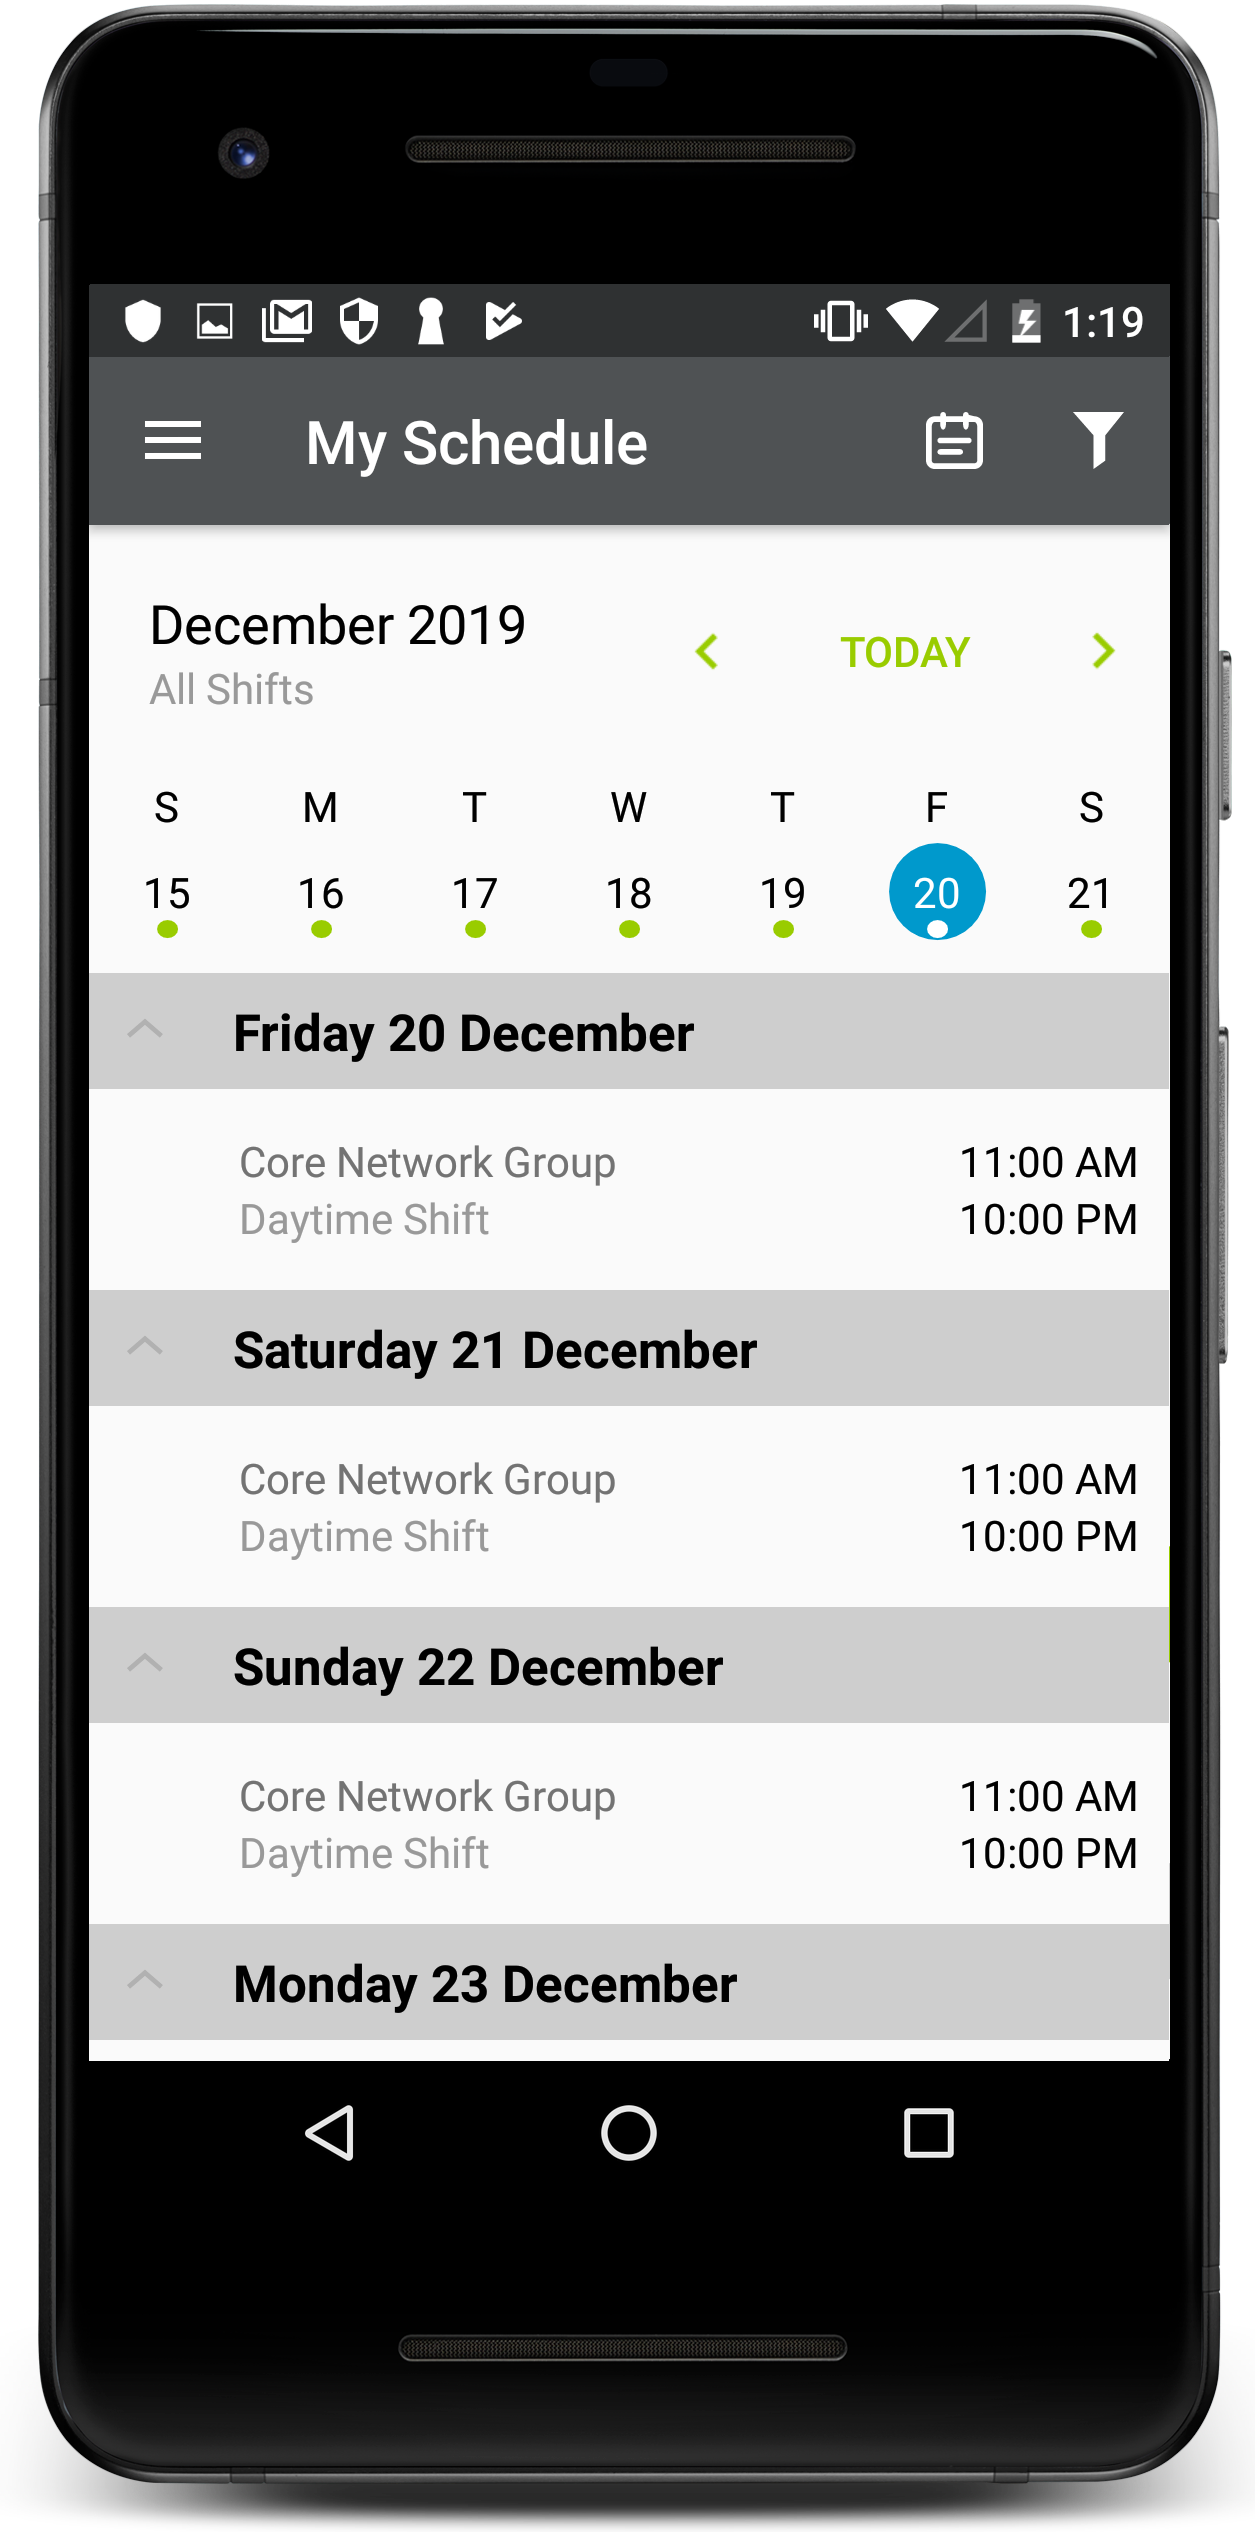
You can use the calendar to view your on-call schedule for up to the next 90 days. A handy "Today" shortcut makes it easy to quickly return to today's on-call schedule. You can also use the shift filter to choose which on-call shifts to display - where you're primary on-call, primary or secondary on-call, or all of your shifts.
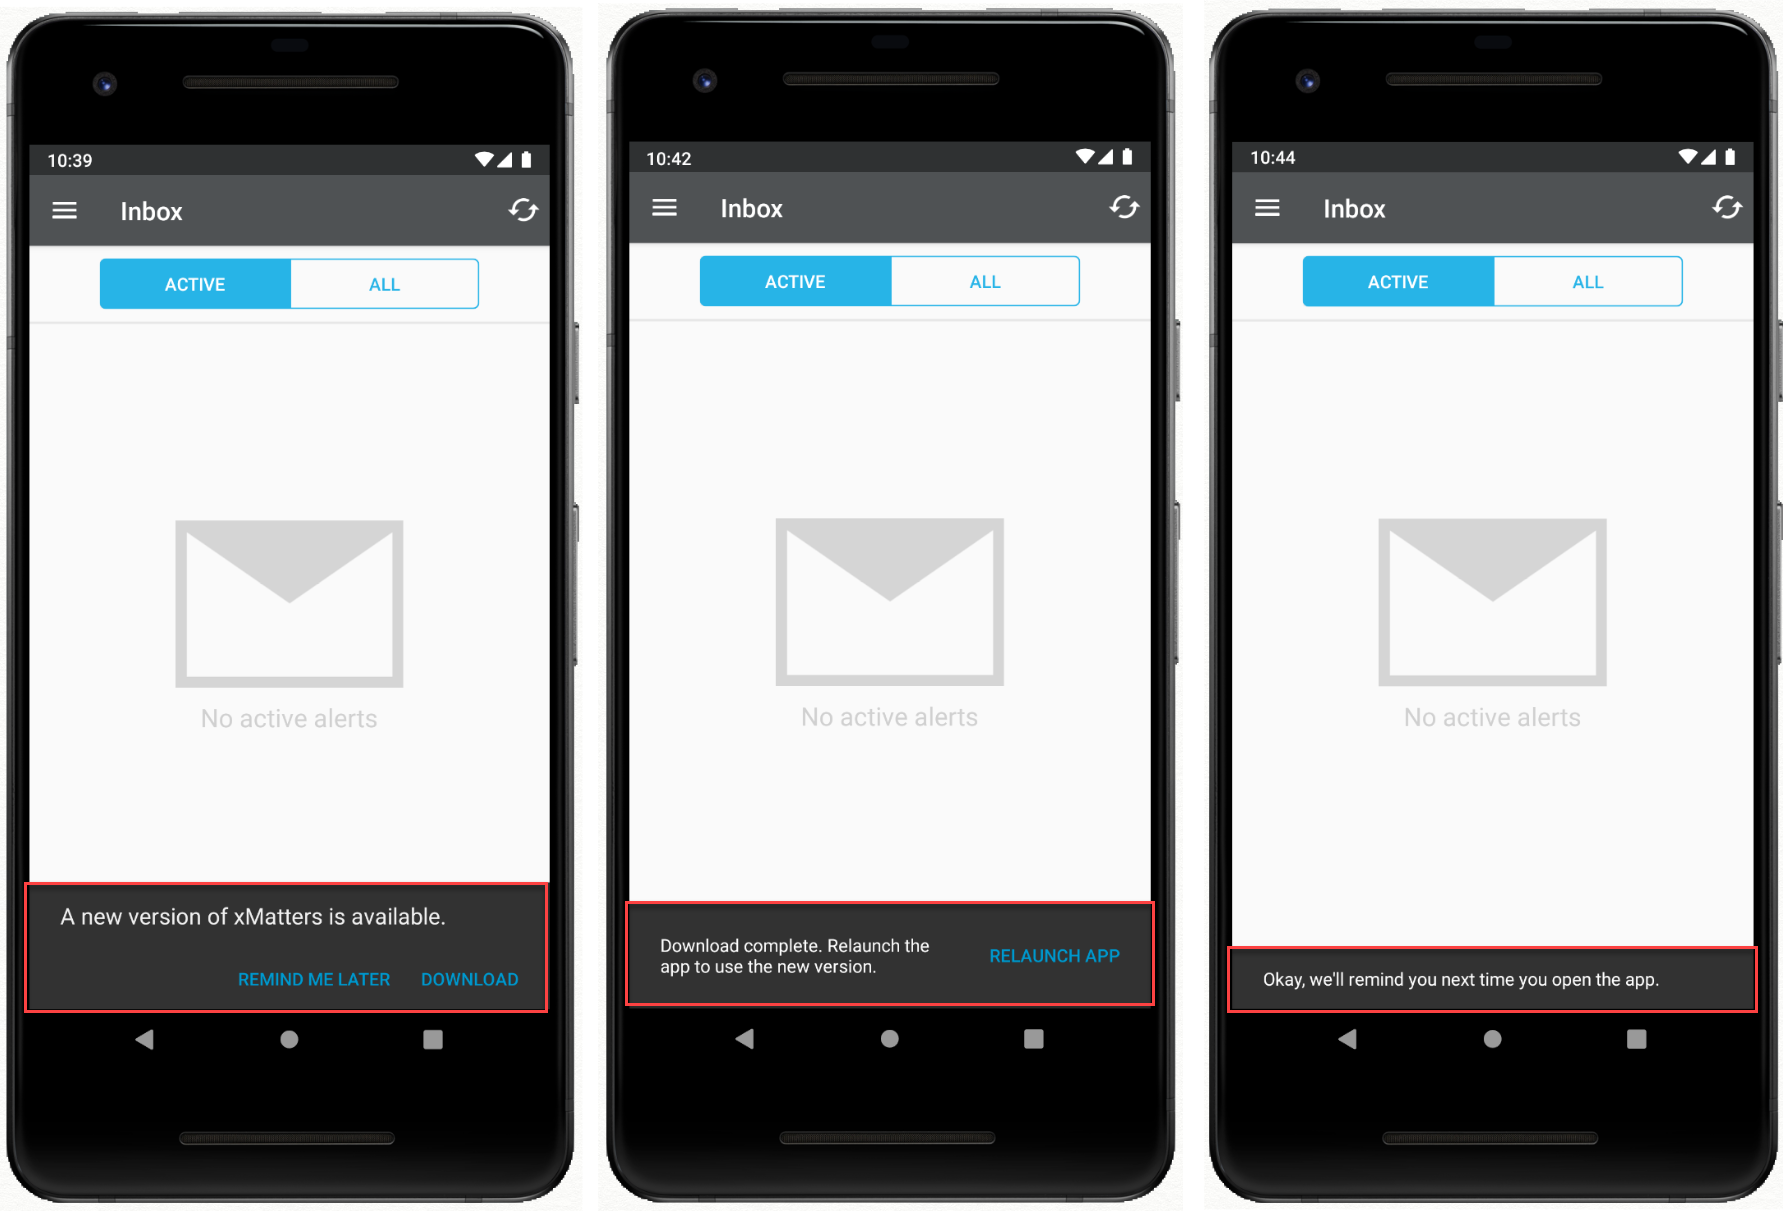
Available update notices
Take advantage of the latest app updates as soon as they're released! The xMatters Android app now lets you know when a new version of the app becomes available. To get the latest updates, just tap to download and to relaunch the app. If it's not a convenient time, tap 'Remind me later' and we'll notify you again the next time you open the app.
More accurate group search
The app now returns groups that match all of your search criteria. In other words, it's been updated to use AND instead of OR when multiple search terms are provided (for example: searching for "Database Admin" returns the Database Admins group, but not the Administrators group).
Android 10 support
The xMatters app now supports Android's latest mobile operating system, Android 10 (apparently Google has ditched their dessert naming theme). Get this version of the app to keep things running smoothly on Android’s latest OS.
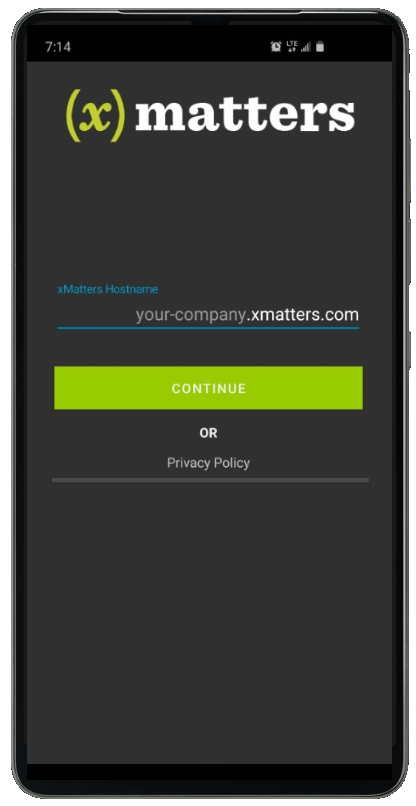
Easier login
When you log into the Android mobile app, instead of having to type in your entire hostname, all you need to do is type in the name of your company (e.g., "Acme-Corp") - we'll append the rest of the address:
iOS
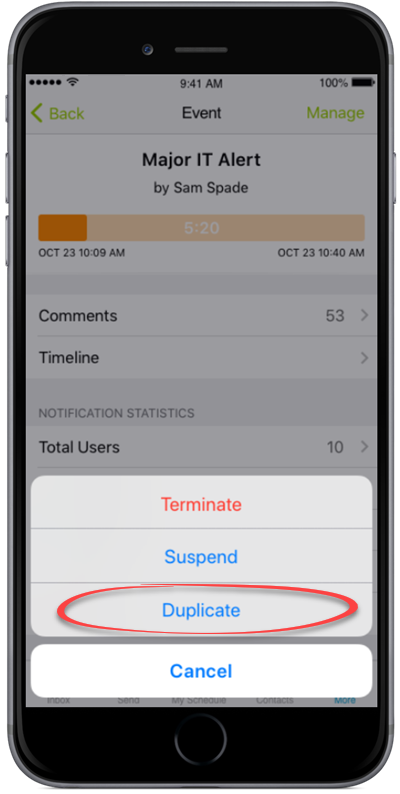
Duplicate events
Have you ever needed to initiate an event, but then noticed there’s already an event with all the right details, just begging to be sent again? Ever wish you could save time and just copy over an existing event right on your mobile device? Now you can, with the new Duplicate Event feature for iOS!
Simply tap on the event you want to duplicate, tap "Manage" in the top-right corner of the Event report, and then tap "Duplicate" from the list of options that appears. You can see and make changes to the event before sending it off. (Just note that at this time you won’t be able to override attachments or recipients in the new event - for those you’ll need to create and send an event the old-fashioned way.)
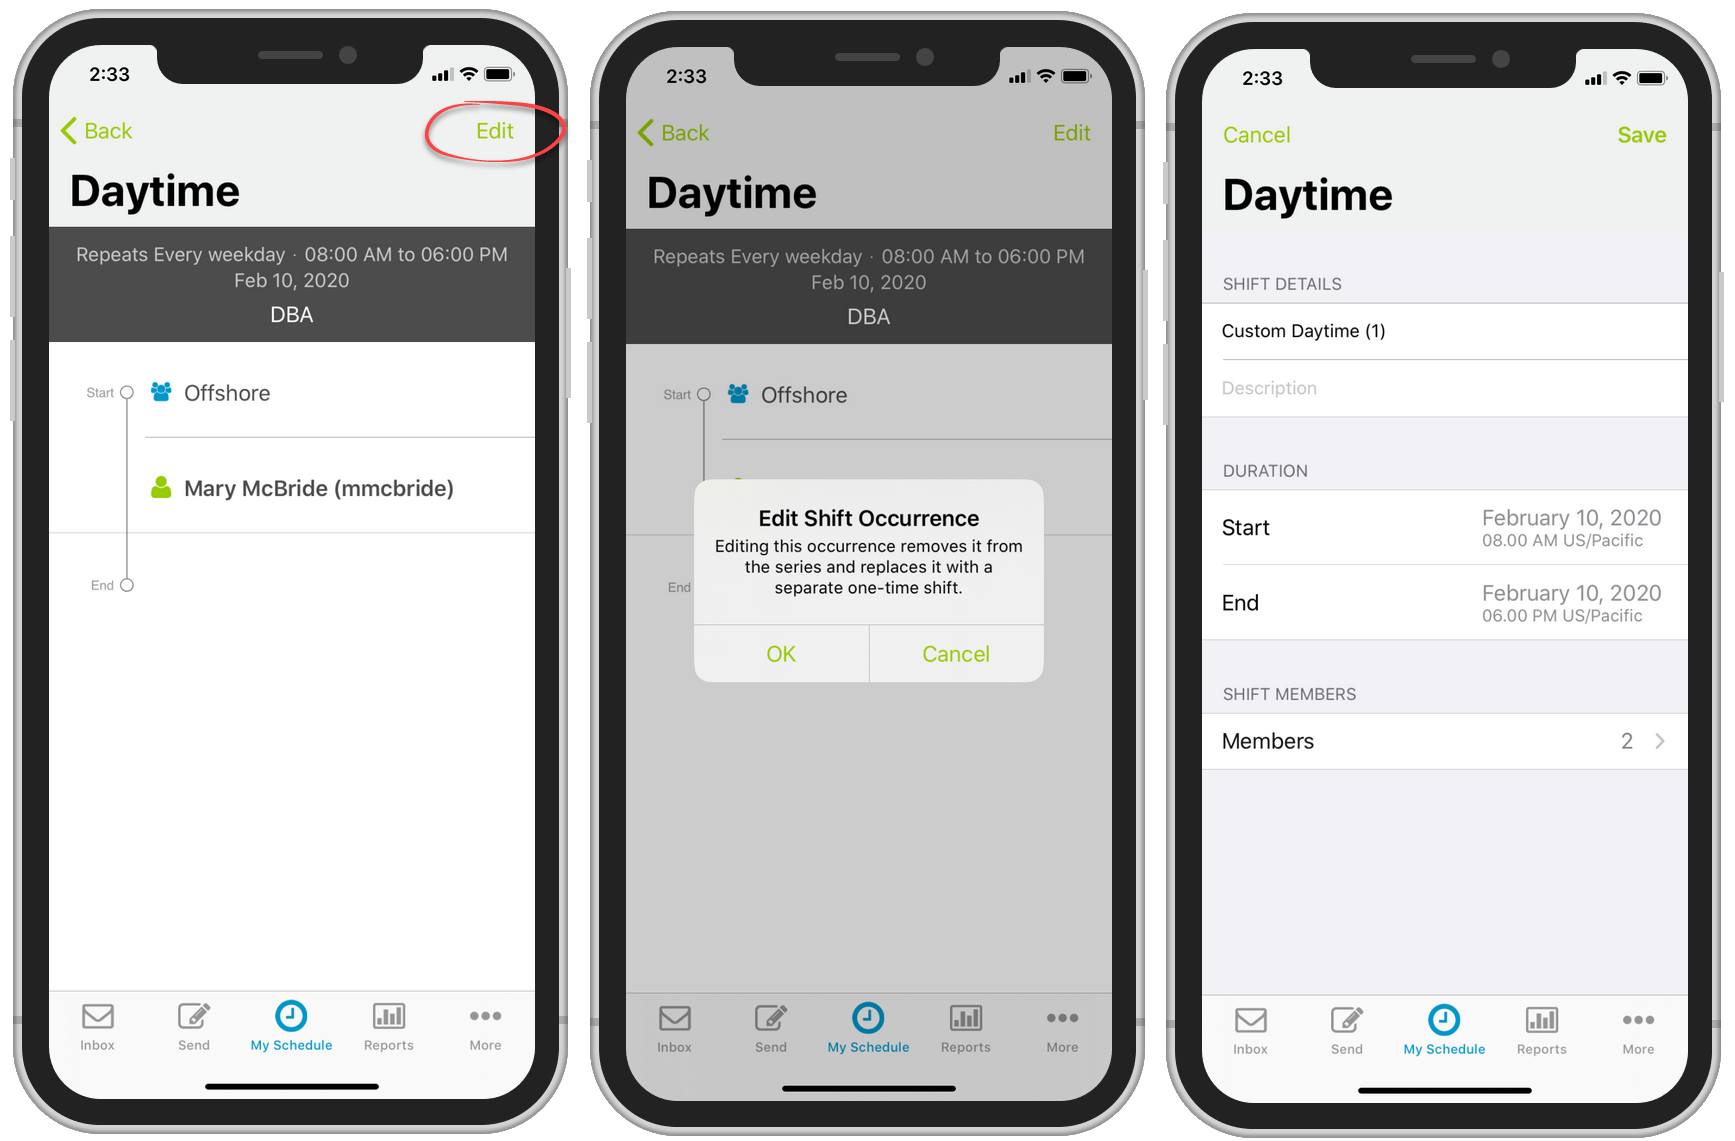
Edit shift occurrence
In our last quarterly release, we brought our iOS users the ability to tap on any shift in My Schedule to view its details. In this release, we go a step further and allow you to edit the details of a shift. Just tap "Edit" in the top right-corner of the screen to create a one-time shift where you can edit the shift start and end times, and its members:
Respond to push notifications
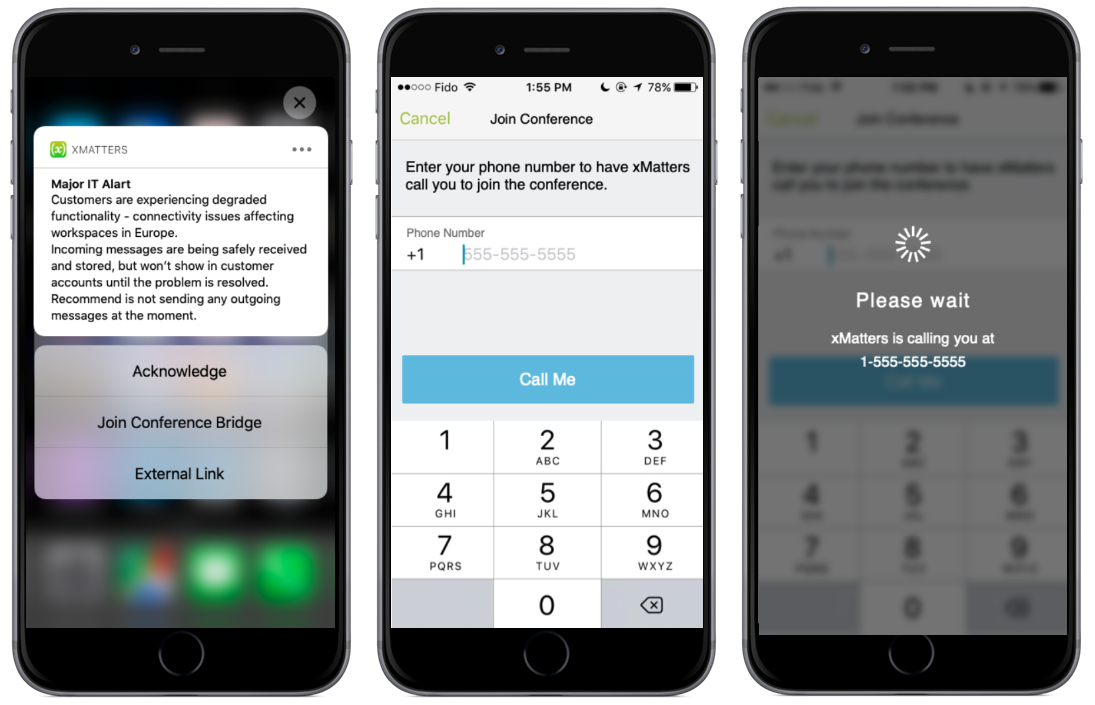
With xMatters, we know the most valuable thing we can save you is time. Now when you get a push notification related to an event, you can respond directly from the push notification without even opening the app. Just tap and hold on a notification or swipe from the lock screen to see your response options.
If you've got a conference bridge configured for a response, it'll automatically launch the Call Me feature to have xMatters call you to join the conference:
Other product updates
In case all the above just wasn't enough for you, we've got a couple of other great resources that we think you're going to find very useful.
xMatters Support: new knowledge base
A joint production between our dedicated Customer Support staff and the Product Communications team, our new Knowledge Base is designed to help you quickly find the most relevant answers to all your questions:
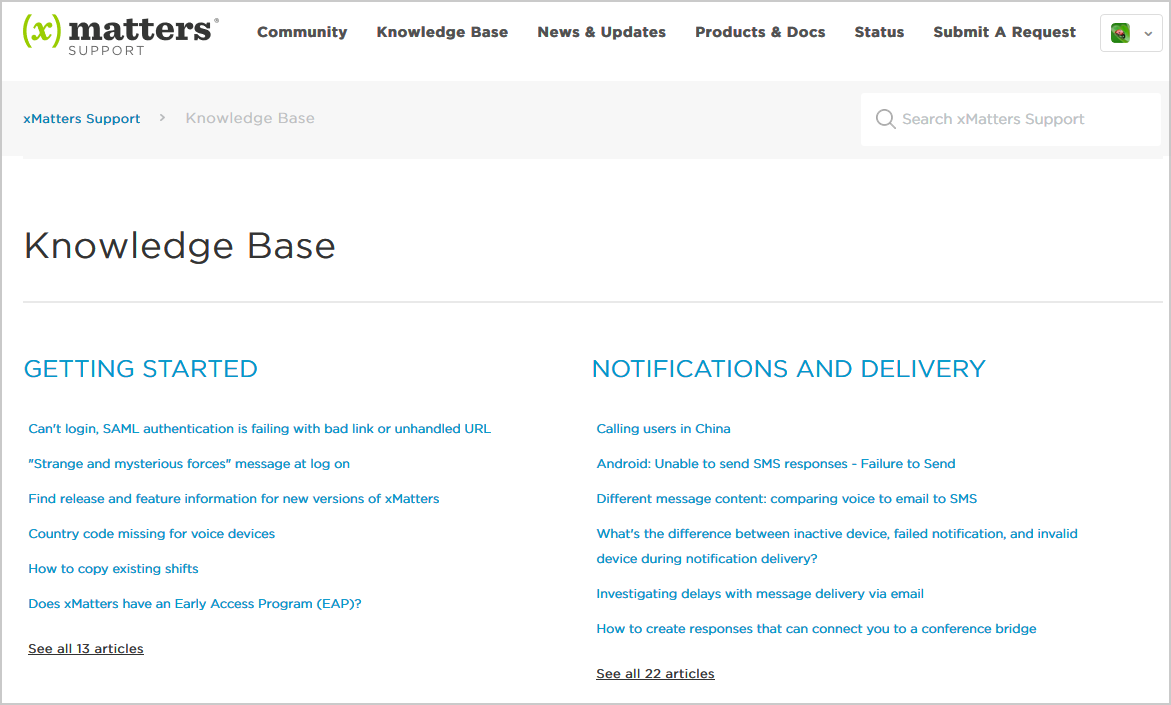
We're still hard at work populating the different sections with even more useful stuff, but head on over and check out the material that's already there. You'll find knowledge-centered articles designed to answer specific questions clearly and quickly, with everything you need to know to solve issues and find solutions.
Help resource kits
We've released a couple of awesome new help resource kits that we think the new xMatters users and group supervisors in your organization are going to find very useful:
Getting started guide for new xMatters users
Are you new to xMatters? Do you wish someone could give you a quick run-through of how to get started so that you're ready to receive and respond to notifications?
- Getting started guide for new xMatters users walks you through the basics of logging into the web application and mobile app, leads you through setting up your devices and checking your on-call schedule, and shows you what to expect when getting a notification. It also includes additional recommendations for more in-depth documentation and resources that are available to help launch you from a newbie to an 'xPert' in no time!
How to be the best group supervisor ever
Have you just been assigned the Group Supervisor role in xMatters? Are you wondering what that means and what kinds of things you'll be able to do?
- How to be the best group supervisor ever gives you the run-down on the Group Supervisor role’s capabilities, as well as links to handy resources that will help introduce you to working with groups, shifts, escalations, rosters, and everything else you need to know. It also includes some first-hand tips and tricks contributed from our advisors and consultants in the field that you won't find anywhere else.
Early Access Program & feature delivery update
The goal of our current delivery model for xMatters On-Demand is to balance feature delivery with customer change management processes. This means providing visibility into upcoming changes for customers that want it, while allowing other customers to have a more standard non-production environment that matches production.
If you aren't familiar with the current model, we release features only visible to admins/developers at a faster pace than the quarterly release process. These features should not impact end users until a customer provisions them into their communication plan. Customers can opt their non-production environments into the Early Access Program to see features and functionality enhancements that impact end users before they're released on a quarterly basis. All customer non-production environments are updated two weeks prior to official quarterly production release to allow for testing and training on new features.
We regularly reevaluate and improve our deployment processes to ensure they reflect industry best practices and customer feedback. For more information about our deployment process, see our On-Demand Deployment Process and Early Access article. We'll update that document whenever we make a change, and let you know about the change through other appropriate channels.
Learn more
These are the main features for this release but be aware that there are a number of other small changes and enhancements we're delivering to keep xMatters looking sharp. Detailed information and instructions for using these new features will be available in our online documentation.
We hope you enjoy the new release! We're already hard at work on the next one...
Comments
1 commentArticle is closed for comments.
The Hogan's Alley Release is now available in all production environments.